SensorDisplay: Public Donation Machine

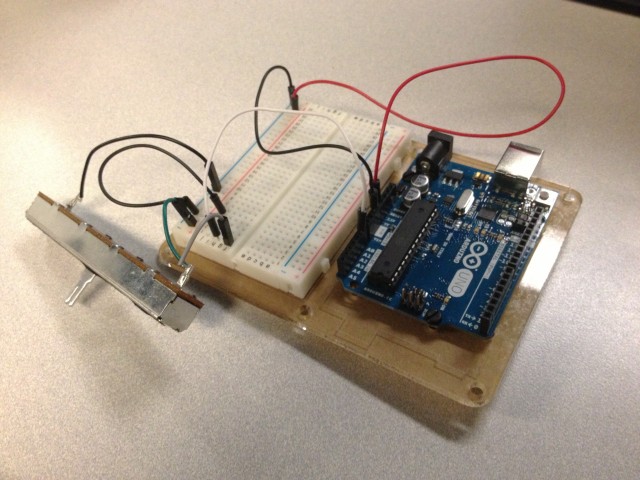
The Public Donation Machine is a small device that is meant to be placed in a high-traffic public space. The machine controls how a large donation of money will be divided between two organizations.

The device lets the public vote on which organization will receive the most money. As people pass by The Public Donation Machine, they can move the slider to exactly the place that represents how much they support each organization. After thousands of people give their input, the money donated will represent an average amount for each cause that fairly represents the will of the population.

IMG_2011

In theory this seems like it would work. But what would actually happen is, given a controversial enough issue (eg. pro life vs. pro-choice organization) and a large enough sum on money (one million dollars?), it would devolve from a fair voting system into a massive battle of fighting over the control of the device and long stretches of time guarding and defending the ‘territory’ of the surrounding area.

// This Arduino program reads two analog signals, 
// such as from two potentiometers, and transmits 
// the digitized values over serial communication. 
 
int sensorValue0 = 0;  // variable to store the value coming from the sensor
 
void setup() {
  Serial.begin(9600);  // initialize serial communications    
}
 
void loop() {
 
  // Read the value from the sensor(s):
  sensorValue0 = analogRead (A0);  // reads value from Analog input 0 
 
  Serial.print ("A"); 
  Serial.println (sensorValue0);  
 
  delay (50);   // wait a fraction of a second, to be polite
}

Sensors: Thunder

Thunder

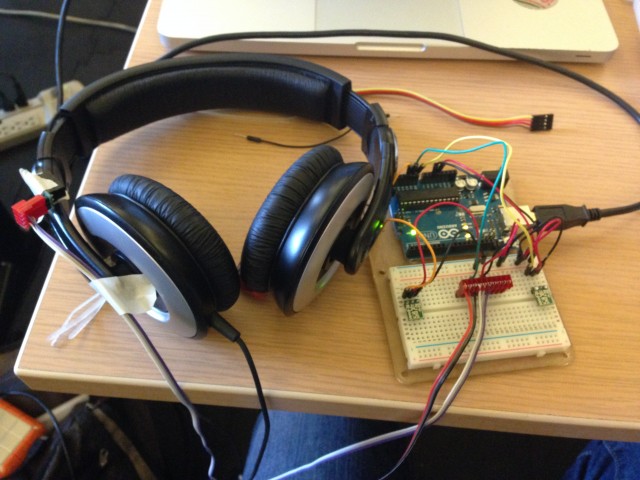
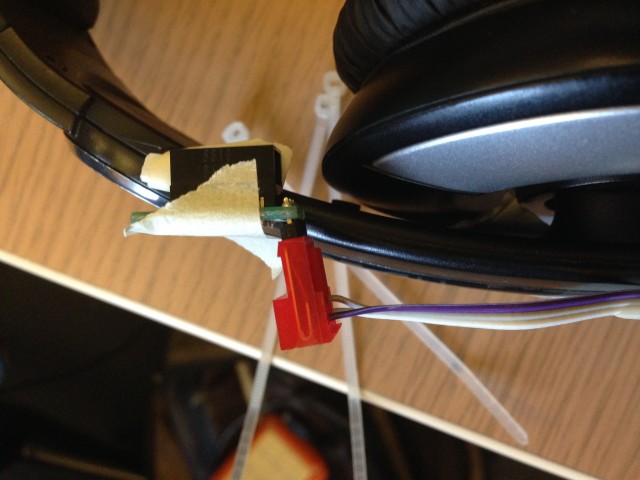
I was working on a site fairly recently where a nearby building was using an old siren as a warning. The kind that served as warnings for the Blitzkrieg. This got me thinking about warnings, and I ended up wanting to work with that same sound. Thunder is, in concept, a simulator for someone reminiscing about the blitz. It consists of three sensors: one proximity sensor on the headphones, and 2 light sensors on the board. Triggereing all of them will cause a recording of  blitz sirens to play. Removing your hands or taking off the headphones causes the audio to stop.

//video here

In this video, the headphones are unplugged for demonstration reasons. Originally I wanted to have it so that the user’s hands would have to cover their ears, but this led to complications. The act of physically placing your hands in a certain place functions as giving an entry and exit to the space of memory.

IMG_1074

the full rig

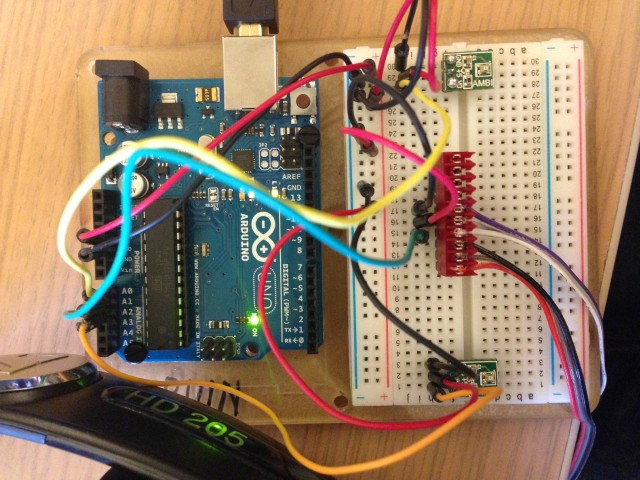
IMG_1081

the two green squares are light sensors, and the purple/white cable set leads to  the headphone sensor. the other leads nowhere and does nothing.

IMG_1082

Arduino Code. Modified to return a yes/no response

int sv0 = 0;  // variable to store the value coming from the sensors
int sv1 = 0;
int sv2 = 0; 
int req = 400;
 
void setup() {
  Serial.begin(9600);  // initialize serial communications    
}
 
void loop() {
 
  // Read the value from the sensors:
  sv0 = analogRead (A0); 
  sv1 = analogRead (A1);  
  sv2 = analogRead (A2);  
 
  //Serial.print(sv0);
  //Serial.print(" : ");
  //Serial.print(sv1);
  //Serial.print(" : ");
  //Serial.println(sv2);
  if((sv0 < req) && (sv1 < req) && (sv2 < req)){
    Serial.println ("A");
  } else {
    Serial.println ("B");
  }
  delay (50);   // wait a fraction of a second, to be polite
}

Processing Code

// Processing program to handle audio playing
 
// Import the Serial library and create a Serial port handler
import processing.serial.*;
Serial myPort;   
 
import ddf.minim.*; 
Minim minim;
AudioPlayer player; 
 
int valueA;  // Sensor Value A
int valueB;  // Sensor Value B
Boolean running = false;
 
//------------------------------------
void setup() {
  size(1024, 200);
 
  // List my available serial ports
  int nPorts = Serial.list().length; 
  for (int i=0; i &lt; nPorts; i++) {
    println("Port " + i + ": " + Serial.list()[i]);
  } 
 
  // Choose which serial port to fetch data from. 
  // IMPORTANT: This depends on your computer!!!
  // Read the list of ports printed by the code above,
  // and try choosing the one like /dev/cu.usbmodem1411
  // On my laptop, I'm using port #4, but yours may differ.
  String portName = Serial.list()[5]; 
  myPort = new Serial(this, portName, 9600);
  serialChars = new ArrayList();
  
  minim = new Minim(this);
  player = minim.loadFile("AirRaidSirens1.wav");
  
}
 
//------------------------------------
void draw() {
 
  // Process the serial data. This acquires freshest values. 
  processSerial();
 
  background (150);  
 
}
 
 
//---------------------------------------------------------------
// The processSerial() function acquires serial data byte-by-byte, 
// as it is received, and when it is properly captured, modifies
// the appropriate global variable. 
// You won't have to change anything unless you want to add additional sensors. 

ArrayList serialChars;      // Temporary storage for received serial data
int whichValueToAccum = 0;  // Which piece of data am I currently collecting? 
boolean bJustBuilt = false; // Did I just finish collecting a datum?
 
void processSerial() {
 
  while (myPort.available () &gt; 0) {
    char aChar = (char) myPort.read();
 
    // checks whether all sensors are currently triggered or not.
    if (aChar == 'A' &amp;&amp; running == false) {
      running = true;
      player.play();
      println("playing...");
    } else if (aChar == 'B' &amp;&amp; running == true) {
      running = false;
      println("stopping");
      player.pause();
      player.rewind();
    }
  }
}


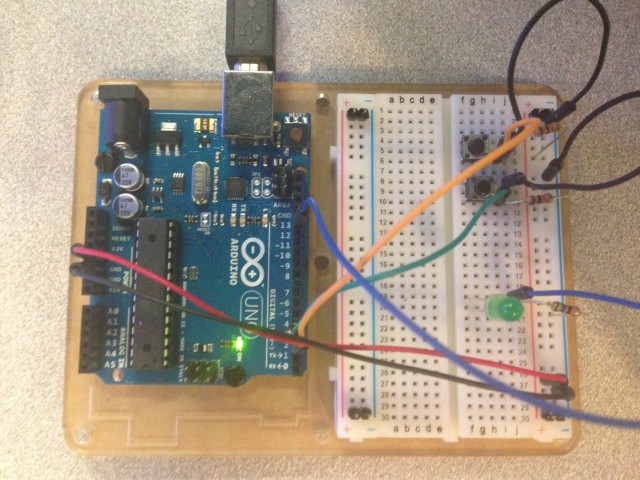
Assignment-10A: PushButtons (Circuit 07)

Assignment-10A: PushButtons (Circuit 07)

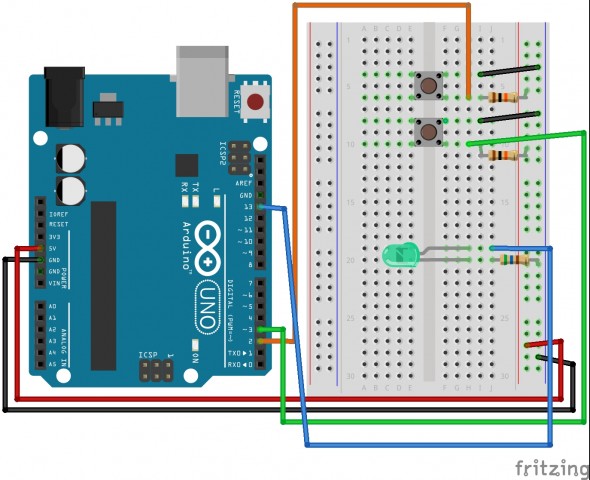
excercise 7image Diagram

Setting Up Setting Up

In action:

Code:

/*
  Button
 
 Turns on and off a light emitting diode(LED) connected to digital  
 pin 13, when pressing a pushbutton attached to pin 7. 
 
 
 The circuit:
 * LED attached from pin 13 to ground 
 * pushbutton attached to pin 2 from +5V
 * 10K resistor attached to pin 2 from ground
 
 * Note: on most Arduinos there is already an LED on the board
 attached to pin 13.
 
 
 created 2005
 by DojoDave 
 modified 17 Jun 2009
 by Tom Igoe
 
  http://www.arduino.cc/en/Tutorial/Button
 */

// constants won't change. They're used here to 
// set pin numbers:
const int buttonPin = 2;     // the number of the pushbutton pin
const int ledPin =  13;      // the number of the LED pin

// variables will change:
int buttonState = 0;         // variable for reading the pushbutton status

void setup() {
  // initialize the LED pin as an output:
  pinMode(ledPin, OUTPUT);      
  // initialize the pushbutton pin as an input:
  pinMode(buttonPin, INPUT);     
}

void loop(){
  // read the state of the pushbutton value:
  buttonState = digitalRead(buttonPin);

  // check if the pushbutton is pressed.
  // if it is, the buttonState is HIGH:
  if (buttonState == HIGH) {     
    // turn LED on:    
    digitalWrite(ledPin, HIGH);  
  } 
  else {
    // turn LED off:
    digitalWrite(ledPin, LOW); 
  }
}

The Experience Generator

For my project, I wanted to process my user’s interactions into actual control of their desktop. I utilize the arduino’s serial connections and java’s ability to control your keyboard and mouse to turn a big red button and a sliber bar into an “Interactive Reddit Experience Generator.” By Translating the slider movement to be a scaled value from “Mundane and Probably SFW” to “Different and Probably NSFW” I allow the user to dictate the browsing experience of the current session with the click of a button. The Decisions on what is “Different” or “Mundane” is currently up to my personal taste but I would like to write an algorithm which automatically does this for me.

Here are a few stills of what the experience generator can throw out.
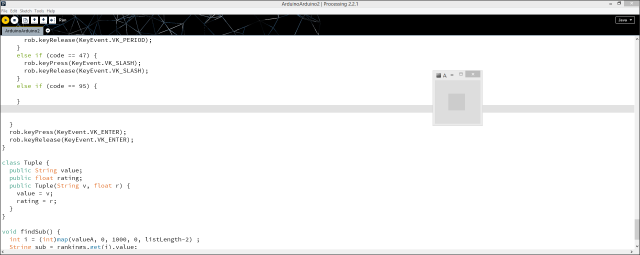
Snap 2014-10-29 at 18.15.37

Snap 2014-10-29 at 18.16.16

Snap 2014-10-29 at 18.16.56

Here is my Arduino and Processing Code (The Arduino code is about the same as the example code, while the processing code uses quite a few java libraries.”

Special thanks to Alvin Alexander at alvinalexander.com for a well documented java typing example!

// This Processing program reads serial data for two sensors,
// presumably digitized by and transmitted from an Arduino. 
// It displays two rectangles whose widths are proportional
// to the values 0-1023 received from the Arduino.
 
// Import the Serial library and create a Serial port handler
import processing.serial.*;
import java.awt.Desktop;
import java.net.URI;
Serial myPort;   

import java.awt.Robot;
import java.awt.AWTException;
import java.awt.MouseInfo;
import java.awt.Point;
import java.awt.event.InputEvent;
import java.awt.event.KeyEvent;

Robot rob;

boolean run = false;
int timeHit = 0;

ArrayList<Tuple> rankings;

int listLength;
 
// Hey you! Use these variables to do something interesting. 
// If you captured them with analog sensors on the arduino, 
// They're probably in the range from 0 ... 1023:
int valueA;  // Sensor Value A
int valueB;  // Sensor Value B
 
//------------------------------------
void setup() { 
  size(50,50);
  rankings = new ArrayList<Tuple>();
  initList();
  
  //Set up Bot to move mouse
  try {
  rob = new Robot();
  }
  catch (AWTException e) {
    e.printStackTrace();
  }
 
  // List my available serial ports
  int nPorts = Serial.list().length; 
  for (int i=0; i < nPorts; i++) {
    println("Port " + i + ": " + Serial.list()[i]);
  } 
 
  // Choose which serial port to fetch data from. 
  // IMPORTANT: This depends on your computer!!!
  // Read the list of ports printed by the code above,
  // and try choosing the one like /dev/cu.usbmodem1411
  // On my laptop, I'm using port #4, but yours may differ.
  String portName = Serial.list()[0]; 
  myPort = new Serial(this, portName, 9600);
  serialChars = new ArrayList();
  rob.delay(300); 
}
 
//------------------------------------
void draw() {
 
  // Process the serial data. This acquires freshest values. 
  processSerial();

  if ((valueB > 0) && (!run) && (millis() - timeHit > 50)) {
      run = true;
      timeHit = millis();
      runWindow();
      delay(300);
  }
  if ((run) && valueB > 0) {
      findSub();
      rect(0,0,width,height);
  }
}
 
ArrayList serialChars;      // Temporary storage for received serial data
int whichValueToAccum = 0;  // Which piece of data am I currently collecting? 
boolean bJustBuilt = false; // Did I just finish collecting a datum?
 
void processSerial() {
 
  while (myPort.available () > 0) {
    char aChar = (char) myPort.read();
 
    // You'll need to add a block like one of these 
    // if you want to add a 3rd sensor:
    if (aChar == 'A') {
      bJustBuilt = false;
      whichValueToAccum = 0;
    } else if (aChar == 'B') {
      bJustBuilt = false;
      whichValueToAccum = 1;
    } else if (((aChar == 13) || (aChar == 10)) && (!bJustBuilt)) {
      // If we just received a return or newline character, build the number: 
      int accum = 0; 
      int nChars = serialChars.size(); 
      for (int i=0; i < nChars; i++) { 
        int n = (nChars - i) - 1; 
        int aDigit = ((Integer)(serialChars.get(i))).intValue(); 
        accum += aDigit * (int)(pow(10, n));
      }
 
      // Set the global variable to the number we captured.
      // You'll need to add another block like one of these 
      // if you want to add a 3rd sensor:
      if (whichValueToAccum == 0) {
        valueA = accum;
        // println ("A = " + valueA);
      } else if (whichValueToAccum == 1) {
        valueB = accum;
        // println ("B = " + valueB);
      }
 
      // Now clear the accumulator
      serialChars.clear();
      bJustBuilt = true;
 
    } else if ((aChar >= 48) && (aChar <= 57)) {
      // If the char is between '0' and '9', save it.
      int aDigit = (int)(aChar - '0'); 
      serialChars.add(aDigit);
    }
  }
}

void runWindow() {
    if(Desktop.isDesktopSupported()) {
      try {
          Desktop.getDesktop().browse(new URI("http://www.google.com"));
      } catch (Exception e) {
        println("Oh no");
      }
   }
}

void initList() {
  //Initialize List (Yes it's ugly but it was a 
//quick conversion from python)
rankings.add(new Tuple("pics", -1));
rankings.add(new Tuple("funny", 0));
rankings.add(new Tuple("aww", 0));
rankings.add(new Tuple("cats", 0));
rankings.add(new Tuple("dIY", 0));
rankings.add(new Tuple("todayilearned", 1));
rankings.add(new Tuple("videos", 1));
rankings.add(new Tuple("gaming", 1));
rankings.add(new Tuple("politics", 1));
rankings.add(new Tuple("technology", 1));
rankings.add(new Tuple("space", 1));
rankings.add(new Tuple("bitcoin", 1));
rankings.add(new Tuple("art", 1));
rankings.add(new Tuple("foodporn", 1));
rankings.add(new Tuple("blep", 1));
rankings.add(new Tuple("askreddit", 2));
rankings.add(new Tuple("atheism", 2));
rankings.add(new Tuple("imgoingtohellforthis", 2));
rankings.add(new Tuple("gentlemanboners", 2));
rankings.add(new Tuple("tattoos", 2));
rankings.add(new Tuple("nosleep", 2));
rankings.add(new Tuple("malefashionadvice", 2));
rankings.add(new Tuple("woodworking", 2));
rankings.add(new Tuple("christianity", 2));
rankings.add(new Tuple("nononono", 2));
rankings.add(new Tuple("gaybros", 2.3));
rankings.add(new Tuple("tinder", 2.5));
rankings.add(new Tuple("microgrowery", 2.7));
rankings.add(new Tuple("trees", 3));
rankings.add(new Tuple("relationships", 3));
rankings.add(new Tuple("shittynosleep", 3));
rankings.add(new Tuple("lifehacks", 3));
rankings.add(new Tuple("girlsinyogapants", 3));
rankings.add(new Tuple("politota", 3));
rankings.add(new Tuple("forwardsfromgrandma", 3.2));
rankings.add(new Tuple("ebola", 3.5));
rankings.add(new Tuple("WTF", 4));
rankings.add(new Tuple("nsfw", 4));
rankings.add(new Tuple("realgirls", 4));
rankings.add(new Tuple("ladyboners", 4));
rankings.add(new Tuple("exmormon", 4));
rankings.add(new Tuple("odd", 4));
rankings.add(new Tuple("nofap", 4));
rankings.add(new Tuple("swoleacceptance", 4));
rankings.add(new Tuple("colanders", 4));
rankings.add(new Tuple("4chan", 5));
rankings.add(new Tuple("nsfw_gif", 5));
rankings.add(new Tuple("ass", 5));
rankings.add(new Tuple("youtubehaiku", 5));
rankings.add(new Tuple("asstastic", 5));
rankings.add(new Tuple("humanporn", 5));
rankings.add(new Tuple("classic4chan", 5));
rankings.add(new Tuple("milf", 6));
rankings.add(new Tuple("creepypms", 6));
rankings.add(new Tuple("mensrights", 6));
rankings.add(new Tuple("translucent_porn", 6));
rankings.add(new Tuple("fiftyfifty", 7));
rankings.add(new Tuple("futanari", 7));
rankings.add(new Tuple("watchpeopledie", 9));
rankings.add(new Tuple("spacedicks", 10));

listLength = rankings.size();
}

void leftClick() {
    rob.mousePress(InputEvent.BUTTON1_MASK);
    rob.delay(200);
    rob.mouseRelease(InputEvent.BUTTON1_MASK);
    rob.delay(200);
    }

void type( String s) {
  rob.keyPress(KeyEvent.VK_CONTROL);
  rob.keyPress(KeyEvent.VK_L);
  
  rob.keyRelease(KeyEvent.VK_CONTROL);
  rob.keyRelease(KeyEvent.VK_L);
  byte[] bytes = s.getBytes();
  for (byte b : bytes)
  {
    int code = b;
    if (code > 96 && code < 123){
      code = code - 32;
      rob.delay(100);
      rob.keyPress(code);
      rob.keyRelease(code);
    }
    else if (code == 46) {
      rob.keyPress(KeyEvent.VK_PERIOD);
      rob.keyRelease(KeyEvent.VK_PERIOD);
    }
    else if (code == 47) {
      rob.keyPress(KeyEvent.VK_SLASH);
      rob.keyRelease(KeyEvent.VK_SLASH);
    }
    else if (code == 95) {

    }
      
   
  }
  rob.keyPress(KeyEvent.VK_ENTER);
  rob.keyRelease(KeyEvent.VK_ENTER);
}

class Tuple {
  public String value;
  public float rating;
  public Tuple(String v, float r) {
    value = v;
    rating = r;
  }
}

void findSub() {
  delay(100);
  int i = (int)map(valueA, 0, 1000, 0, listLength-2) ;
  String sub = rankings.get(i).value;
  String url = String.format("reddit.com/r/%s",sub);
  type(url);
}

Here’s the Arduino code

int sensorValue0 = 0;  // variable to store the value coming from the sensor
int sensorValue1 = 0;  // variable to store the value coming from the other sensor
 
void setup() {
  Serial.begin(9600);  // initialize serial communications    
}
 
void loop() {
 
  // Read the value from the sensor(s):
  sensorValue0 = analogRead (A0);  // reads value from Analog input 0
  sensorValue1 = analogRead (A1);  // reads value from Analog input 1    
 
  Serial.print ("A"); 
  Serial.println (sensorValue0); 
  Serial.print ("B"); 
  Serial.println (sensorValue1);  
 
  delay (50);   // wait a fraction of a second, to be polite
}

Here’s a fritzing diagram of the circuit I used.
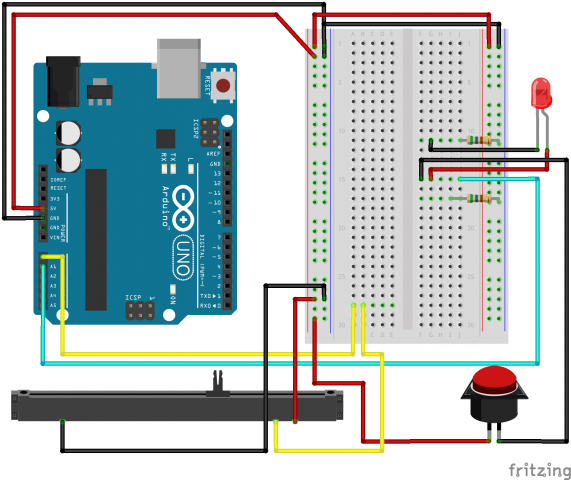
ExperienceGenerator

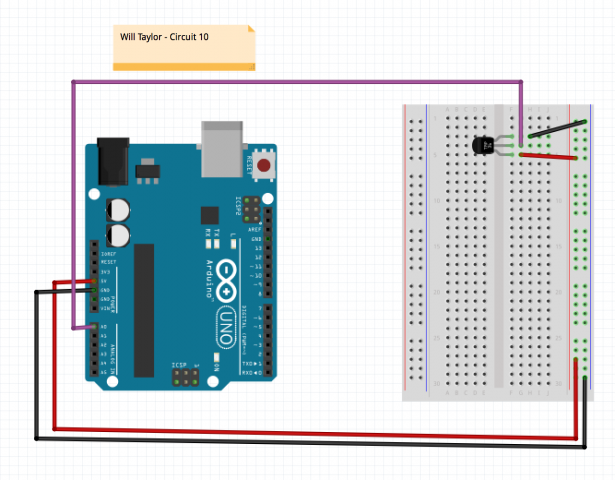
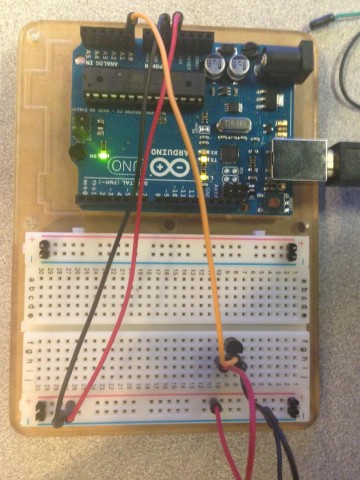
Temperature Resistor – WHT


Circuit 10Screen Shot 2014-10-29 at 6.15.15 PM

C10Pic


// Will Talyor
// Circuit 10

/* ---------------------------------------------------------
* | Arduino Experimentation Kit Example Code |
* | CIRC-10 .: Temperature :. (TMP36 Temperature Sensor) |
* ---------------------------------------------------------
*
* A simple program to output the current temperature to the IDE's debug window
*
* For more details on this circuit: http://tinyurl.com/c89tvd
*/

//TMP36 Pin Variables
int temperaturePin = 0; //the analog pin the TMP36's Vout (sense) pin is connected to
//the resolution is 10 mV / degree centigrade
//(500 mV offset) to make negative temperatures an option

/*
* setup() - this function runs once when you turn your Arduino on
* We initialize the serial connection with the computer
*/
void setup()
{
Serial.begin(9600); //Start the serial connection with the copmuter
//to view the result open the serial monitor
//last button beneath the file bar (looks like a box with an antenae)
}

void loop() // run over and over again
{
float temperature = getVoltage(temperaturePin); //getting the voltage reading from the temperature sensor
temperature = (temperature - .5) * 100; //converting from 10 mv per degree wit 500 mV offset
//to degrees ((volatge - 500mV) times 100)
Serial.println(temperature); //printing the result
delay(1000); //waiting a second
}

/*
* getVoltage() - returns the voltage on the analog input defined by
* pin
*/
float getVoltage(int pin){
return (analogRead(pin) * .004882814); //converting from a 0 to 1023 digital range
// to 0 to 5 volts (each 1 reading equals ~ 5 millivolts
}
Written by Comments Off on Temperature Resistor – WHT Posted in Assignment-10C

OFace

For this assignment, I decided to use the squeezing sensor to work with my program. I wanted to create an image of a mouth that oped wider and wider the harder you squeezed the sensor thus resembling the sensual orgasmic face. I thought about using the twisting sensor to resemble the nipple however, that sensor was more of an on and off sensor that wouldn’t need constant human touch to activate it. I need more help with a more interactive/ gaming/ goal orient visual experience. One thought I had was to have a timer going to see if the individual to “stimulate” at a consistent temperature for a certain amount of time. However, that seems to bland as well. I do not have documentation because I have forgotten to take out my USB cord from my suitcase every single time I leave home for the day.

<

import processing.serial.*;
Serial myPort;

// Hey you! Use these variables to do something interesting.
// If you captured them with analog sensors on the arduino,
// They’re probably in the range from 0 … 1023:
int valueA; // Sensor Value A

float runningAvgA;

//————————————
void setup() {
size(400, 400);
runningAvgA = 0;

// List my available serial ports
int nPorts = Serial.list().length;
for (int i=0; i < nPorts; i++) { println("Port " + i + ": " + Serial.list()[i]); } // Choose which serial port to fetch data from. // IMPORTANT: This depends on your computer!!! // Read the list of ports printed by the code above, // and try choosing the one like /dev/cu.usbmodem1411 // On my laptop, I'm using port #4, but yours may differ. String portName = Serial.list()[4]; myPort = new Serial(this, portName, 9600); serialChars = new ArrayList(); } //------------------------------------ void draw() { // Process the serial data. This acquires freshest values. processSerial(); strokeJoin (ROUND); runningAvgA = 0.95*runningAvgA + 0.05*valueA; background (200,100,100); float m = map(runningAvgA, 0,1000, 0, height); strokeWeight(20); stroke(255, 100, 100); ellipse(width/2, height/2, 200, m); fill (0); stroke(0); strokeWeight(1); ellipse (width/2, height/2, 200, m); } //--------------------------------------------------------------- // The processSerial() function acquires serial data byte-by-byte, // as it is received, and when it is properly captured, modifies // the appropriate global variable. // You won't have to change anything unless you want to add additional sensors. /* The (expected) received serial data should look something like this: A903 B412 A900 B409 A898 B406 A895 B404 A893 B404 ...etcetera. */ ArrayList serialChars; // Temporary storage for received serial data int whichValueToAccum = 0; // Which piece of data am I currently collecting? boolean bJustBuilt = false; // Did I just finish collecting a datum? void processSerial() { while (myPort.available () > 0) {
char aChar = (char) myPort.read();

// You’ll need to add a block like one of these
// if you want to add a 3rd sensor:
if (aChar == ‘A’) {
bJustBuilt = false;
whichValueToAccum = 0;
} else if (aChar == ‘B’) {
bJustBuilt = false;
whichValueToAccum = 1;
} else if (((aChar == 13) || (aChar == 10)) && (!bJustBuilt)) {
// If we just received a return or newline character, build the number:
int accum = 0;
int nChars = serialChars.size();
for (int i=0; i < nChars; i++) { int n = (nChars - i) - 1; int aDigit = ((Integer)(serialChars.get(i))).intValue(); accum += aDigit * (int)(pow(10, n)); } // Set the global variable to the number we captured. // You'll need to add another block like one of these // if you want to add a 3rd sensor: if (whichValueToAccum == 0) { valueA = accum; // println ("A = " + valueA); } // Now clear the accumulator serialChars.clear(); bJustBuilt = true; } else if ((aChar >48) && (aChar <57)) {
// If the char is between ‘0’ and ‘9’, save it.
int aDigit = (int)(aChar – ‘0’);
serialChars.add(aDigit);
}
}
}

Arduino Code

int sensorValue0 = 0; // variable to store the value coming from the sensor

void setup() {
Serial.begin(9600); // initialize serial communications
}

void loop() {

// Read the value from the sensor(s):
sensorValue0 = analogRead (A0); // reads value from Analog input 0

Serial.print (“A”);
Serial.println (sensorValue0);

delay (50); // wait a fraction of a second, to be polite
}

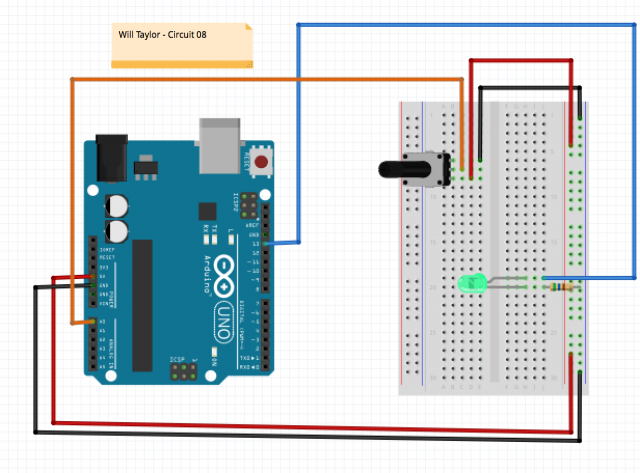
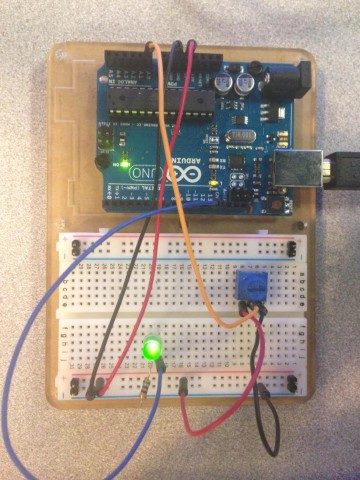
Variable Resistors – WHT

http://youtu.be/Dn_k3N2Y9QE – Circuit 08

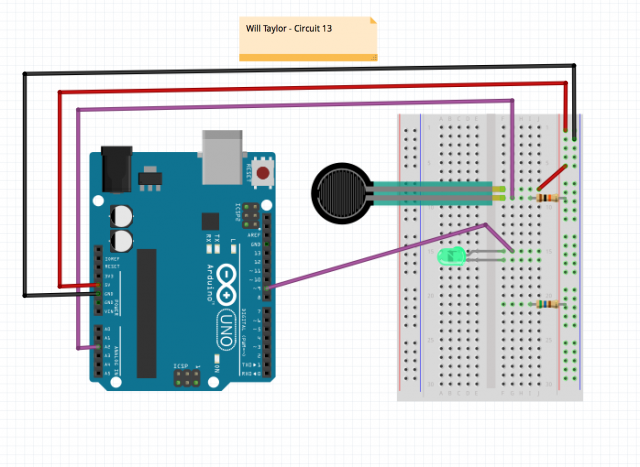
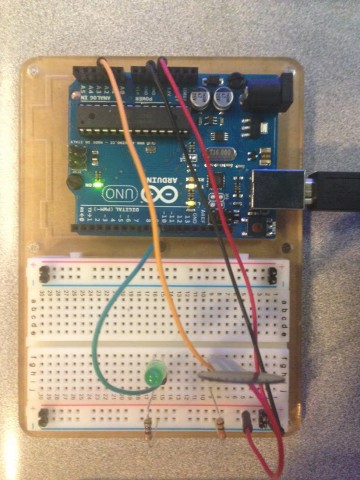
http://youtu.be/YWa1vtchHV4 – Circuit 13

Circuit 08

Screen Shot 2014-10-29 at 6.14.29 PM

C08Pic

Circuit 13

Screen Shot 2014-10-29 at 6.13.47 PM

C13Pic

// Will Taylor
// Circuit 8

/* Analog Input

 * Demonstrates analog input by reading an analog sensor on analog 

 * pin 0 and turning on and off a light emitting diode(LED) connected to 

digital pin 13. 

 * The amount of time the LED will be on and off depends on the value obtained by 

 * analogRead().

 * Created by David Cuartielles

 * Modified 16 Jun 2009

 * By Tom Igoe

 * http://arduino.cc/en/Tutorial/AnalogInput

 */

int sensorPin = 0; // select the input pin for the potentiometer

int ledPin = 13; // select the pin for the LED

int sensorValue = 0; // variable to store the value coming from the sensor

void setup() {

 pinMode(ledPin, OUTPUT); //declare the ledPin as an OUTPUT:

}

void loop() {

 sensorValue = analogRead(sensorPin);// read the value from the sensor:

 digitalWrite(ledPin, HIGH); // turn the ledPin on

 delay(sensorValue); // stop the program for  milliseconds:

 digitalWrite(ledPin, LOW); // turn the ledPin off: 

 delay(sensorValue); // stop the program for for  milliseconds:

}

// Will Taylor
// Circuit 13

/*
 * Force Sensitive Resistor Test Code
 *
 * The intensity of the LED will vary with the amount of pressure on the sensor
 */

int sensePin = 2;    // the pin the FSR is attached to
int ledPin = 9;      // the pin the LED is attached to (use one capable of PWM)

void setup() {
  Serial.begin(9600);
  pinMode(ledPin, OUTPUT);  // declare the ledPin as an OUTPUT
}

void loop() {
  int value = analogRead(sensePin) / 4; //the voltage on the pin divded by 4 (to scale from 10 bits (0-1024) to 8 (0-255)
  analogWrite(ledPin, value);        //sets the LEDs intensity proportional to the pressure on the sensor
  Serial.println(value);              //print the value to the debug window
}

Ping Sensor Carrot Karate!

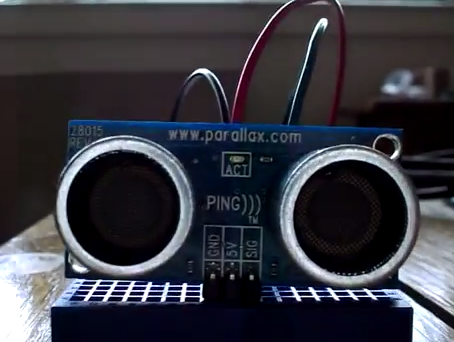
Some time ago, I purchased a Parallax Ping sensor during a RadioShack sale just for the heck of it, without any idea of what to do with it.  Well, one day, this assignment came along and I decided to make use of it.  I plugged it in an Arduino Mega, and it was surprisingly easy to get working – the interesting bit was that it uses the signal pin as both input and output.  It first sends a ping out as digital output, and then the same pin switches into input to receive the pulse that bounces back.  Ok, that’s great for technology, but now what to do with it…

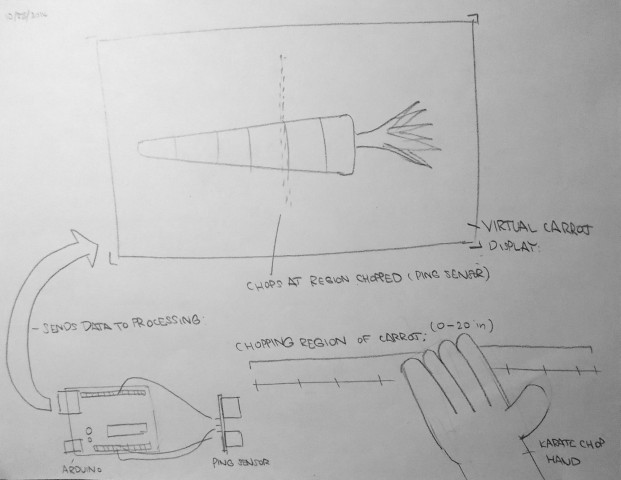
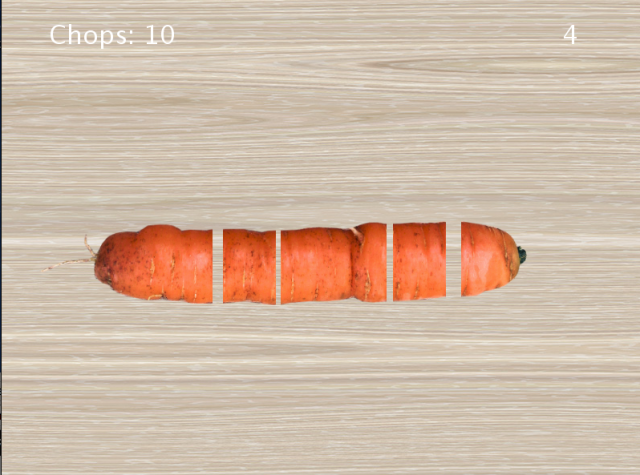
Hmm… aha!  The idea hit me when I was munching on some carrots.  Why not use build a carrot chopping simulator using the ping sensor to detect the position of the chop?  And that is exactly what I did.  While the project did feel somewhat rushed (I was initially intending on adding 4 different types of carrots but time got the better of me), the system works fairly well along with a very simple circuit that could be dismantled and rebuilt very fast.  I think the sound effects are a nice addition, and I will be looking forward to seeing what else I could achieve with this ultrasonic rangefinder.

Here is a concept sketch:

conceptsketch

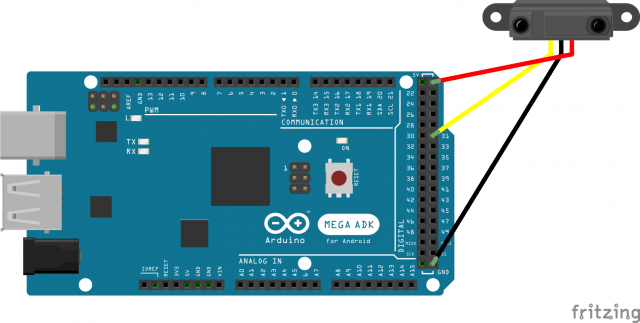
Here is a Fritzing Diagram of the Ping Sensor (I could not find the exact model):

pingSensor

Some pics of the hardware setup:

Screen Shot 2014-10-29 at 6.25.21 PM Screen Shot 2014-10-29 at 6.25.43 PM

Some Processing Screens:

carrot_ee_title

carrot_ee_game

The Arduino Code:

/* Simple ping sensor carrot chopping game

/* --- PRE SETUP --- */
int pingPin = 31;

/* ----- SETUP ----- */
void setup() { 
  Serial.begin(57600); 
}

/* --- MAIN LOOP --- */
void loop() {
  //send a ping out
  pingOut();
  
  //get the ping back as duration in microseconds
  unsigned int duration = pingIn();
  
  //convert the duration to a distance
  unsigned int cm = microsecondsToCm(duration);
  unsigned int in = microsecondsToIn(duration);
  
  //print the data
  //Serial.print(in);
  //Serial.print("in, ");
  
  //send the data to processing
  Serial.write(in);
      
  //delay a bit
  delay(100);

}


/* --- Ping Functions --- */
//sends a ping out
void pingOut() {
  pinMode(pingPin, OUTPUT);
  digitalWrite(pingPin, LOW);
  delayMicroseconds(2);
  digitalWrite(pingPin, HIGH);
  delayMicroseconds(5);
  digitalWrite(pingPin, LOW);
}

//getting the time it takes for the ping to return (in microseconds)
unsigned int pingIn() {
  pinMode(pingPin, INPUT);
  return pulseIn(pingPin, HIGH);
}

//get cm from microseconds
int microsecondsToCm(int microseconds)
{ return microseconds / 29 / 2; }
//get in from microseconds
int microsecondsToIn(int microseconds)
{ return microseconds / 74 / 2; }

The Processing Code:

/* Simple ping sensor carrot chopping game
 * by John Choi. */
 
/* --- PRE SETUP --- */
//screen width and height
int w = 800;
int h = 600;

//pre setup serial:
import processing.serial.*;
Serial serial;
boolean useSerial = true;

//pre setup minim:
import ddf.minim.*;
Minim minim;
AudioPlayer gong;
AudioPlayer chop;

//pre setup game:
PImage wood;
PImage title;
PImage[] carrot = new PImage[10];
int[] chops = {0,0,0,0,0,0,0,0,0,0};
int carrotSize = w/12;
int carrotPos = w+100;

//game vars
boolean started = false;
boolean chopStarted = false;
int chopEndTime = 5000;
int chopStartTime = 0;
int chopTime = 0;
float fade = 255;
int oldIn = 42;
int in = 42;
int time = 0;
int score = 0;

/* ----- SETUP ----- */
void setup() {
  //prepare the screen
  size(w,h);

  //setup serial
  if(useSerial == true) {
    println(Serial.list());
    serial = new Serial(this, Serial.list()[5], 57600);  
  }

  //setup minim
  minim = new Minim(this);
  gong = minim.loadFile("gong.wav");
  chop = minim.loadFile("chop.wav");
  
  //load all the images
  wood = loadImage("wood.png");
  //wood.resize(w,h);
  title = loadImage("title.png");
  title.resize(0,h);
  for(int i = 0; i < 10; i++) {     carrot[i] = loadImage("c1_"+i+".png");     carrot[i].resize(carrotSize,0);   }    } /* --- MAIN LOOP --- */ void draw() {    //update the time.   time = millis();      //refresh the screen:   background(0);   /* --- GET INPUT: --- */   //get serial input:   if(useSerial == true && serial.available() > 0) {
    in = serial.read()/2-2;
  }
  
  //key press override:
  if(keyPressed == true) {
    switch(key) {
      case '0': in = 0; break;
      case '1': in = 1; break;
      case '2': in = 2; break;
      case '3': in = 3; break;
      case '4': in = 4; break;
      case '5': in = 5; break;
      case '6': in = 6; break;
      case '7': in = 7; break;
      case '8': in = 8; break;
      case '9': in = 9; break;
    }
  }

  /* --- GAME DISPLAY --- */
  //if the game started:
  if(started == true) {
    
    //draw the wood:
    tint(255,255);
    image(wood,0,0);  
   
    //move the carrot into position:
    if(carrotPos > 0) {
      carrotPos -= 4;
    } else if (carrotPos == 0) {
      if(chopStarted == false) { 
        chopStarted = true; 
        chopStartTime = time;
      }
    }
    //update the chop time:
    chopTime = time - chopStartTime;
    //move the carrot out when time runs out:
    if(chopTime > chopEndTime && chopStarted == true) {
      if(carrotPos > -w) {
        carrotPos -= 4;
      } else {
        chopStarted = false;
        carrotPos = w+100;
        for(int i = 0; i < 10; i++) { chops[i] = 0; }
      }
    }
   
    //chop the carrot based on input:
    if(in != oldIn && chopStarted == true) {
      if(0 <= in && in < 10) {
        //if the spot was not already chopped:
        if(chops[in] == 0) {
          chops[in] = parseInt(random(15))+5;
          chop.rewind();
          chop.play();
          score += 1;
        }
      }
    }
   
    //draw the carrot:
    for(int i = 0; i < 10; i++) {
      //get the offset up to the top spot:
      int offset = carrotPos;
      for(int c = 0; c < i; c++) { offset+=chops[c]; }       //draw the carrot piece with the offset.       image(carrot[i],carrotSize*(i)+offset,h/2-carrotSize/2);     }          //draw the score:     fill(255,255);     textSize(32);     text("Chops: "+score,60,60);   }      /* --- TITLE SCREEN --- */      //if we haven't started yet:   if (started == false) {     //if input found, then start:     if(in != oldIn && time > 5000) { 
      started = true; 
      gong.play();
    }
  }
  //we have started, so fade the title out.
  else { 
    if(fade > 0) { fade -= 1.2; } 
    else { fade = 0; } 
  }
  drawTitle(); 
    
  //update oldIn:
  oldIn = in;
  
  //draw info about oldIn and in
  fill(255,255);
  textSize(32);
  text(in,700,60);
  
}

//this function draws the title screen and slowly fades it out:
void drawTitle() {
  //draw the black title background:
  fill(0,fade);
  rect(0,0,w,h);
  //draw the title:
  tint(255,constrain(fade*2.5,0,255));
  image(title,0,0); //title text
  //draw the chop to begin flickering text:  
  fill(255, (fade/255.0) * (sin(time*0.002)*255 +128));
  textSize(24);
  text("Chop to begin",w/2-90,h*9/10);
}

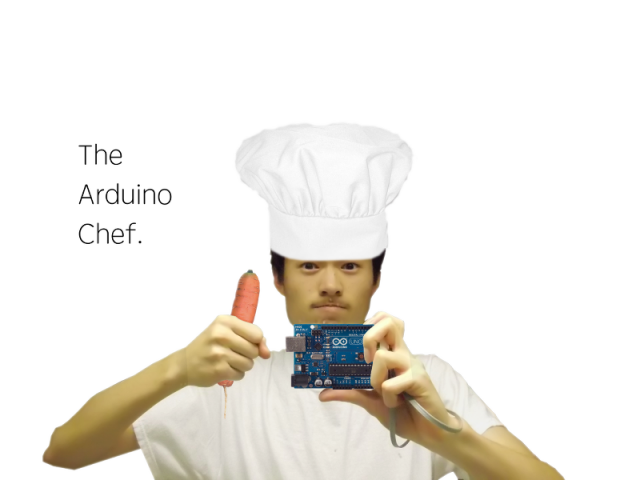
And if you read all that, go ahead and take a look at this stupid picture of me holding a carrot and pretending to be a chef (by Golan’s request):  Enjoy!

arduinochef

Assignment 10: clair chin

I used proximity sensors to turn on a switch that allows power to go to a powerstrip. Two bodies are necessary for the switch to be triggered. I wanted this piece to be about human interaction. In this case a hug visually changes the atmosphere in which it occurs.

Push Button


http://youtu.be/4oNz_M8QiUoCIRC-07

C07Pic


// Will Taylor
// Circuit 07

/*

* Button

* by DojoDave <http://www.0j0.org>

*

* Turns on and off a light emitting diode(LED) connected to digital

* pin 13, when pressing a pushbutton attached to pin 7.

* http://www.arduino.cc/en/Tutorial/Button

*/

int ledPin = 13; // choose the pin for the LED

int inputPin = 2; // choose the input pin (for a pushbutton)

int val = 0; // variable for reading the pin status

void setup() {

pinMode(ledPin, OUTPUT); // declare LED as output

pinMode(inputPin, INPUT); // declare pushbutton as input

}

void loop(){

val = digitalRead(inputPin); // read input value

if (val == HIGH) { // check if the input is HIGH

digitalWrite(ledPin, LOW); // turn LED OFF

} else {

digitalWrite(ledPin, HIGH); // turn LED ON

}

}