Category: Assignment-10C

Temperature Resistor

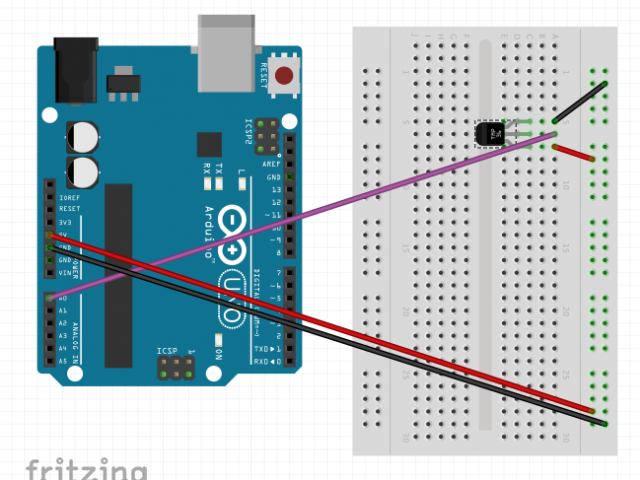
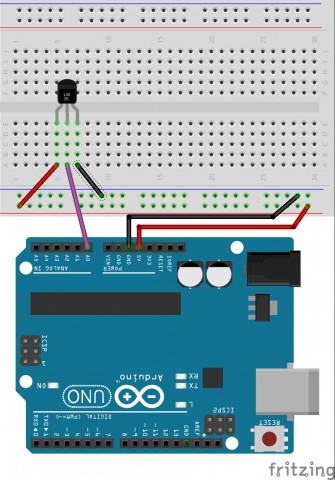
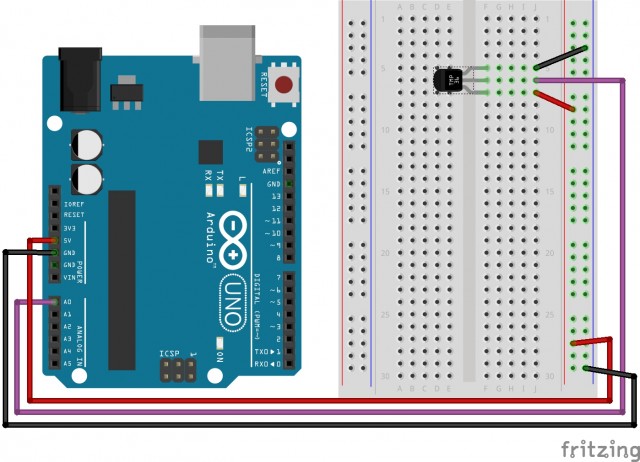
temperature_bb

Code for temperature resistor

/*     ---------------------------------------------------------
 *     |  Arduino Experimentation Kit Example Code             |
 *     |  CIRC-10 .: Temperature :. (TMP36 Temperature Sensor) |
 *     ---------------------------------------------------------
 *   
 *  A simple program to output the current temperature to the IDE's debug window 
 * 
 *  For more details on this circuit: http://tinyurl.com/c89tvd 
 */

//TMP36 Pin Variables
int temperaturePin = 0; //the analog pin the TMP36's Vout (sense) pin is connected to
                        //the resolution is 10 mV / degree centigrade 
                        //(500 mV offset) to make negative temperatures an option

/*
 * setup() - this function runs once when you turn your Arduino on
 * We initialize the serial connection with the computer
 */
void setup()
{
  Serial.begin(9600);  //Start the serial connection with the copmuter
                       //to view the result open the serial monitor 
                       //last button beneath the file bar (looks like a box with an antenae)
}
 
void loop()                     // run over and over again
{
 float temperature = getVoltage(temperaturePin);  //getting the voltage reading from the tem
                    //perature sensor
 temperature = (temperature - .5) * 100;          //converting from 10 mv per degree wit 500
                    // mV offset
                                                  //to degrees ((volatge - 500mV) times 100)
 Serial.println(temperature);                     //printing the result
 delay(1000);                                     //waiting a second
}

/*
 * getVoltage() - returns the voltage on the analog input defined by
 * pin
 */
float getVoltage(int pin){
 return (analogRead(pin) * .004882814); //converting from a 0 to 1023 digital range
                                        // to 0 to 5 volts (each 1 reading equals ~ 5 milliv
                    //olts
}

Assignment-10C: Temperature (Circuit 10)

Assignment-10C: Temperature (Circuit 10) + Serial

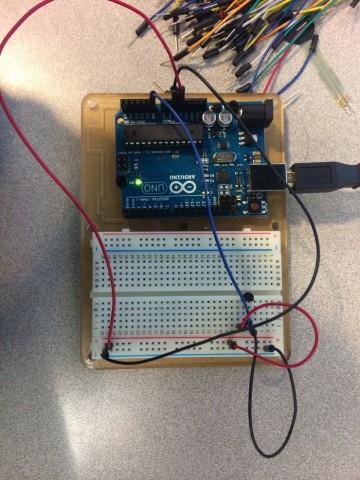
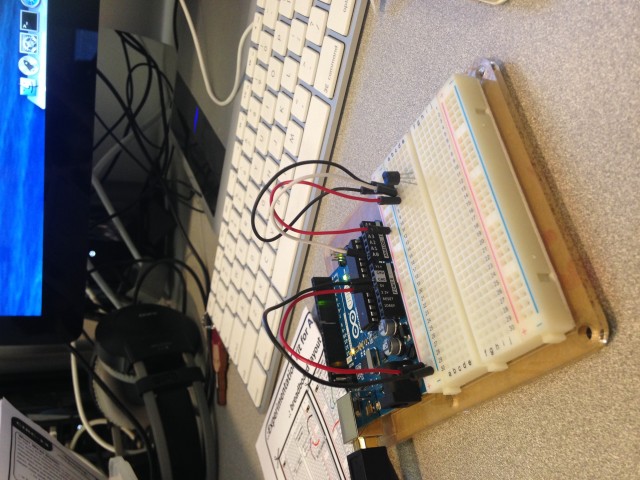
Temperature Circuit Temperature Circuit

As the user places their hand over the temperature sensor the numbers on the screen spike rapidly.


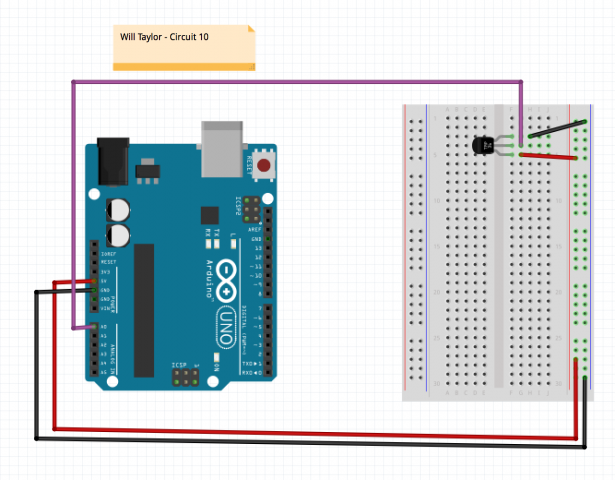
Fritzing diagram Fritzing diagram


Code:

/*     ---------------------------------------------------------
 *     |  Arduino Experimentation Kit Example Code             |
 *     |  CIRC-10 .: Temperature :. (TMP36 Temperature Sensor) |
 *     ---------------------------------------------------------
 *   
 *  A simple program to output the current temperature to the IDE's debug window 
 * 
 *  For more details on this circuit: http://tinyurl.com/c89tvd 
 */

//TMP36 Pin Variables
int temperaturePin = 0; //the analog pin the TMP36's Vout (sense) pin is connected to
                        //the resolution is 10 mV / degree centigrade 
                        //(500 mV offset) to make negative temperatures an option

/*
 * setup() - this function runs once when you turn your Arduino on
 * We initialize the serial connection with the computer
 */
void setup()
{
  Serial.begin(9600);  //Start the serial connection with the copmuter
                       //to view the result open the serial monitor 
                       //last button beneath the file bar (looks like a box with an antenae)
}
 
void loop()                     // run over and over again
{
 float temperature = getVoltage(temperaturePin);  //getting the voltage reading from the tem
                    //perature sensor
 temperature = (temperature - .5) * 100;          //converting from 10 mv per degree wit 500
                    // mV offset
                                                  //to degrees ((volatge - 500mV) times 100)
 Serial.println(temperature);                     //printing the result
 delay(1000);                                     //waiting a second
}

/*
 * getVoltage() - returns the voltage on the analog input defined by
 * pin
 */
float getVoltage(int pin){
 return (analogRead(pin) * .004882814); //converting from a 0 to 1023 digital range
                                        // to 0 to 5 volts (each 1 reading equals ~ 5 milliv
                    //olts
}


circuit 10

video
IMG_0149 (2)

MOV_5968 (2)

picture
IMG_0149 (2)

fritzing
Screen Shot 2014-10-30 at 6.53.08 PM

code

/*     ---------------------------------------------------------
 *     |  Arduino Experimentation Kit Example Code             |
 *     |  CIRC-10 .: Temperature :. (TMP36 Temperature Sensor) |
 *     ---------------------------------------------------------
 *   
 *  A simple program to output the current temperature to the IDE's debug window 
 * 
 *  For more details on this circuit: http://tinyurl.com/c89tvd 
 */

//TMP36 Pin Variables
int temperaturePin = 0; //the analog pin the TMP36's Vout (sense) pin is connected to
                        //the resolution is 10 mV / degree centigrade 
                        //(500 mV offset) to make negative temperatures an option

/*
 * setup() - this function runs once when you turn your Arduino on
 * We initialize the serial connection with the computer
 */
void setup()
{
  Serial.begin(9600);  //Start the serial connection with the copmuter
                       //to view the result open the serial monitor 
                       //last button beneath the file bar (looks like a box with an antenae)
}
 
void loop()                     // run over and over again
{
 float temperature = getVoltage(temperaturePin);  //getting the voltage reading from the temperature sensor
 temperature = (temperature - .5) * 100;          //converting from 10 mv per degree wit 500 mV offset
                                                  //to degrees ((volatge - 500mV) times 100)
 Serial.println(temperature);                     //printing the result
 delay(1000);                                     //waiting a second
}

/*
 * getVoltage() - returns the voltage on the analog input defined by
 * pin
 */
float getVoltage(int pin){
 return (analogRead(pin) * .004882814); //converting from a 0 to 1023 digital range
                                        // to 0 to 5 volts (each 1 reading equals ~ 5 millivolts
}

Temperature Resistor – WHT


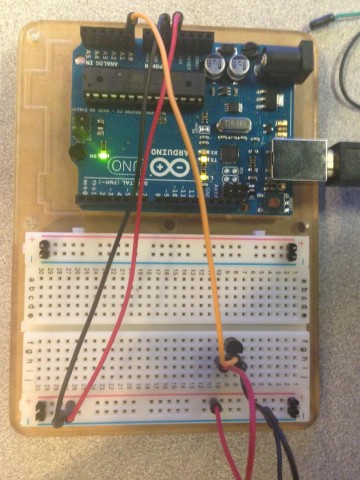
Circuit 10Screen Shot 2014-10-29 at 6.15.15 PM

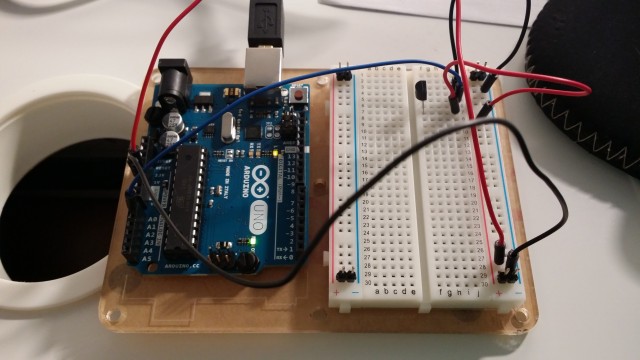
C10Pic


// Will Talyor
// Circuit 10

/* ---------------------------------------------------------
* | Arduino Experimentation Kit Example Code |
* | CIRC-10 .: Temperature :. (TMP36 Temperature Sensor) |
* ---------------------------------------------------------
*
* A simple program to output the current temperature to the IDE's debug window
*
* For more details on this circuit: http://tinyurl.com/c89tvd
*/

//TMP36 Pin Variables
int temperaturePin = 0; //the analog pin the TMP36's Vout (sense) pin is connected to
//the resolution is 10 mV / degree centigrade
//(500 mV offset) to make negative temperatures an option

/*
* setup() - this function runs once when you turn your Arduino on
* We initialize the serial connection with the computer
*/
void setup()
{
Serial.begin(9600); //Start the serial connection with the copmuter
//to view the result open the serial monitor
//last button beneath the file bar (looks like a box with an antenae)
}

void loop() // run over and over again
{
float temperature = getVoltage(temperaturePin); //getting the voltage reading from the temperature sensor
temperature = (temperature - .5) * 100; //converting from 10 mv per degree wit 500 mV offset
//to degrees ((volatge - 500mV) times 100)
Serial.println(temperature); //printing the result
delay(1000); //waiting a second
}

/*
* getVoltage() - returns the voltage on the analog input defined by
* pin
*/
float getVoltage(int pin){
return (analogRead(pin) * .004882814); //converting from a 0 to 1023 digital range
// to 0 to 5 volts (each 1 reading equals ~ 5 millivolts
}
Written by Comments Off on Temperature Resistor – WHT Posted in Assignment-10C

Assignment 10: clair chin

I used proximity sensors to turn on a switch that allows power to go to a powerstrip. Two bodies are necessary for the switch to be triggered. I wanted this piece to be about human interaction. In this case a hug visually changes the atmosphere in which it occurs.

Temp

<

/*     ———————————————————
* | Arduino Experimentation Kit Example Code |
* | CIRC-10 .: Temperature :. (TMP36 Temperature Sensor) |
* ———————————————————
*
* A simple program to output the current temperature to the IDE’s debug window
*
* For more details on this circuit: http://tinyurl.com/c89tvd
*/

//TMP36 Pin Variables
int temperaturePin = 0; //the analog pin the TMP36’s Vout (sense) pin is connected to
//the resolution is 10 mV / degree centigrade
//(500 mV offset) to make negative temperatures an option

/*
* setup() – this function runs once when you turn your Arduino on
* We initialize the serial connection with the computer
*/
void setup()
{
Serial.begin(9600); //Start the serial connection with the copmuter
//to view the result open the serial monitor
//last button beneath the file bar (looks like a box with an antenae)
}

void loop() // run over and over again
{
float temperature = getVoltage(temperaturePin); //getting the voltage reading from the tem
//perature sensor
temperature = (temperature – .5) * 100; //converting from 10 mv per degree wit 500
// mV offset
//to degrees ((volatge – 500mV) times 100)
Serial.println(temperature); //printing the result
delay(1000); //waiting a second
}

/*
* getVoltage() – returns the voltage on the analog input defined by
* pin
*/
float getVoltage(int pin){
return (analogRead(pin) * .004882814); //converting from a 0 to 1023 digital range
// to 0 to 5 volts (each 1 reading equals ~ 5 milliv
//olts
}
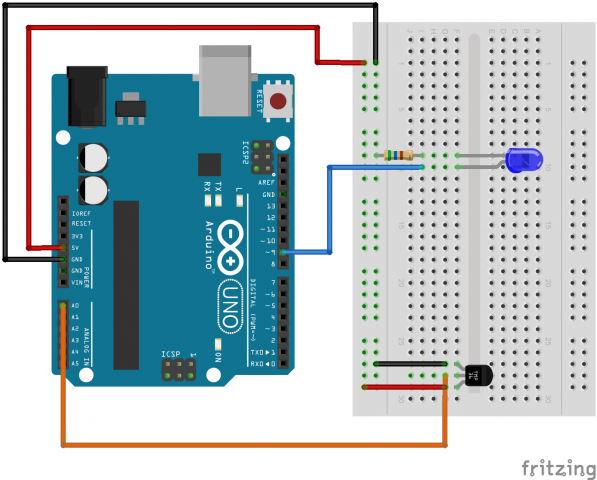
Arduino 10

int temperaturePin = 0;
void setup(){
Serial.begin(9600);
}
void loop(){
float temperature = getVoltage(temperaturePin);
temperature = (temperature - .5) * 100;
Serial.println(temperature);
delay(1000);}

float getVoltage(int pin){
return (analogRead(pin)* .004882814);
}

#10

The most exciting part of the video is that ten seconds afterward when I dismantled the circuit, I burned myself on the temperature sensor because I had it plugged in wrong, and also it was one of the transistors and not the temperature sensor.

And then I had to re-shoot the entire video because I deleted the video before I realized it’d look identical either way.

10

Untitled Sketch 2_bb


/*     ---------------------------------------------------------
 *     |  Arduino Experimentation Kit Example Code             |
 *     |  CIRC-10 .: Temperature :. (TMP36 Temperature Sensor) |
 *     ---------------------------------------------------------
 *   
 *  A simple program to output the current temperature to the IDE's debug window 
 * 
 *  For more details on this circuit: http://tinyurl.com/c89tvd 
 */

//TMP36 Pin Variables
int temperaturePin = 0; //the analog pin the TMP36's Vout (sense) pin is connected to
                        //the resolution is 10 mV / degree centigrade 
                        //(500 mV offset) to make negative temperatures an option

/*
 * setup() - this function runs once when you turn your Arduino on
 * We initialize the serial connection with the computer
 */
void setup()
{
  Serial.begin(9600);  //Start the serial connection with the copmuter
                       //to view the result open the serial monitor 
                       //last button beneath the file bar (looks like a box with an antenae)
}
 
void loop()                     // run over and over again
{
 float temperature = getVoltage(temperaturePin);  //getting the voltage reading from the tem
                    //perature sensor
 temperature = (temperature - .5) * 100;          //converting from 10 mv per degree wit 500
                    // mV offset
                                                  //to degrees ((volatge - 500mV) times 100)
 Serial.println(temperature);                     //printing the result
 delay(1000);                                     //waiting a second
}

/*
 * getVoltage() - returns the voltage on the analog input defined by
 * pin
 */
float getVoltage(int pin){
 return (analogRead(pin) * .004882814); //converting from a 0 to 1023 digital range
                                        // to 0 to 5 volts (each 1 reading equals ~ 5 milliv
                    //olts
}

Proximity Sensor experiment

Rather than wiring up the given diagrams for sensors from the book, I made a circuit using something I hadn’t used before. I made a simple circuit which plays tones based on a value measured from a proximity sensor.

Here is the video:

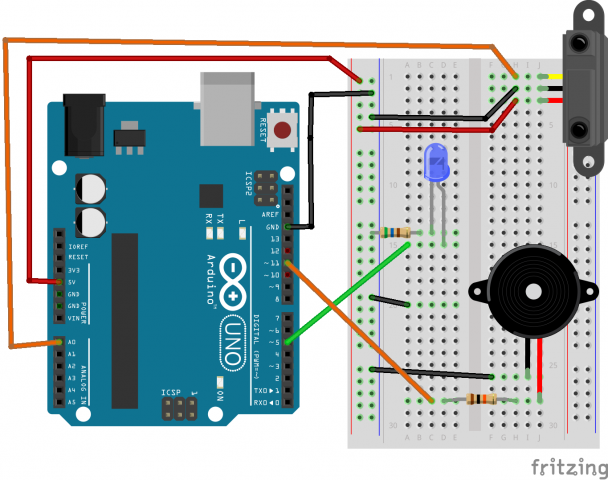
Here is the fritzing diagram:

proximity_mbk

Here is the code:

/* 
 * Proximity instrument
 * This is totally not anything like a theramin.
 * Author: Matthew Kellogg
 * Date: October 22, 2014
 */
int ledPin = 5;    // LED connected to digital pin 9

void setup()  { 
  pinMode(ledPin, OUTPUT);
  Serial.begin(9600);
} 

static const int thresh = 160;

void loop()  {
  int val = analogRead(0);
  if (val > thresh){
    analogWrite(ledPin, map(val, 30, 950, 0, 255));
    tone(11, map(val, thresh, 950, 60, 4400));
  } else { 
    analogWrite(ledPin, 0);
    noTone(11);
  }
}


Assignment 10C

https://www.youtube.com/watch?v=HHh_-q_hG08&feature=youtu.be

20141026_150019CIRC-10


/*     ---------------------------------------------------------
 *     |  Arduino Experimentation Kit Example Code             |
 *     |  CIRC-10 .: Temperature :. (TMP36 Temperature Sensor) |
 *     ---------------------------------------------------------
 *   
 *  A simple program to output the current temperature to the IDE's debug window 
 * 
 *  For more details on this circuit: http://tinyurl.com/c89tvd 
 */
 
//TMP36 Pin Variables
int temperaturePin = 0; //the analog pin the TMP36's Vout (sense) pin is connected to
                        //the resolution is 10 mV / degree centigrade 
                        //(500 mV offset) to make negative temperatures an option
 
/*
 * setup() - this function runs once when you turn your Arduino on
 * We initialize the serial connection with the computer
 */
void setup()
{
  Serial.begin(9600);  //Start the serial connection with the copmuter
                       //to view the result open the serial monitor 
                       //last button beneath the file bar (looks like a box with an antenae)
}
 
void loop()                     // run over and over again
{
 float temperature = getVoltage(temperaturePin);  //getting the voltage reading from the tem
                    //perature sensor
 temperature = (temperature - .5) * 100;          //converting from 10 mv per degree wit 500
                    // mV offset
                                                  //to degrees ((volatge - 500mV) times 100)
 Serial.println(temperature);                     //printing the result
 delay(1000);                                     //waiting a second
}
 
/*
 * getVoltage() - returns the voltage on the analog input defined by
 * pin
 */
float getVoltage(int pin){
 return (analogRead(pin) * .004882814); //converting from a 0 to 1023 digital range
                                        // to 0 to 5 volts (each 1 reading equals ~ 5 milliv
                    //olts
}