Assignment 06
This is a smaller assignment with just two parts, due Monday October 6th.
Looking Outwards: Max/MSP
Do a “Looking Outwards” blog post to investigate how artists are using the Max/MSP/Jitter arts-engineering environment (sometimes simply called Max) to create new forms of art and performance. See, for example:
- Videos tagged ‘maxmsp’ on Vimeo;
- Projects that use MaxMSP, blogged on CreativeApplications.net
- Interviews with artists who use Max, hosted at Cycling74
- Projects by artists like Luke DuBois, Sue Costabile, Kurt Ralske, Laetitia Sonami, Craig Fahner, David Tinapple…
Don’t forget to tag your project with the Category, “Looking Outwards”.
Assignment-06-FaceOSC.
In this assignment, you’ll use Processing and FaceOSC to create an interactive face puppet. Most probably, you will make a “face avatar” — some kind of animated portrait or character. But you could also make a “face-responsive abstraction”, a game that you play with your face, or some other composition that responds to your facial expressions.
Broadly speaking, your challenge is to create an interesting graphic system which responds in real-time to input from a high-quality facial analysis tool. The pedagogic purpose (and learning outcome) of this assignment is threefold:
- To increase your fluency in the craft and conceptual application of computation to the arts, through practice;
- To familiarize you with OSC, the most widely used protocol for inter-process data communications in the media arts;
- To familiarize you with the logistics of installing an extension library in Processing, a basic skill that significantly expands your tool-kit.
For this assignment:
- Sketch first… on paper…!
- Create a program in Processing that responds to FaceOSC. Technical instructions are below.
- Document your program by capturing 30-60 seconds of screen-grabbed video, in which you are puppeteering your design in real time. There’s some information about how to screengrab video here.
- Upload this video to YouTube and embed it in a blog post. You’ll have best results using YouTube’s “Share->Embed” tool, but there are also helpful instructions for embedding YouTube videos here.
- Also in your blog post, upload your code by embedding your Java code using the WP-Syntax wordpress plugin. There are instructions for doing so in the section labeled “Embedding syntax-colored code.”, here.
- Write a paragraph about your inspirations, goal, and evaluations of your project. In your narrative, mention the specific properties of the face that you used to control your design. Feel free to include a scan of your sketches to document your process.
- Label your blog post with the Category, Assignment-06-FaceOSC.
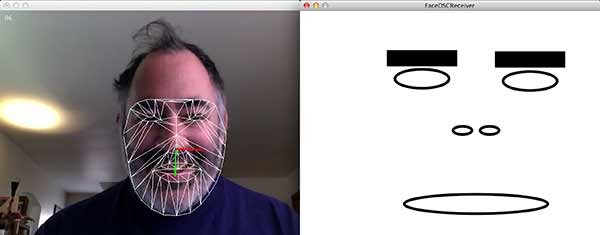
When you’ve uploaded your screengrabbed video documentation, it might look something like the following — with the FaceOSC window on one side of the screen, and your application on the other:
And again, here’s a still image of a recommended layout. The purpose of this split-screen layout is to help the viewer understand the relationship of your face actions to your final result:
To get started technically:
- Download FaceOSC for the CFA-318 Macs here: http://cmuems.com/resources/FaceOSC-2014.zip. If this version doesn’t work on your own laptop, try http://cmuems.com/resources/FaceOSC.zip. These zips contains example Processing files, including FaceOSCReceiver.pde, with a simple face. You can surely do better! (For other operating systems, browse the downloads section from Kyle McDonald’s github, where the OSX one is located)
- You will need to download the OscP5 library by Andreas Schegel, which allows Processing to communicate over OSC with other applications: http://www.sojamo.de/libraries/oscP5/. If you don’t install this, nothing will work!
- Install OscP5 into your Processing “libraries” folder. Instructions for doing this can be found in the file called INSTALL.txt found in the OscP5 zip. You’ll need to restart Processing after doing so.
- You’ll obviously need a camera on your computer. Run the FaceOSC.app and keep it open. If it sees your face, it should start transmitting data to whomever is listening.
- If you can’t get the webcamera to work, or if you’d like to create a puppet driven by a character from a movie, then here is a version of FaceOSC (for Mac OSX) that uses a locally-stored movie file instead of the camera: https://github.com/CreativeInquiry/FaceOSC-Templates/downloads
- Open and work on FaceOSCReceiver.pde (inside the boldfaced FaceOSC download zip linked at the top) or, preferably, a duplicate of it. When your sketch is running it should automatically communicate with FaceOSC.
For advanced students, here’s some additional info you might find helpful:
In case you’re interested, here’s the code for my interactive face-controlled box (which also comes in the download zip):
import oscP5.*;
OscP5 oscP5;

int     found;
PVector poseOrientation = new PVector();

//----------------------------------
void setup() {
  size(640, 480, OPENGL);
  oscP5 = new OscP5(this, 8338);
  oscP5.plug(this, "found", "/found");
  oscP5.plug(this, "poseOrientation", "/pose/orientation");
}

//----------------------------------
void draw() {
  background (180);
  strokeWeight (3);
  noFill();

  if (found > 0) {
    pushMatrix();
    translate (width/2, height/2, 0);
    rotateY (0 - poseOrientation.y);
    rotateX (0 - poseOrientation.x);
    rotateZ (    poseOrientation.z);
    box (200, 250, 200);
    popMatrix();
  }
}

//----------------------------------
public void found (int i) { found = i; }
public void poseOrientation(float x, float y, float z) {
  poseOrientation.set(x, y, z);
}
