Category: Assignment-10B

Variable Resistors

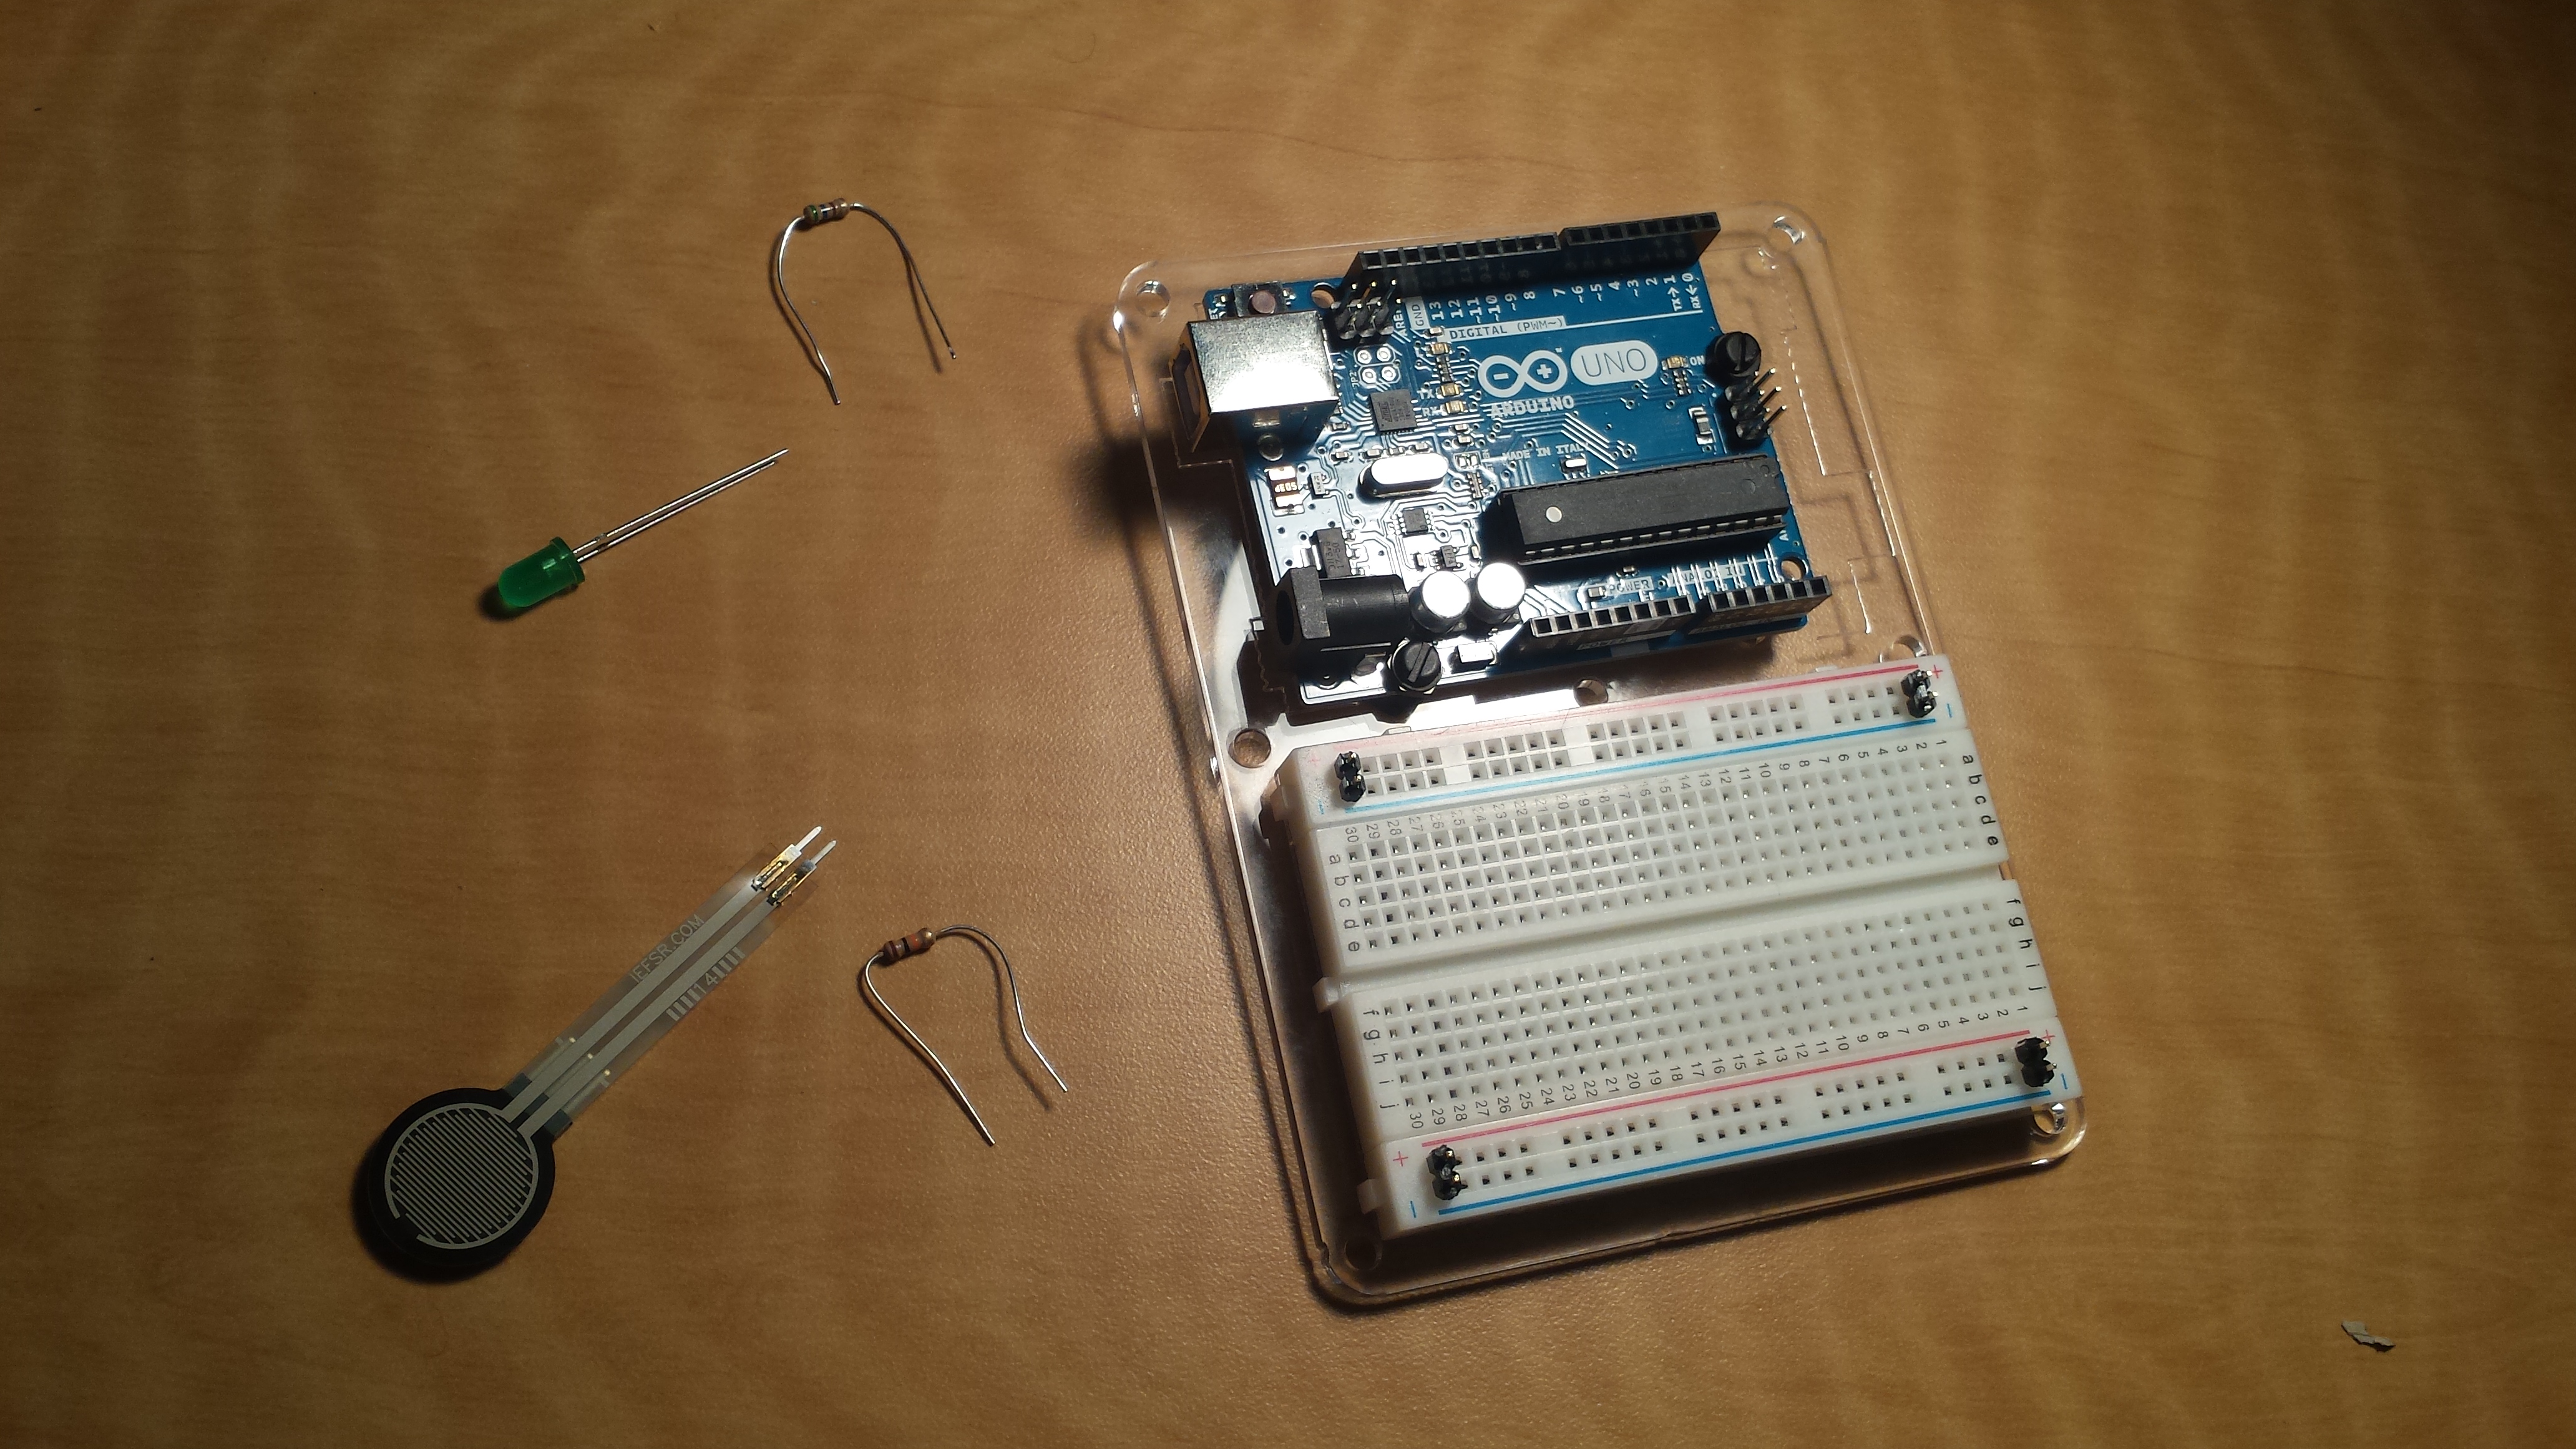
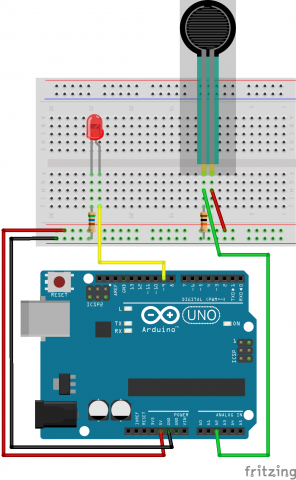
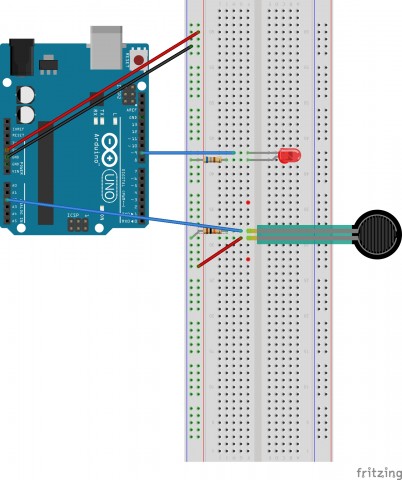
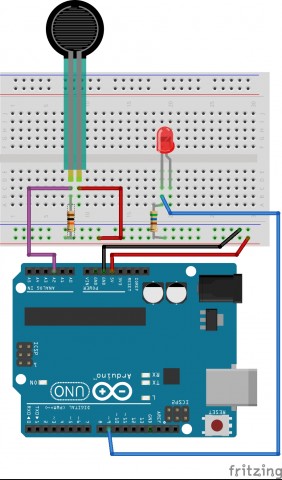
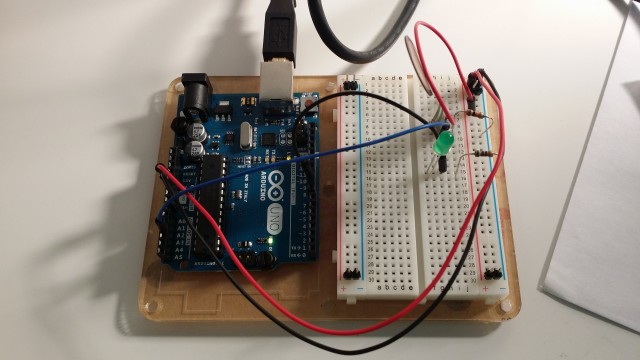
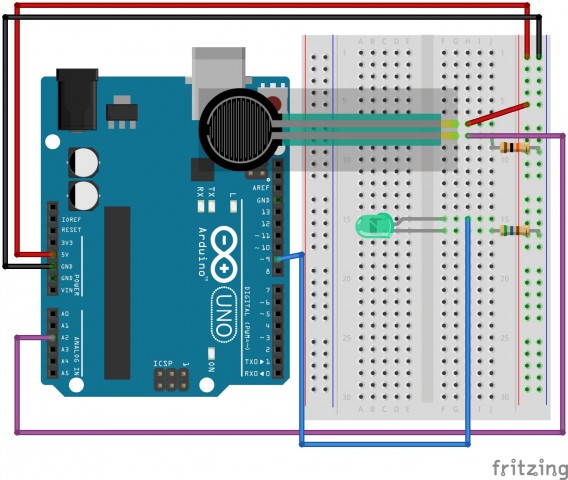
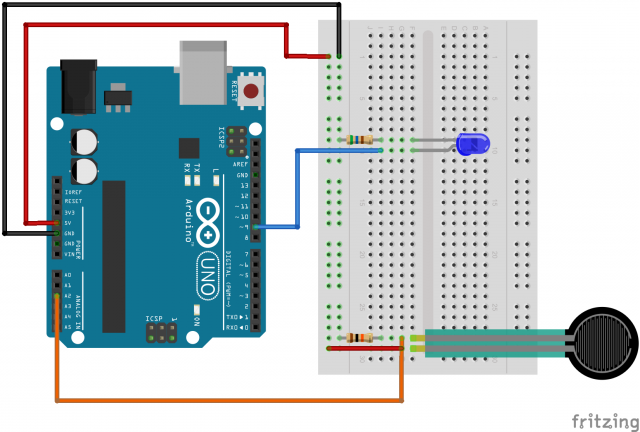
Pressure_bb

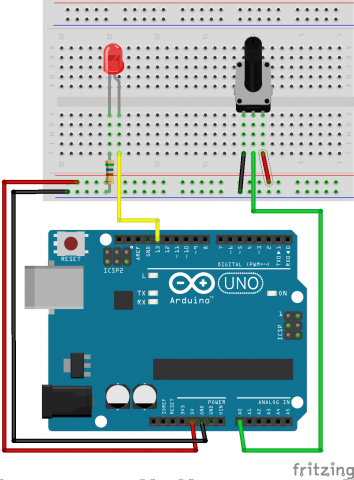
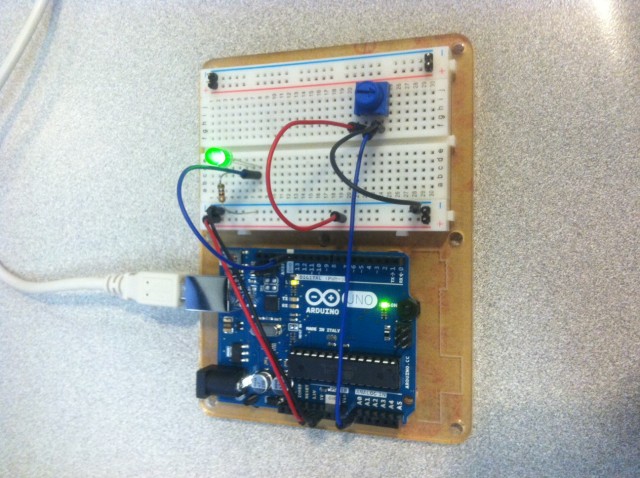
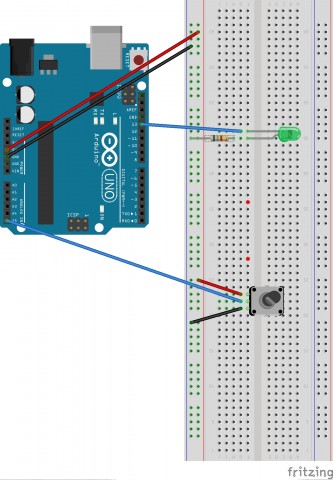
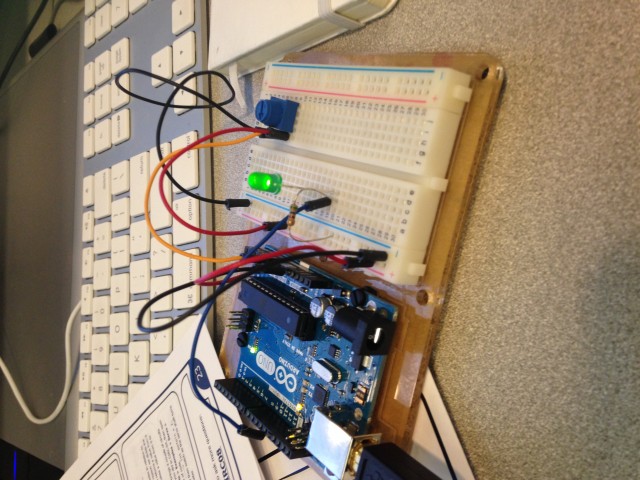
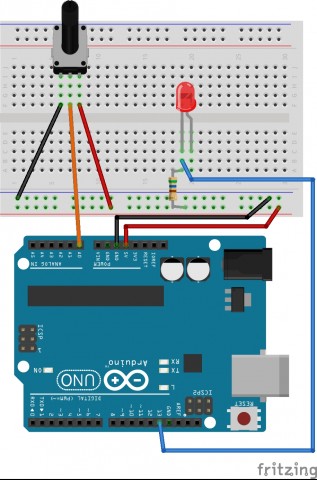
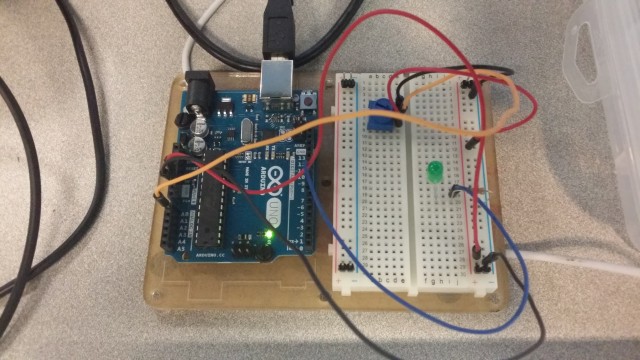
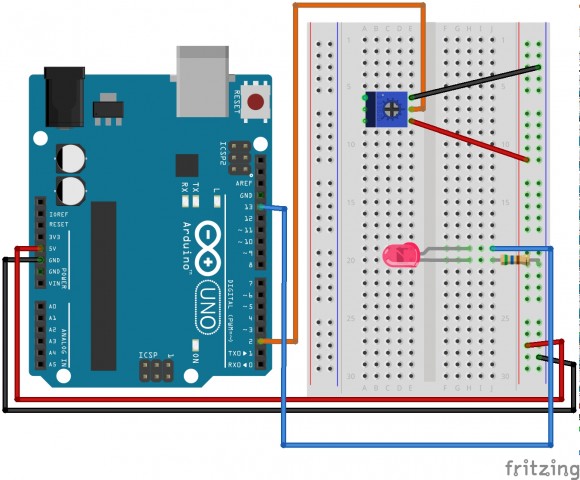
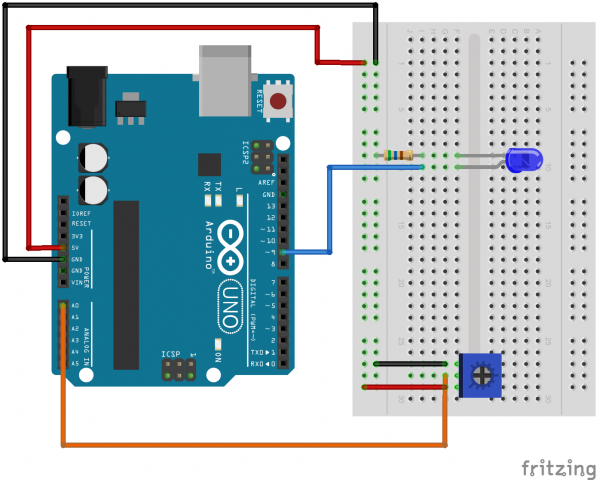
Potentiometer_bb

Code For potentiometer

/*
Analog Input
Demonstrates analog input by reading an analog sensor on analog pin 0 and
turning on and off a light emitting diode(LED) connected to digital pin 13.
The amount of time the LED will be on and off depends on
the value obtained by analogRead().

The circuit:
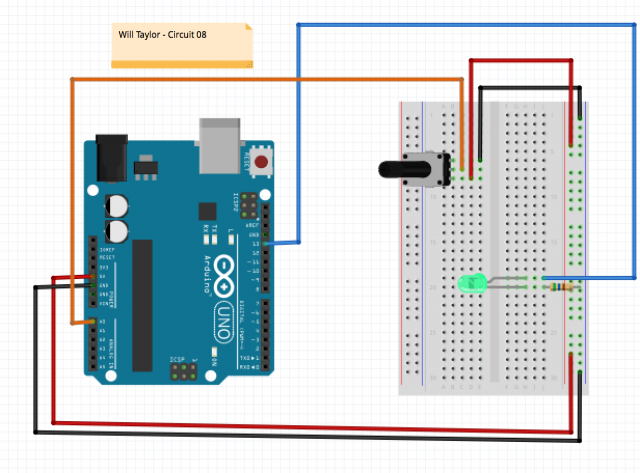
* Potentiometer attached to analog input 0
* center pin of the potentiometer to the analog pin
* one side pin (either one) to ground
* the other side pin to +5V
* LED anode (long leg) attached to digital output 13
* LED cathode (short leg) attached to ground

* Note: because most Arduinos have a built-in LED attached
to pin 13 on the board, the LED is optional.

 Created by David Cuartielles
 Modified 16 Jun 2009
 By Tom Igoe
 
 http://arduino.cc/en/Tutorial/AnalogInput
 
 */

int sensorPin = 0;    // select the input pin for the potentiometer
int ledPin = 13;      // select the pin for the LED
int sensorValue = 0;  // variable to store the value coming from the sensor

void setup() {
  // declare the ledPin as an OUTPUT:
  pinMode(ledPin, OUTPUT);  
}

void loop() {
  // read the value from the sensor:
  sensorValue = analogRead(sensorPin);    
  // turn the ledPin on
  digitalWrite(ledPin, HIGH);  
  // stop the program for  milliseconds:
  delay(sensorValue);          
  // turn the ledPin off:        
  digitalWrite(ledPin, LOW);   
  // stop the program for for  milliseconds:
  delay(sensorValue);                  
}

Code for force sensitive resistor

/*
 * Force Sensitive Resistor Test Code
 *
 * The intensity of the LED will vary with the amount of pressure on the sensor
 */

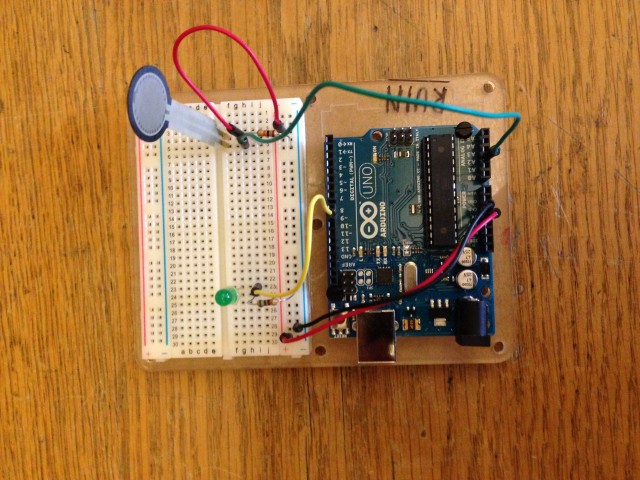
int sensePin = 2;    // the pin the FSR is attached to
int ledPin = 9;      // the pin the LED is attached to (use one capable of PWM)

void setup() {
  Serial.begin(9600);
  pinMode(ledPin, OUTPUT);  // declare the ledPin as an OUTPUT
}

void loop() {
  int value = analogRead(sensePin) / 4; //the voltage on the pin divded by 4 (to scale from 10 bits (0-1024) to 8 (0-255)
  analogWrite(ledPin, value);        //sets the LEDs intensity proportional to the pressure on the sensor
  Serial.println(value);              //print the value to the debug window
}

Assignment-10B: Variable Resistors (Circuits 08 & 13)

Assignment-10B: Variable Resistors (Circuits 08 & 13)

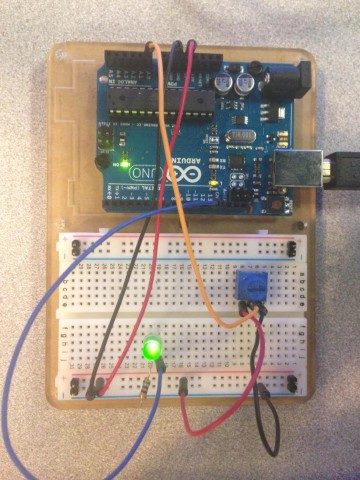
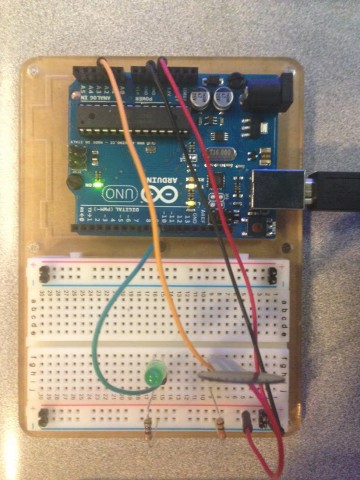
(Circuit 08) setup: (Circuit 08)


diagram diagram

Code:

Analog Input
Demonstrates analog input by reading an analog sensor on analog pin 0 and
turning on and off a light emitting diode(LED) connected to digital pin 13.
The amount of time the LED will be on and off depends on
the value obtained by analogRead().
The circuit:
* Potentiometer attached to analog input 0
* center pin of the potentiometer to the analog pin
* one side pin (either one) to ground
* the other side pin to +5V
* LED anode (long leg) attached to digital output 13
* LED cathode (short leg) attached to ground

* Note: because most Arduinos have a built-in LED attached
to pin 13 on the board, the LED is optional.

Created by David Cuartielles
Modified 16 Jun 2009
By Tom Igoe

http://arduino.cc/en/Tutorial/AnalogInput

*/

int sensorPin = 0; // select the input pin for the potentiometer
int ledPin = 13; // select the pin for the LED
int sensorValue = 0; // variable to store the value coming from the sensor

void setup() {
// declare the ledPin as an OUTPUT:
pinMode(ledPin, OUTPUT);
}

void loop() {
// read the value from the sensor:
sensorValue = analogRead(sensorPin);
// turn the ledPin on
digitalWrite(ledPin, HIGH);
// stop the program for milliseconds:
delay(sensorValue);
// turn the ledPin off:
digitalWrite(ledPin, LOW);
// stop the program for for milliseconds:
delay(sensorValue);
}

Circuit 13:

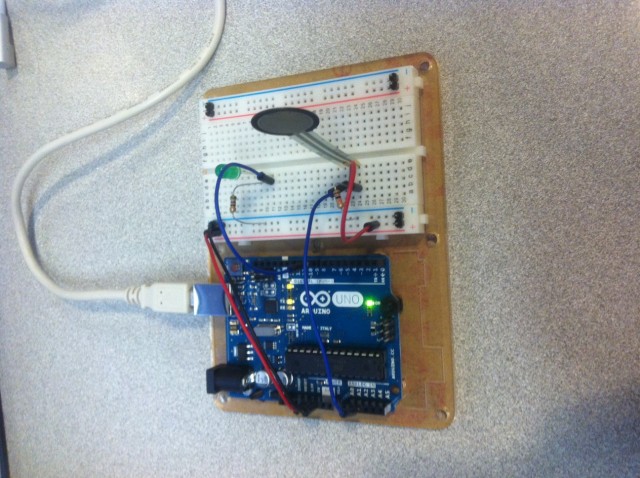
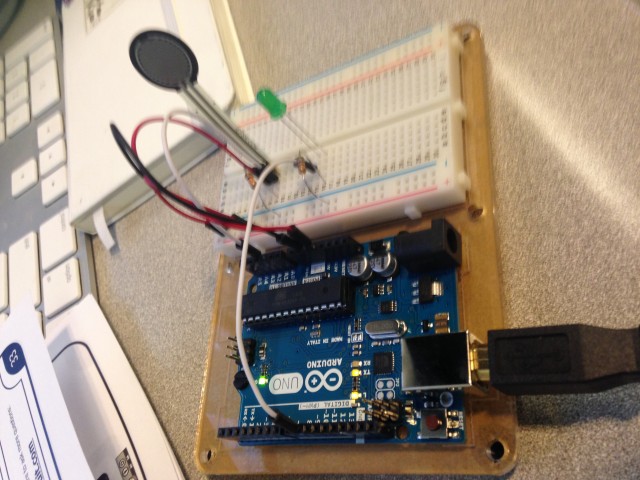
Project 13 setup: (Circuit 13)

In action:

pro13

diagram diagram

Code:


/*
/*
 * Force Sensitive Resistor Test Code
 *
 * The intensity of the LED will vary with the amount of pressure on the sensor
 */

int sensePin = 2;    // the pin the FSR is attached to
int ledPin = 9;      // the pin the LED is attached to (use one capable of PWM)

void setup() {
  Serial.begin(9600);
  pinMode(ledPin, OUTPUT);  // declare the ledPin as an OUTPUT
}

void loop() {
  int value = analogRead(sensePin) / 4; //the voltage on the pin divded by 4 (to scale from 10 bits (0-1024) to 8 (0-255)
  analogWrite(ledPin, value);        //sets the LEDs intensity proportional to the pressure on the sensor
  Serial.println(value);              //print the value to the debug window
}
Written by Comments Off on Assignment-10B: Variable Resistors (Circuits 08 & 13) Posted in Assignment-10B

Circuit 08/13

video
MOV_6319 (1)

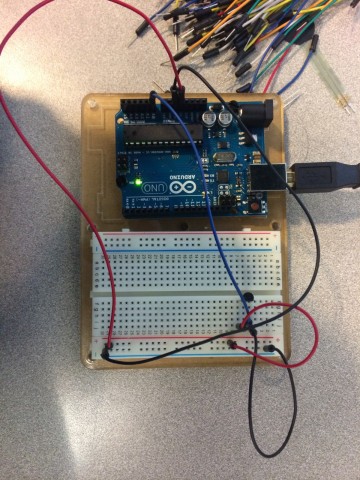
picture
IMG_0149 (1)

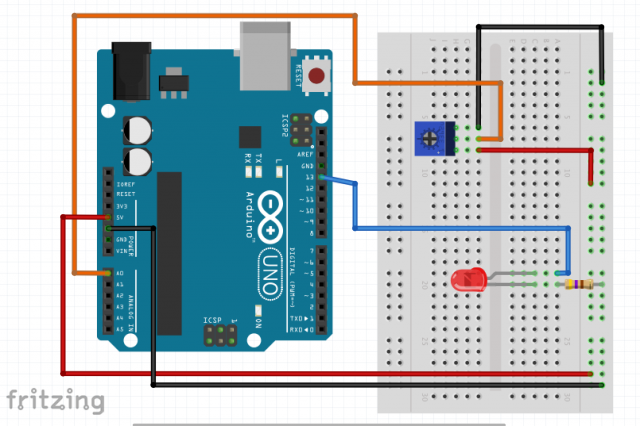
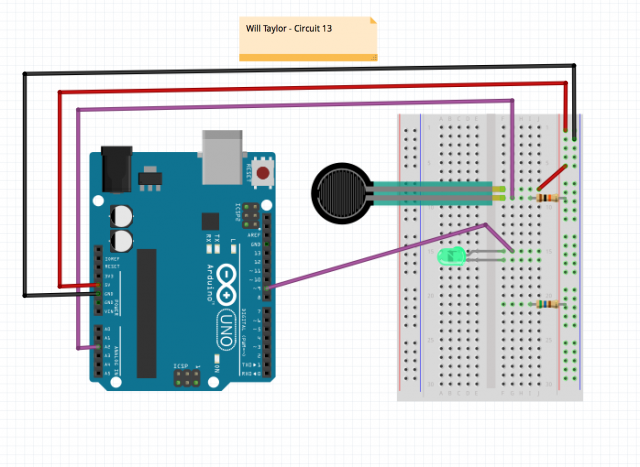
fritzing diagram
Screen Shot 2014-10-30 at 6.53.00 PM

code
/*
  Analog Input
 Demonstrates analog input by reading an analog sensor on analog pin 0 and
 turning on and off a light emitting diode(LED)  connected to digital pin 13. 
 The amount of time the LED will be on and off depends on
 the value obtained by analogRead(). 
 
 The circuit:
 * Potentiometer attached to analog input 0
 * center pin of the potentiometer to the analog pin
 * one side pin (either one) to ground
 * the other side pin to +5V
 * LED anode (long leg) attached to digital output 13
 * LED cathode (short leg) attached to ground
 
 * Note: because most Arduinos have a built-in LED attached 
 to pin 13 on the board, the LED is optional.
 
 
 Created by David Cuartielles
 modified 30 Aug 2011
 By Tom Igoe
 
 This example code is in the public domain.
 
 http://arduino.cc/en/Tutorial/AnalogInput
 
 */

int sensorPin = A0;    // select the input pin for the potentiometer
int ledPin = 13;      // select the pin for the LED
int sensorValue = 0;  // variable to store the value coming from the sensor

void setup() {
  // declare the ledPin as an OUTPUT:
  pinMode(ledPin, OUTPUT);  
}

void loop() {
  // read the value from the sensor:
  sensorValue = analogRead(sensorPin);    
  // turn the ledPin on
  digitalWrite(ledPin, HIGH);  
  // stop the program for <sensorValue> milliseconds:
  delay(sensorValue);          
  // turn the ledPin off:        
  digitalWrite(ledPin, LOW);   
  // stop the program for for <sensorValue> milliseconds:
  delay(sensorValue);                  
}

Assignment 10: Variable Resistors

Twisting Variable Resistor

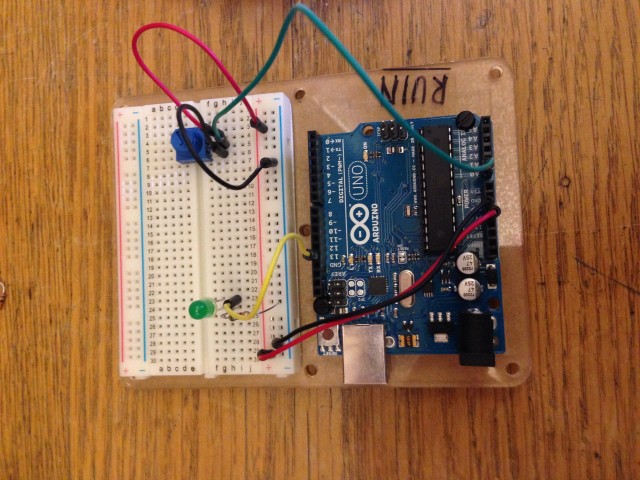
IMG_1085

TwistingPotentiometer_bb

int sensorPin = 0;    // select the input pin for the potentiometer
int ledPin = 13;      // select the pin for the LED
int sensorValue = 0;  // variable to store the value coming from the sensor

void setup() {
  // declare the ledPin as an OUTPUT:
  pinMode(ledPin, OUTPUT);  
}

void loop() {
  // read the value from the sensor:
  sensorValue = analogRead(sensorPin);    
  // turn the ledPin on
  digitalWrite(ledPin, HIGH);  
  // stop the program for  milliseconds:
  delay(sensorValue);          
  // turn the ledPin off:        
  digitalWrite(ledPin, LOW);   
  // stop the program for for  milliseconds:
  delay(sensorValue);                  
}

FSR

IMG_1087

FSR_bb

int sensePin = 2;    // the pin the FSR is attached to
int ledPin = 9;      // the pin the LED is attached to (use one capable of PWM)

void setup() {
  Serial.begin(9600);
  pinMode(ledPin, OUTPUT);  // declare the ledPin as an OUTPUT
}

void loop() {
  int value = analogRead(sensePin) / 4; //the voltage on the pin divded by 4 (to scale from 10 bits (0-1024) to 8 (0-255)
  analogWrite(ledPin, value);        //sets the LEDs intensity proportional to the pressure on the sensor
  Serial.println(value);              //print the value to the debug window
}


Variable Resistors – WHT

http://youtu.be/Dn_k3N2Y9QE – Circuit 08

http://youtu.be/YWa1vtchHV4 – Circuit 13

Circuit 08

Screen Shot 2014-10-29 at 6.14.29 PM

C08Pic

Circuit 13

Screen Shot 2014-10-29 at 6.13.47 PM

C13Pic

// Will Taylor
// Circuit 8

/* Analog Input

 * Demonstrates analog input by reading an analog sensor on analog 

 * pin 0 and turning on and off a light emitting diode(LED) connected to 

digital pin 13. 

 * The amount of time the LED will be on and off depends on the value obtained by 

 * analogRead().

 * Created by David Cuartielles

 * Modified 16 Jun 2009

 * By Tom Igoe

 * http://arduino.cc/en/Tutorial/AnalogInput

 */

int sensorPin = 0; // select the input pin for the potentiometer

int ledPin = 13; // select the pin for the LED

int sensorValue = 0; // variable to store the value coming from the sensor

void setup() {

 pinMode(ledPin, OUTPUT); //declare the ledPin as an OUTPUT:

}

void loop() {

 sensorValue = analogRead(sensorPin);// read the value from the sensor:

 digitalWrite(ledPin, HIGH); // turn the ledPin on

 delay(sensorValue); // stop the program for  milliseconds:

 digitalWrite(ledPin, LOW); // turn the ledPin off: 

 delay(sensorValue); // stop the program for for  milliseconds:

}

// Will Taylor
// Circuit 13

/*
 * Force Sensitive Resistor Test Code
 *
 * The intensity of the LED will vary with the amount of pressure on the sensor
 */

int sensePin = 2;    // the pin the FSR is attached to
int ledPin = 9;      // the pin the LED is attached to (use one capable of PWM)

void setup() {
  Serial.begin(9600);
  pinMode(ledPin, OUTPUT);  // declare the ledPin as an OUTPUT
}

void loop() {
  int value = analogRead(sensePin) / 4; //the voltage on the pin divded by 4 (to scale from 10 bits (0-1024) to 8 (0-255)
  analogWrite(ledPin, value);        //sets the LEDs intensity proportional to the pressure on the sensor
  Serial.println(value);              //print the value to the debug window
}

Twisting and Squeezing


photo 4


photo 3

Squeezing

Potentiometers


Squeezing

<

/*
* Force Sensitive Resistor Test Code
*
* The intensity of the LED will vary with the amount of pressure on the sensor
*/

int sensePin = 2; // the pin the FSR is attached to
int ledPin = 9; // the pin the LED is attached to (use one capable of PWM)

void setup() {
Serial.begin(9600);
pinMode(ledPin, OUTPUT); // declare the ledPin as an OUTPUT
}

void loop() {
int value = analogRead(sensePin) / 4; //the voltage on the pin divded by 4 (to scale from 10 bits (0-1024) to 8 (0-255)
analogWrite(ledPin, value); //sets the LEDs intensity proportional to the pressure on the sensor
Serial.println(value); //print the value to the debug window
}
Twisting

/*
Analog Input
Demonstrates analog input by reading an analog sensor on analog pin 0 and
turning on and off a light emitting diode(LED) connected to digital pin 13.
The amount of time the LED will be on and off depends on
the value obtained by analogRead().

The circuit:
* Potentiometer attached to analog input 0
* center pin of the potentiometer to the analog pin
* one side pin (either one) to ground
* the other side pin to +5V
* LED anode (long leg) attached to digital output 13
* LED cathode (short leg) attached to ground

* Note: because most Arduinos have a built-in LED attached
to pin 13 on the board, the LED is optional.

Created by David Cuartielles
Modified 16 Jun 2009
By Tom Igoe

http://arduino.cc/en/Tutorial/AnalogInput

*/

int sensorPin = 0; // select the input pin for the potentiometer
int ledPin = 13; // select the pin for the LED
int sensorValue = 0; // variable to store the value coming from the sensor

void setup() {
// declare the ledPin as an OUTPUT:
pinMode(ledPin, OUTPUT);
}

void loop() {
// read the value from the sensor:
sensorValue = analogRead(sensorPin);
// turn the ledPin on
digitalWrite(ledPin, HIGH);
// stop the program for milliseconds:
delay(sensorValue);
// turn the ledPin off:
digitalWrite(ledPin, LOW);
// stop the program for for milliseconds:
delay(sensorValue);
}

Arduino 08 and 13

int sensorPin = 0; // select the input pin for the potentiometer
int ledPin = 13; // select the pin for the LED
int sensorValue = 0; // variable to store the value coming from the sensor
void setup() {
 pinMode(ledPin, OUTPUT); //declare the ledPin as an OUTPUT:
}
void loop() {
 sensorValue = analogRead(sensorPin);// read the value from the sensor:
 digitalWrite(ledPin, HIGH); // turn the ledPin on
 delay(sensorValue); // stop the program for  milliseconds:
 digitalWrite(ledPin, LOW); // turn the ledPin off: 
 delay(sensorValue); // stop the program for for  milliseconds:
}

int sensePin = 2; // the pin the FSR is attached to
int ledPin = 9; // the pin the LED is attached to (use one capable of PWM)
void setup() {
 Serial.begin(9600);
 pinMode(ledPin, OUTPUT); // declare the ledPin as an OUTPUT
}
void loop() {
 int value = analogRead(sensePin) / 4; //the voltage on the pin divded by 4 (to 
 //scale from 10 bits (0-1024) to 8 (0-255)
 analogWrite(ledPin, value); //sets the LEDs intensity proportional to 
 //the pressure on the sensor
 Serial.println(value); //print the value to the debug window
}

#8/#13

#8

8

8

#13

13

for some reason this one’s video dropped in quality and I have no idea why it happened…

13

codes (first one is 8, second is 13)

/*
  Analog Input
 Demonstrates analog input by reading an analog sensor on analog pin 0 and
 turning on and off a light emitting diode(LED)  connected to digital pin 13. 
 The amount of time the LED will be on and off depends on
 the value obtained by analogRead(). 
 
 The circuit:
 * Potentiometer attached to analog input 0
 * center pin of the potentiometer to the analog pin
 * one side pin (either one) to ground
 * the other side pin to +5V
 * LED anode (long leg) attached to digital output 13
 * LED cathode (short leg) attached to ground
 
 * Note: because most Arduinos have a built-in LED attached 
 to pin 13 on the board, the LED is optional.
 
 
 Created by David Cuartielles
 Modified 16 Jun 2009
 By Tom Igoe
 
 http://arduino.cc/en/Tutorial/AnalogInput
 
 */

int sensorPin = 0;    // select the input pin for the potentiometer
int ledPin = 13;      // select the pin for the LED
int sensorValue = 0;  // variable to store the value coming from the sensor

void setup() {
  // declare the ledPin as an OUTPUT:
  pinMode(ledPin, OUTPUT);  
}

void loop() {
  // read the value from the sensor:
  sensorValue = analogRead(sensorPin);    
  // turn the ledPin on
  digitalWrite(ledPin, HIGH);  
  // stop the program for  milliseconds:
  delay(sensorValue);          
  // turn the ledPin off:        
  digitalWrite(ledPin, LOW);   
  // stop the program for for  milliseconds:
  delay(sensorValue);                  
}
/*
 * Force Sensitive Resistor Test Code
 *
 * The intensity of the LED will vary with the amount of pressure on the sensor
 */

int sensePin = 2;    // the pin the FSR is attached to
int ledPin = 9;      // the pin the LED is attached to (use one capable of PWM)

void setup() {
  Serial.begin(9600);
  pinMode(ledPin, OUTPUT);  // declare the ledPin as an OUTPUT
}

void loop() {
  int value = analogRead(sensePin) / 4; //the voltage on the pin divded by 4 (to scale from 10 bits (0-1024) to 8 (0-255)
  analogWrite(ledPin, value);        //sets the LEDs intensity proportional to the pressure on the sensor
  Serial.println(value);              //print the value to the debug window
}

Proximity Sensor experiment

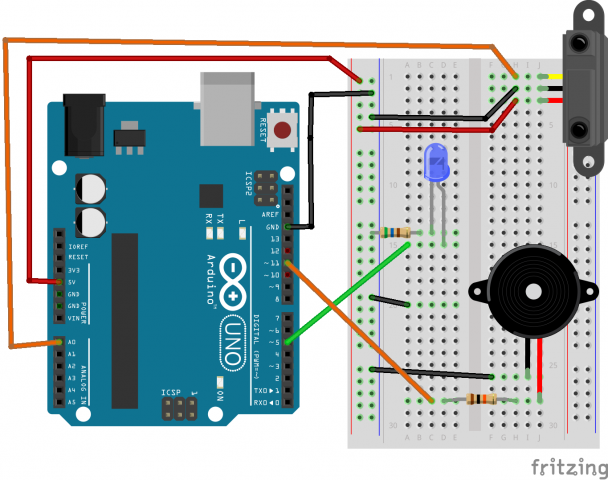
Rather than wiring up the given diagrams for sensors from the book, I made a circuit using something I hadn’t used before. I made a simple circuit which plays tones based on a value measured from a proximity sensor.

Here is the video:

Here is the fritzing diagram:

proximity_mbk

Here is the code:

/* 
 * Proximity instrument
 * This is totally not anything like a theramin.
 * Author: Matthew Kellogg
 * Date: October 22, 2014
 */
int ledPin = 5;    // LED connected to digital pin 9

void setup()  { 
  pinMode(ledPin, OUTPUT);
  Serial.begin(9600);
} 

static const int thresh = 160;

void loop()  {
  int val = analogRead(0);
  if (val > thresh){
    analogWrite(ledPin, map(val, 30, 950, 0, 255));
    tone(11, map(val, thresh, 950, 60, 4400));
  } else { 
    analogWrite(ledPin, 0);
    noTone(11);
  }
}


Assignment10B

https://www.youtube.com/watch?v=HwhaKQGPgNk&feature=youtu.be20141022_192602

CIRC-08


/*
  Analog Input
 Demonstrates analog input by reading an analog sensor on analog pin 0 and
 turning on and off a light emitting diode(LED)  connected to digital pin 13. 
 The amount of time the LED will be on and off depends on
 the value obtained by analogRead(). 
 
 The circuit:
 * Potentiometer attached to analog input 0
 * center pin of the potentiometer to the analog pin
 * one side pin (either one) to ground
 * the other side pin to +5V
 * LED anode (long leg) attached to digital output 13
 * LED cathode (short leg) attached to ground
 
 * Note: because most Arduinos have a built-in LED attached 
 to pin 13 on the board, the LED is optional.
 
 
 Created by David Cuartielles
 modified 30 Aug 2011
 By Tom Igoe
 
 This example code is in the public domain.
 
 http://arduino.cc/en/Tutorial/AnalogInput
 
 */
 
int sensorPin = A0;    // select the input pin for the potentiometer
int ledPin = 13;      // select the pin for the LED
int sensorValue = 0;  // variable to store the value coming from the sensor
 
void setup() {
  // declare the ledPin as an OUTPUT:
  pinMode(ledPin, OUTPUT);  
}
 
void loop() {
  // read the value from the sensor:
  sensorValue = analogRead(sensorPin);    
  // turn the ledPin on
  digitalWrite(ledPin, HIGH);  
  // stop the program for  milliseconds:
  delay(sensorValue);          
  // turn the ledPin off:        
  digitalWrite(ledPin, LOW);   
  // stop the program for for  milliseconds:
  delay(sensorValue);                  
}

https://www.youtube.com/watch?v=0-Ttohk-uS8&feature=youtu.be20141026_142633CIRC-13


/*
 * Force Sensitive Resistor Test Code
 *
 * The intensity of the LED will vary with the amount of pressure on the sensor
 */
 
int sensePin = 2;    // the pin the FSR is attached to
int ledPin = 9;      // the pin the LED is attached to (use one capable of PWM)
 
void setup() {
  Serial.begin(9600);
  pinMode(ledPin, OUTPUT);  // declare the ledPin as an OUTPUT
}
 
void loop() {
  int value = analogRead(sensePin) / 4; //the voltage on the pin divded by 4 (to scale from 10 bits (0-1024) to 8 (0-255)
  analogWrite(ledPin, value);        //sets the LEDs intensity proportional to the pressure on the sensor
  Serial.println(value);              //print the value to the debug window
}