Temp

<

/*     ———————————————————
* | Arduino Experimentation Kit Example Code |
* | CIRC-10 .: Temperature :. (TMP36 Temperature Sensor) |
* ———————————————————
*
* A simple program to output the current temperature to the IDE’s debug window
*
* For more details on this circuit: http://tinyurl.com/c89tvd
*/

//TMP36 Pin Variables
int temperaturePin = 0; //the analog pin the TMP36’s Vout (sense) pin is connected to
//the resolution is 10 mV / degree centigrade
//(500 mV offset) to make negative temperatures an option

/*
* setup() – this function runs once when you turn your Arduino on
* We initialize the serial connection with the computer
*/
void setup()
{
Serial.begin(9600); //Start the serial connection with the copmuter
//to view the result open the serial monitor
//last button beneath the file bar (looks like a box with an antenae)
}

void loop() // run over and over again
{
float temperature = getVoltage(temperaturePin); //getting the voltage reading from the tem
//perature sensor
temperature = (temperature – .5) * 100; //converting from 10 mv per degree wit 500
// mV offset
//to degrees ((volatge – 500mV) times 100)
Serial.println(temperature); //printing the result
delay(1000); //waiting a second
}

/*
* getVoltage() – returns the voltage on the analog input defined by
* pin
*/
float getVoltage(int pin){
return (analogRead(pin) * .004882814); //converting from a 0 to 1023 digital range
// to 0 to 5 volts (each 1 reading equals ~ 5 milliv
//olts
}

Arduino 10

int temperaturePin = 0;
void setup(){
Serial.begin(9600);
}
void loop(){
float temperature = getVoltage(temperaturePin);
temperature = (temperature - .5) * 100;
Serial.println(temperature);
delay(1000);}

float getVoltage(int pin){
return (analogRead(pin)* .004882814);
}

Twisting and Squeezing


photo 4


photo 3

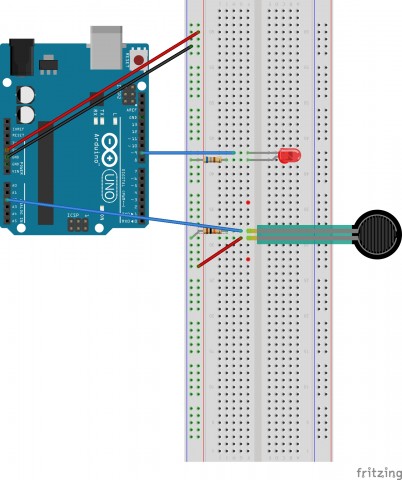
Squeezing

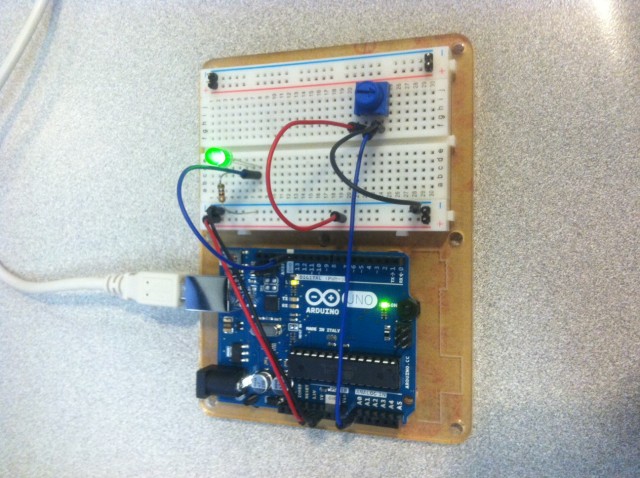
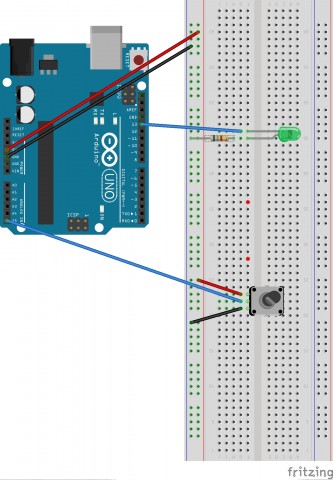
Potentiometers


Squeezing

<

/*
* Force Sensitive Resistor Test Code
*
* The intensity of the LED will vary with the amount of pressure on the sensor
*/

int sensePin = 2; // the pin the FSR is attached to
int ledPin = 9; // the pin the LED is attached to (use one capable of PWM)

void setup() {
Serial.begin(9600);
pinMode(ledPin, OUTPUT); // declare the ledPin as an OUTPUT
}

void loop() {
int value = analogRead(sensePin) / 4; //the voltage on the pin divded by 4 (to scale from 10 bits (0-1024) to 8 (0-255)
analogWrite(ledPin, value); //sets the LEDs intensity proportional to the pressure on the sensor
Serial.println(value); //print the value to the debug window
}

Twisting

/*
Analog Input
Demonstrates analog input by reading an analog sensor on analog pin 0 and
turning on and off a light emitting diode(LED) connected to digital pin 13.
The amount of time the LED will be on and off depends on
the value obtained by analogRead().

The circuit:
* Potentiometer attached to analog input 0
* center pin of the potentiometer to the analog pin
* one side pin (either one) to ground
* the other side pin to +5V
* LED anode (long leg) attached to digital output 13
* LED cathode (short leg) attached to ground

* Note: because most Arduinos have a built-in LED attached
to pin 13 on the board, the LED is optional.

Created by David Cuartielles
Modified 16 Jun 2009
By Tom Igoe

http://arduino.cc/en/Tutorial/AnalogInput

*/

int sensorPin = 0; // select the input pin for the potentiometer
int ledPin = 13; // select the pin for the LED
int sensorValue = 0; // variable to store the value coming from the sensor

void setup() {
// declare the ledPin as an OUTPUT:
pinMode(ledPin, OUTPUT);
}

void loop() {
// read the value from the sensor:
sensorValue = analogRead(sensorPin);
// turn the ledPin on
digitalWrite(ledPin, HIGH);
// stop the program for milliseconds:
delay(sensorValue);
// turn the ledPin off:
digitalWrite(ledPin, LOW);
// stop the program for for milliseconds:
delay(sensorValue);
}

Arduino 08 and 13

int sensorPin = 0; // select the input pin for the potentiometer
int ledPin = 13; // select the pin for the LED
int sensorValue = 0; // variable to store the value coming from the sensor
void setup() {
 pinMode(ledPin, OUTPUT); //declare the ledPin as an OUTPUT:
}
void loop() {
 sensorValue = analogRead(sensorPin);// read the value from the sensor:
 digitalWrite(ledPin, HIGH); // turn the ledPin on
 delay(sensorValue); // stop the program for  milliseconds:
 digitalWrite(ledPin, LOW); // turn the ledPin off: 
 delay(sensorValue); // stop the program for for  milliseconds:
}

int sensePin = 2; // the pin the FSR is attached to
int ledPin = 9; // the pin the LED is attached to (use one capable of PWM)
void setup() {
 Serial.begin(9600);
 pinMode(ledPin, OUTPUT); // declare the ledPin as an OUTPUT
}
void loop() {
 int value = analogRead(sensePin) / 4; //the voltage on the pin divded by 4 (to 
 //scale from 10 bits (0-1024) to 8 (0-255)
 analogWrite(ledPin, value); //sets the LEDs intensity proportional to 
 //the pressure on the sensor
 Serial.println(value); //print the value to the debug window
}

Assignment 10_Sensor Display: RandomPointillism

800px-A_Sunday_on_La_Grande_Jatte,_Georges_Seurat,_1884

Pointillism is a way of painting where every dot that is painted is calculated through scientific rules that Seurat had created. It uses pure colour and is carefully placed. Since I wanted to go against this scientific method I created a machine where people can play with the pointillism. Not 100 percent can be controlled by the interacting person but some parts can be.

20141029_155739

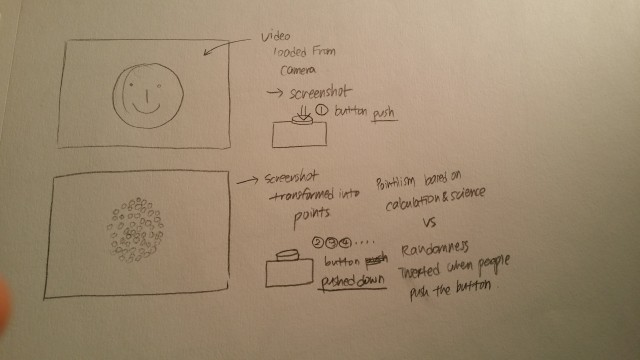
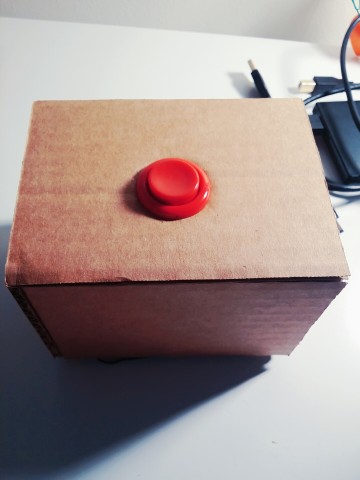
In my project, the person first uses the button to capture the screen. Then the screen is turned into a canvas where it starts placing dots according to the original photo colours. However, when the person pushes the button down, randomness is added to the dots. The colours and sizes and density is changed to random scale which was my way of interacting with the painting that processing was making.

IMG_20141029_154855

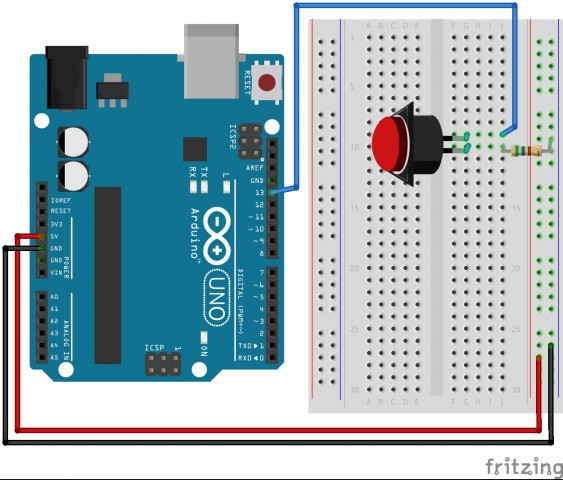
Sensor_Display


Code for the Arduino

int buttonState = 0;         // variable for reading the pushbutton status

void setup() {       
 Serial.begin(9600); 
}

void loop(){
  // read the state of the pushbutton value:
  buttonState = digitalRead(13);
  // check if the pushbutton is pressed.
  // if it is, the buttonState is HIGH:
  Serial.println(buttonState);
  delay(100);
}

Code for the Processing

import processing.video.*; 
import processing.serial.*;

Serial myPort;
char val;
float sizeR;
float randomC; 
float lightness;

PImage img;

Capture myCapture; 

String filename = "portrait.jpg"; 

void setup () { 
  size (640, 480); 
  myCapture = new Capture(this, width, height, 30); 
  myCapture.start();
  
  String portName = Serial.list()[2]; 
  myPort = new Serial(this, portName, 9600);
  
  background(255);
  smooth();
} 

void captureEvent (Capture myCapture) { 
  myCapture.read (); 
} 

void draw() { 
  File f = new File(dataPath(filename));
  println(dataPath(filename), f.exists());
  if(f.exists()){
  img = loadImage("portrait.jpg");
  
  if (myPort.available() > 0){
    val = (char) myPort.read();
  }
  
  if (val == 48){
    sizeR = random(10,40);
    randomC = 100;
    lightness = random(50,150);
  }else{
    sizeR = 15;
    randomC = 0;
    lightness = 100;
  }
  
  pointilism();
  }else{
    image (myCapture, 0, 0); 
    
    if (myPort.available() > 0){
      val = (char) myPort.read();
    }
  
    if (val == 48){
      myCapture.stop();    
      save("data/portrait.jpg");
      background(255);
    }
  }
} 

void pointilism(){
  
  int x = int(random(img.width));
  int y = int(random(img.height));
  int loc = x + y*img.width;

  loadPixels();
  float r = red(img.pixels[loc]);
  float g = green(img.pixels[loc]);
  float b = blue(img.pixels[loc]);
  
  noStroke();
  fill(random(r-randomC,r+randomC),random(g-randomC,g+randomC),
  random(b-randomC,b+randomC),lightness);
  ellipse(x,y,sizeR,sizeR); 
}

Arduino 07

 int ledPin = 13; // choose the pin for the LED
int inputPin = 2; // choose the input pin (for a pushbutton)
int val = 0; // variable for reading the pin status
void setup() {
 pinMode(ledPin, OUTPUT); // declare LED as output
 pinMode(inputPin, INPUT); // declare pushbutton as input
}
void loop(){
 val = digitalRead(inputPin); // read input value
 if (val == HIGH) { // check if the input is HIGH
 digitalWrite(ledPin, LOW); // turn LED OFF
 } else {
 digitalWrite(ledPin, HIGH); // turn LED ON
 }
}


SUPERMAN [MINI]

superman2

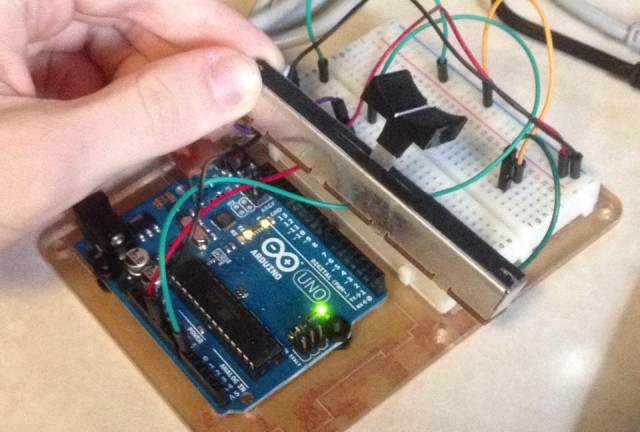
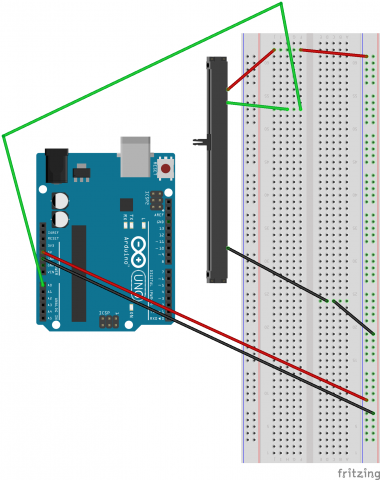
For my project I did a classic dodging game, modeled after retro games, with the resolution of the frame matching that of a Gameboy Advance. Controls are done through a slider (up/down movement).

ARTWORK by Adam Knuckey (my friend)

To Do for future: variable levels (after 30 or 60 seconds) with increase in speed, number of clouds, and perhaps size of clouds.

Video:

10577626_1553673304866063_2037513627_nSliderSketch

Arduino code:

int sensorPin = 0; // select the input pin for the potentiometer
int ledPin = 13; // select the pin for the LED
int sensorValue = 0; // variable to store the value coming from the sensor

void setup() 
{
//initialize serial communications at a 9600 baud rate
Serial.begin(9600);
}

void loop()
{
sensorValue = analogRead(sensorPin);// read the value from the sensor:
Serial.println(sensorValue);
delay(25);
}

Processing code:

import processing.serial.*;
import gifAnimation.*;

int[][] clouds = new int[10][4];
Animation man;

Serial myPort;  // Create object from Serial class
String val;     // Data received from the serial port
float pos = 0;
int size;
int speed;
boolean gameOver;
int level;
int millis;
int score;
PImage cld1;
PImage cld2;
int manX;


void setup() {
  size(240, 160);
  String portName = Serial.list()[9]; //change the 0 to a 1 or 2 etc. to match your port
  myPort = new Serial(this, portName, 9600);
  myPort.bufferUntil('\n');
  initialize();
  man = new Animation("man", 23);
}

void draw()
{

  textAlign(CENTER);
  background(#4AE8E8);
  textSize(14);
  text("Level "+level, width/7, height/8);
  textSize(11);
  text("Score: "+score, width/6, height/8+14);
  if ( myPort.available() > 0) {  
    val = myPort.readStringUntil('\n');
  } 
  if (millis>30000) {
    level++; 
    // speed++; 
    // size++;
  }
  millis = millis()%30000;
  if (val != null && !gameOver) {
    val = trim(val);
    pos = map(int(val), 295, 768, 10, height-10); //768
    pos = constrain(pos, 20, height-10);
    pos = height-pos;
    println(val+" "+pos);
  }
  noStroke();
  fill(255, 0, 0);

  man.display(width/7, pos);
  // ellipse(width/6, pos, 15, 15);

  for (int i=0; i<10; i++) {
    fill(255);
    if (clouds[i][2]==10) {
      image(cld1, width-clouds[i][0], clouds[i][1]);
    } else {
      image(cld2, width-clouds[i][0], clouds[i][1]);
    }
    //ellipse(width-clouds[i][0], clouds[i][1], size, size);
    if (manX >= width-clouds[i][0] && 
      manX < = width-clouds[i][0]+clouds[i][3]) {
      if (!gameOver) {
        score++;
      }
      if (pos <= clouds[i][1]+clouds[i][2] &&          pos+size >=clouds[i][1]) {
        gameOver=true;
        if (!gameOver) {
          score--;
        }
      }
    }
    if (!gameOver) {
      clouds[i][0]+=speed;
      if (clouds[i][0]>(width+20)) {
        clouds[i][0] = clouds[i][0]%int(random(1, 30));
        clouds[i][1]= int(random(0, height));
      }
    }
    if (gameOver) {
      textSize(28);
      text("Game Over", width/2, height/2);
      textSize(14);
      text("Press 'R' to play again", width/2, height/2+28);
    }
  }
  if (keyPressed) {
    if (key == 'r') {
      initialize();
    }
  }
}

void initialize() {
  for (int i=0; i<10; i++) {
    clouds[i][0] = int(random(-width*1.5, -10));
    clouds[i][1] = int(random(0, height));
    if (i%2==0) {
      clouds[i][2] = 10;
      clouds[i][3] = 20;
    } else {
      clouds[i][2] = 15;
      clouds[i][3] = 30;
    }
  }
  size = 9;
  manX = width/7+16;
  speed = 3;
  gameOver = false;
  level = 1;
  score = 0;
  cld1 = loadImage("cloud_small.png");
  cld2 = loadImage("cloud_big.png");
}

// Class for animating a sequence of GIFs

class Animation {
  PImage[] images;
  int imageCount;
  int frame;

  Animation(String imagePrefix, int count) {
    imageCount = count;
    images = new PImage[imageCount];

    for (int i = 0; i < imageCount; i++) {
      // Use nf() to number format 'i' into four digits
      String filename = imagePrefix + nf(i, 4) + ".gif";
      images[i] = loadImage(filename);
    }
  }

  void display(float xpos, float ypos) {
    frame = (frame+1) % imageCount;
    image(images[frame], xpos, ypos);
  }

  int getWidth() {
    return images[0].width;
  }
}


Sensor Display


In the Cave from Elizabeth Agyemang on Vimeo.
A week ago I was handed a box filled with all sorts of strange gadgets and gizmos, little parts that could be connected to an Aurdino and used to create something, anything. That’s the task I was given to do. After scrumaging through the remaining items, I found myself drawn to two objects. The first was a simple white stick like object connected to a circlular base, a sparkfun potentiometer I learned. The device immediately felt reminiscent to a flash light, the way it twisted and turned in the same smooth and intuitive fashion. It was based on this encounter, that I created my program.
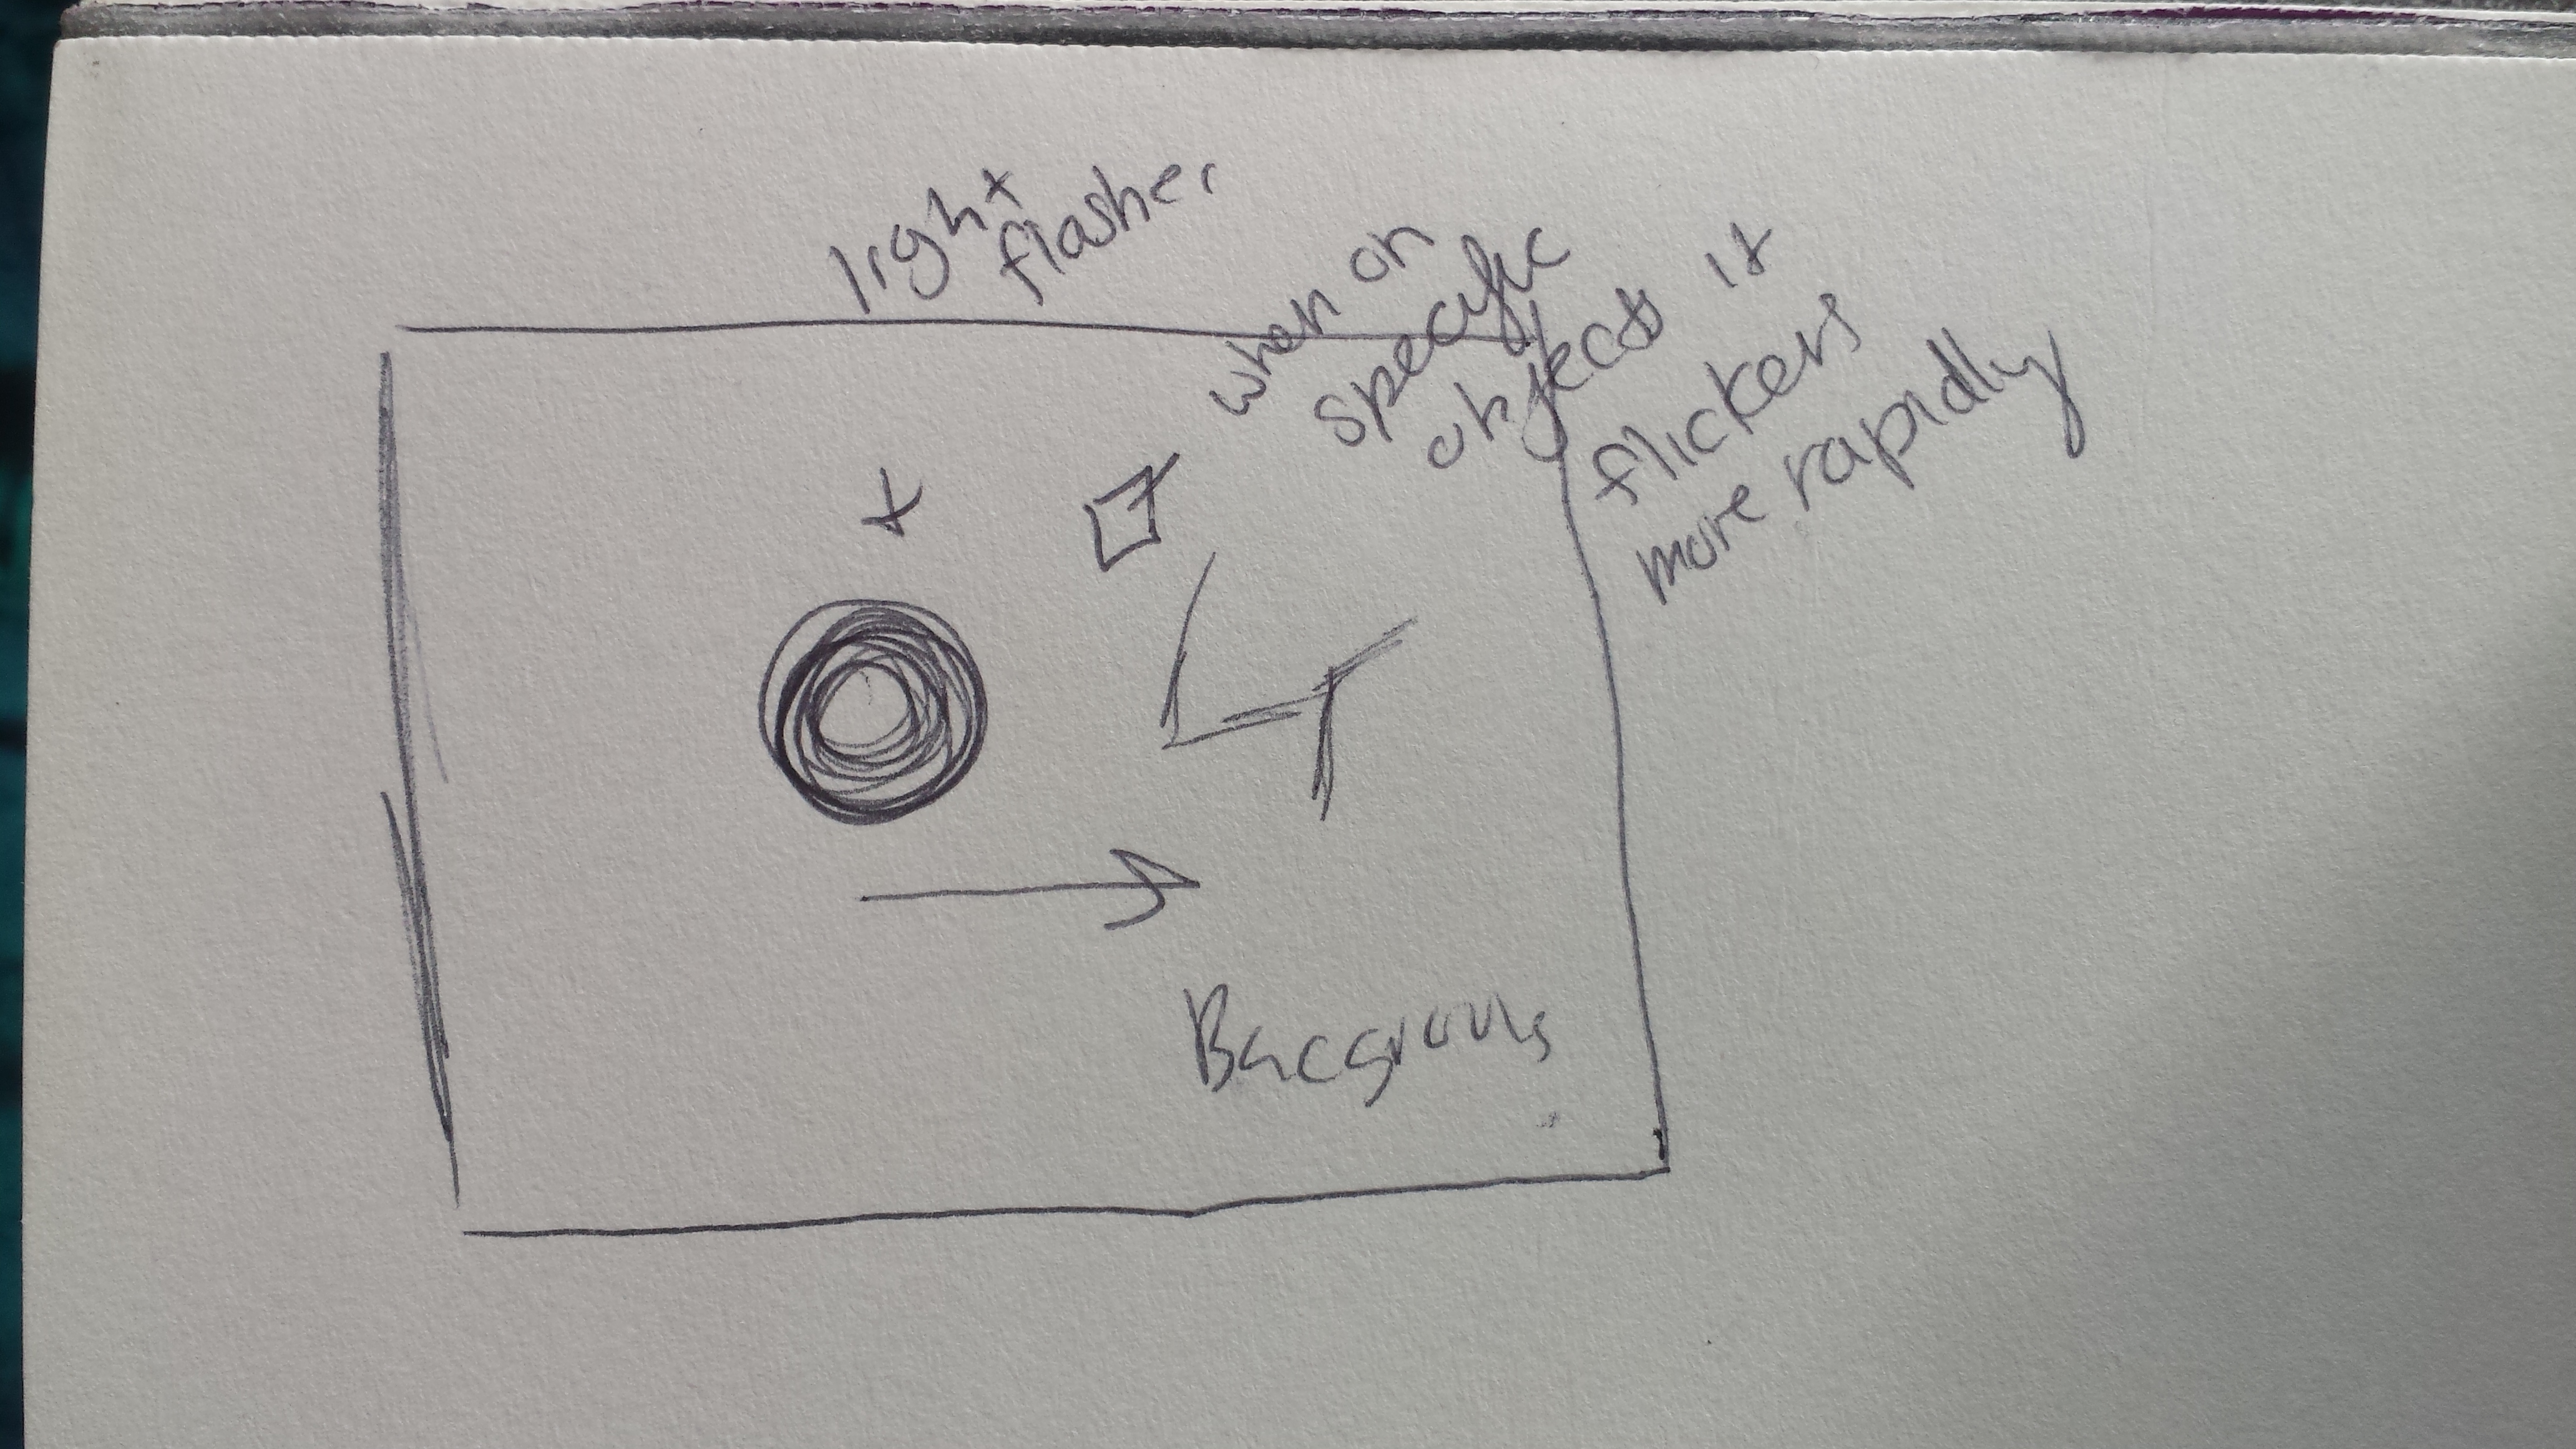
Concept Quick Sketch of the concept

The Cave, is not so much a game as it is an experience, at least, that’s what I envisioned it to be. Though the program is fully functional, including the changing the flashlight size and moving its x position on the screen, their is no audio of dripping water in the cave, no eerie voices or music to set the tone. At least, not yet.

How it Works:

Essentially the player is in control of two functions. You use the large, stick potentiometer to change the size of the flashlight, and the small blue one to shift it on the x-axis.
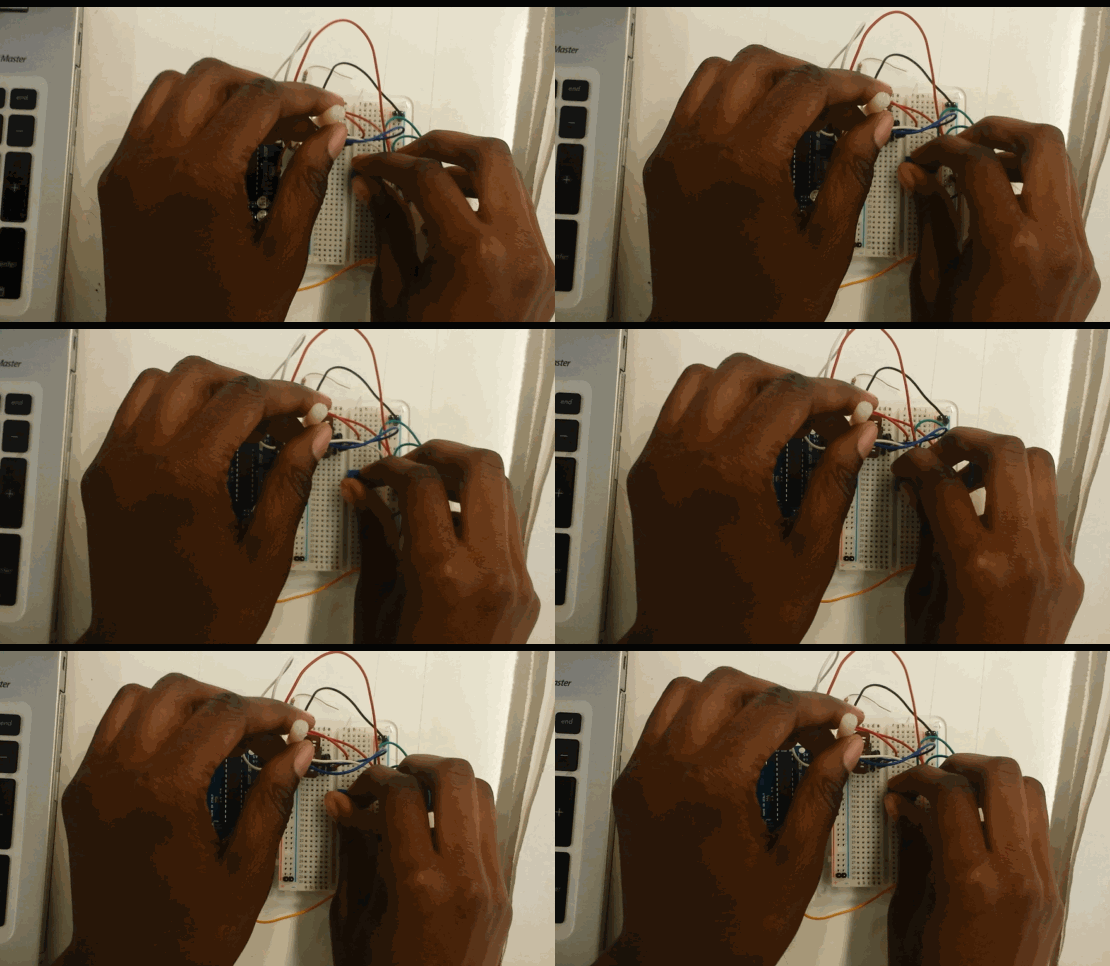
moving Playing the game

The goal of the game is to find all three clues which you do by pointing the flashlight across the screen. Once a clue is spotted the light will flicker wildly and then the play while be moved on different y-axis of the screen in order to find the next clue.

hallo final

Problems:

noticed with the sliding potentiometer I was having issues (it kept jumping from value to value randomly), so I switched to another twisting potentiometer which fixed the problem. Also, once the player hits the third clue, I’ve been having issues changing the screen. Hopefully with some more time and coding I’ll be able to fix these issues.
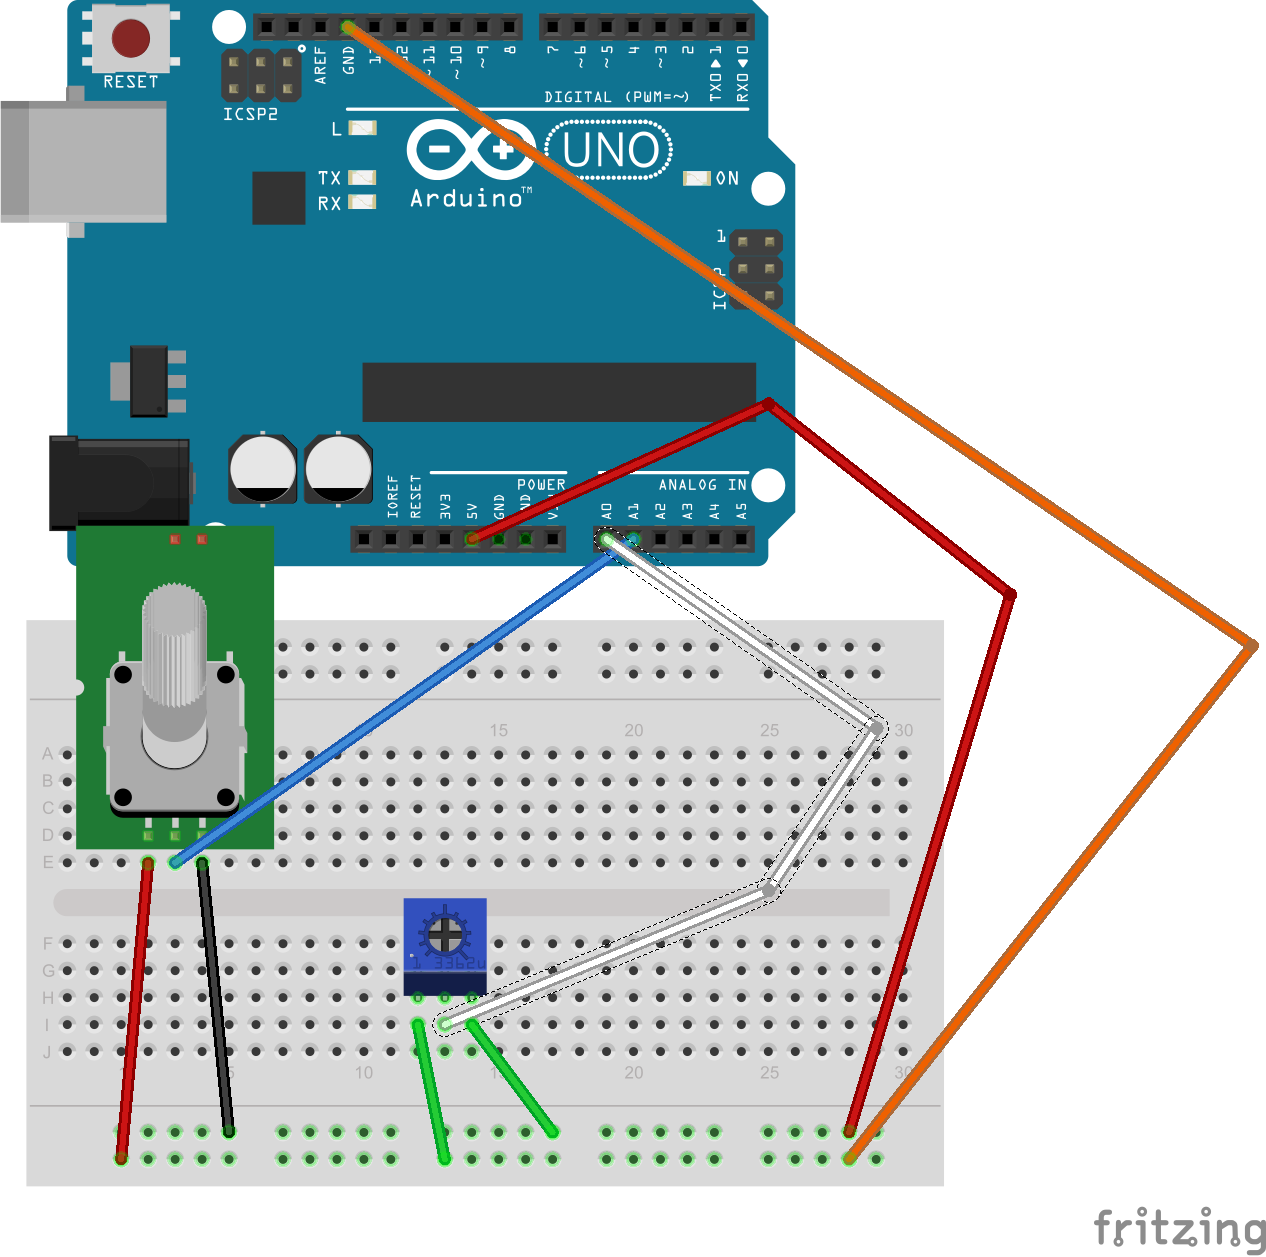
diagram diagram


//game in which you are trying to find 3 instances of murder. Once all three are found the image reveals itself

//background image

PImage backg0;
PImage back1;
PImage back2;
PImage mid3;
PImage mid4;
PImage fro5;
PImage fro6;
PImage fro7;


float lightx;
float lighty;
float opacity=300;
float opacityb=0;
float circ1=100;
float change=0;

//locations of the clues
float clue1x;
float clue2x;
float clue3x;


//blood stains/horror
PImage dripblood;
PImage bottomstain;
PImage hands;
PImage topstain;
PImage lizzie;
PImage crimescene;

float mecirc=50;
//big circle stuff
float bigcx;
float bigcy;


float circlebig=50;
float flashclick=0;

//moving lizzie
float move=753;


float secC=0;
//game counter, counting to see if the images have bee located
//begin at the top, go to middle, then go to the bottom

//load text "Something Happened Here..."
//find the clues
float gamecounter=0;

// This Processing program reads serial data for two sensors,
// presumably digitized by and transmitted from an Arduino. 
// It displays two rectangles whose widths are proportional
// to the values 0-1023 received from the Arduino.
 
// Import the Serial library and create a Serial port handler
import processing.serial.*;
Serial myPort;   
 
// Hey you! Use these variables to do something interesting. 
// If you captured them with analog sensors on the arduino, 
// They're probably in the range from 0 ... 1023:
int valueA;  // Sensor Value A
int valueB;  // Sensor Value B
int counter= valueA;
float outcircle;
//distance between flashlight and ci
 float d;
 float mapB;
 
void setup(){
 size(838,450);
 // List my available serial ports
  int nPorts = Serial.list().length; 
  for (int i=0; i < nPorts; i++) {
    println("Port " + i + ": " + Serial.list()[i]);
  } 
   // Choose which serial port to fetch data from. 
  // IMPORTANT: This depends on your computer!!!
  // Read the list of ports printed by the code above,
  // and try choosing the one like /dev/cu.usbmodem1411
  // On my laptop, I'm using port #4, but yours may differ.
  String portName = Serial.list()[2]; 
  myPort = new Serial(this, portName, 9600);
  serialChars = new ArrayList();
 
  //drawing the background
backg0= loadImage("0Background.png");
back1= loadImage("1back.png");
back2= loadImage("2back.png");

mid4= loadImage("4middle.png");
fro5= loadImage("5front.png");

fro6= loadImage("6front.png");
fro7= loadImage("7fronts.png");
mid3= loadImage("3middle.png");


//drawing the blood stain DONT FORGET BLUR
dripblood= loadImage("blood.png");
bottomstain= loadImage("bottomstain.png");
hands= loadImage("hidhands.png");
topstain= loadImage("top stain.png");
lizzie= loadImage("lizzie2.png");
 
opacity1= map(d,0,valueA,0,250);


}
float opacity1;

void draw(){
  // Process the serial data. This acquires freshest values. 
 //value of y
 lighty=250;
  processSerial();
 //background
  image(backg0,0,0);
  image(back1,48,-11);
  image(back2,-9,-2);
  image(mid3,506,87);
  image(mid4,287,257);
  image(fro5,0,32);
  image(fro7,324,385);
  image(fro6,284,146);
  
  //blood stains/horror
image(dripblood,636,-2);
image(bottomstain,-91,31);
image(hands,161,171);
image(topstain,-91,31);
image(lizzie,move,91);

  
  noStroke();
  smooth();
float cirx=80;
//mapping


 //bigger circles
 
for(bigcx=11; bigcx<width; bigcx=bigcx+58){
for(bigcy=26; bigcy<height;bigcy=bigcy+47){     //if the distance between the flashlight and the circles is less then 25 and          //mapping the opacity to the distance of the light source. as it increases so does the opacity         float d= dist(valueB,lighty,bigcx,bigcy); //  opacity1= map(d,0,valueA,0,250); //    if ((dist(valueB,lighty,bigcx,bigcy)<25)&&(valueA>=cirx)){
//      opacity1=0;
//      
//    }else{
//     opacity1=map(d,0,valueA,0,250);
//      
//    }
  
    if (valueA< =7){       opacity1=248;     }else{       opacity1=map(d,0,valueA,0,250);            }          fill(0,0,0, opacity1);//opacity1    ellipse(bigcx,bigcy,cirx,cirx); //  println("opacity1", opacity1, "valB:", valueB, "valA", valueA);               //locations of the clues       clue1x=248; clue2x=656; clue3x=832;               while ((valueB==clue3x)&&(gamecounter>2)){
     opacity1=0;
     
   }
   }
        
   //if the flashlight is on the clue add to counter and move to next line in image
  if((dist(valueB,lighty,clue1x,254)< =5)||(valueB==clue1x)){         secC= random(15);       gamecounter=1;           }else{     secC=secC;      lighty=lighty;        }    if (gamecounter==1){      lighty=10;                }    if ((dist(valueB, lighty, clue2x,13)<5)||(valueB==clue2x)&&(gamecounter>=1)&&(lighty==10)){
     
     secC= random(40);
     gamecounter=2;
     lighty=130;
          
   }
   
   if ((dist(valueB, lighty, clue3x,13)<5)||(lighty==130)||(gamecounter>=2) ){
     lighty=130;
     
     secC= random(40);
     gamecounter=3;
     
   }if((gamecounter==2)&&(valueB==clue3x)){
     gamecounter=3;
     opacity1=random(100);
     
   }
   if((gamecounter==3)&&(valueB==clue3x)){
     
    move= random(753);
     
     
   }


 }


   fill(255,200,0,0);
   rect(clue1x,254,5,5);
   rect(clue2x,13,5,5);
   rect(clue3x,140,5,5);
  //flashlight
    //change the blue, ie the last number to lighten it
  fill(254,255,0,25*1/2*secC);
  //the size of the flashlight is being mapped to the mouse
  lightx= map(mouseX,0,width,0,850);
//   lighty= map(valueB,0,height,0,200);
   
  ellipse(valueB, lighty,flashclick,flashclick);
  //main center circle
fill(254,255,0,secC);
  ellipse(valueB,lighty,valueA,valueA);
  //outside rim
  fill(254,255,0,secC*1/2);
  outcircle= valueA+(valueA+(valueA*1/2));
  ellipse(valueB,lighty, outcircle,outcircle);
  //changing the opacity of the flashlight
        if (valueA< =7){  
 secC=0;         
  counter=valueA;}         
 while((valueA>counter)){
         secCsecC+ 5;
          counter=valueA;
          
        }
        
         while (valueA 0) {
    char aChar = (char) myPort.read();
 
    // You'll need to add a block like one of these 
    // if you want to add a 3rd sensor:
    if (aChar == 'A') {
      bJustBuilt = false;
      whichValueToAccum = 0;
    } else if (aChar == 'B') {
      bJustBuilt = false;
      whichValueToAccum = 1;
    } else if (((aChar == 13) || (aChar == 10)) && (!bJustBuilt)) {
      // If we just received a return or newline character, build the number: 
      int accum = 0; 
      int nChars = serialChars.size(); 
      for (int i=0; i < nChars; i++) {int n = (nChars - i) - 1; int aDigit = ((Integer)(serialChars.get(i))).intValue();         
 accum += aDigit * (int)(pow(10, n));  }      
   // Set the global variable to the number we captured.     
 // You'll need to add another block like one of these      
  // if you want to add a 3rd sensor:  
 if (whichValueToAccum == 0) {valueA = accum;// println ("A = " + valueA)  } 
else if (whichValueToAccum == 1) {valueB = accum; // println ("B = " + valueB);}         
// Now clear the accumulator 
serialChars.clear();bJustBuilt = true;} 
else if ((aChar >= 48) && (aChar < = 57)) {
      // If the char is between '0' and '9', save it.
      int aDigit = (int)(aChar - '0'); 
      serialChars.add(aDigit);
    }
  }
}

Aurdion code:

// program reads two analog signals from two potentiometers 
 
int sensorValue0 = 0;  // variable to store the value coming from the sensor
int sensorValue1 = 0;  // variable to store the value coming from the other sensor
 
void setup() {
  Serial.begin(9600);  // initialize serial communications    
}
 
void loop() {
 
  // Read the value from the sensor(s):
  sensorValue0 = analogRead (A0);  // reads value from Analog input 0
  sensorValue1 = analogRead (A1);  // reads value from Analog input 1    
 
  Serial.print ("A"); 
  Serial.println (sensorValue0); 
  Serial.print ("B"); 
  Serial.println (sensorValue1);  
 
  delay (50);   // wait a fraction of a second 
}
 
/*
 
*/
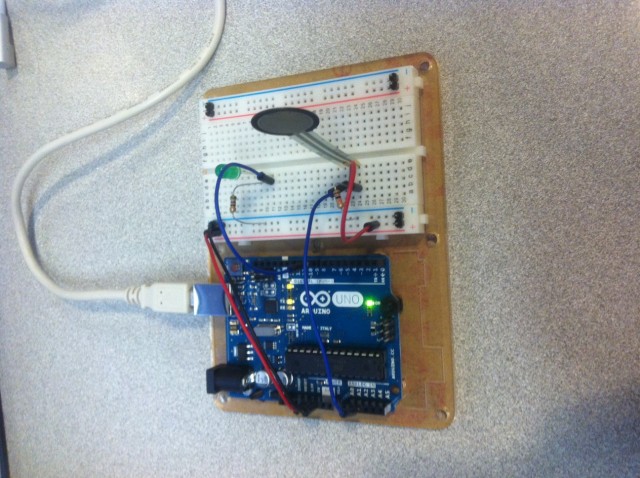
A catapult that almost works

So I sort of understand what’s wrong.
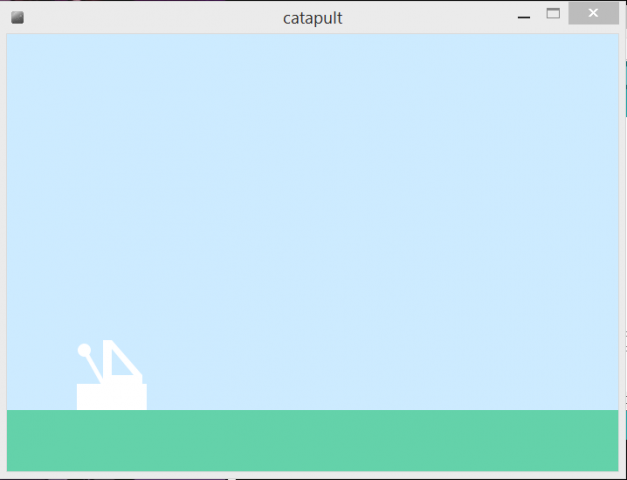
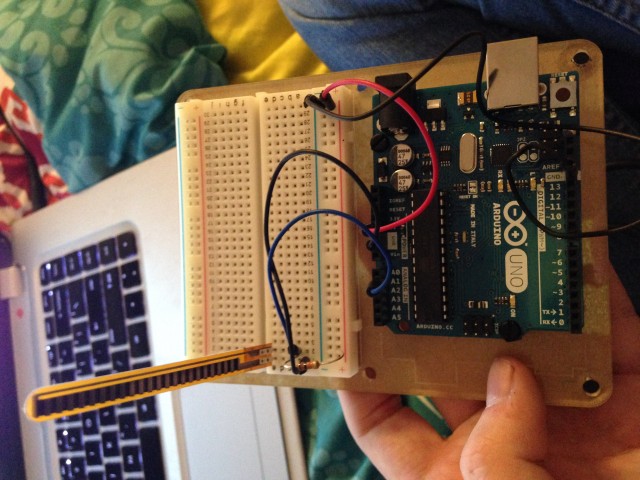
Basically, how it’s set up here is that I’m using the flex sensor to approximate a catapult; you bend the sensor and then release it, like a slingshot. In the code, it looks for that moment of release -when the values change drastically from much higher to much lower- and ideally that change in values would trigger the projectile to launch. I’ve gotten the catapult arm to move along with the flexing of the sensor, but for whatever reason the projectile fails to launch and I don’t quite understand why. I think it has something to do with the fact that it wants to launch the projectile when the value difference is >100, which if I’m right (which, as I’m a programming novice, I might not be) means that it will only launch the projectile if the difference is CONSTANTLY greater than 100. I think this is the reason mainly because the launch animation takes longer than a second, and a second is barely how long the difference in values remains greater than 100. So the period of time in which difference>100 isn’t sufficient for the entire projectile launch to occur, so therefore I’m witnessing nothing happening.
Or maybe I just frankensteined the codes together wrong.
(the code I’m using for the projectile is a modified version of the processing built-in example “Moving on Curves”)

Anyway, my concept was to use the flex sensor as what it pretty literally approximates, which is a catapult. It’s not a super sophisticated concept, but it seemed doable. As far as I’m concerned it still is, but it’ll require me to have a real knock-down drag-out battle with the code, which probably will result in me getting curbstomped by a computer. I’m happy I got the arm to move, at least.

catapult screenshot

flex sensor

flex

// This Processing program reads serial data for two sensors,
// presumably digitized by and transmitted from an Arduino. 
// It displays two rectangles whose widths are proportional
// to the values 0-1023 received from the Arduino.
 
// Import the Serial library and create a Serial port handler
import processing.serial.*;
Serial myPort;   
 
// Hey you! Use these variables to do something interesting. 
// If you captured them with analog sensors on the arduino, 
// They're probably in the range from 0 ... 1023:
int valueA;  // Sensor Value A
int valueB;  // Sensor Value B

int valueBPrevious;


//------------------------------------
void setup() {
  size(700,500);
  // List my available serial ports
  int nPorts = Serial.list().length; 
  for (int i=0; i < nPorts; i++) {     println("Port " + i + ": " + Serial.list()[i]);   }      // Choose which serial port to fetch data from.    // IMPORTANT: This depends on your computer!!!   // Read the list of ports printed by the code above,   // and try choosing the one like /dev/cu.usbmodem1411   // On my laptop, I'm using port #4, but yours may differ.   String portName = Serial.list()[0];    myPort = new Serial(this, portName, 9600);   serialChars = new ArrayList(); }   //------------------------------------ void draw() {     // Process the serial data. This acquires freshest values.    processSerial();      background(205,235,255);   noStroke();   fill(100,210,170);   rect(0,430, 700,500);    float x = map(valueB, 700,900, 130,50);  float y = map(valueB, 700,900, 320,400); //projectile variables float xcoord = x;        // Current x-coordinate float ycoord = y;        // Current y-coordinate float beginX = xcoord;  // Initial x-coordinate float beginY = ycoord;  // Initial y-coordinate float endX = 600;   // Final x-coordinate float endY = 430;   // Final y-coordinate float distX =endX-beginX;          // X-axis distance to move float distY=endY-beginY;          // Y-axis distance to move float exponent = 4;   // Determines the curve float step = 0.01;    // Size of each step along the path float pct = 0.0;      // Percentage traveled (0.0 to 1.0) //catapult base   fill (255);   rect(80,400, 80,30);   rect(110,390, 45,10);   rect(110,350, 10,40);   beginShape();     vertex(120,350);     vertex(120,360);     vertex(145,390);     vertex(155,390);   endShape(); //catapult arm   strokeWeight(5);   stroke(255);   line(110,400, x,y);   //curve motion adopted and modified from processing's example "moving on curves" //projectile somehow isn't working still, either go to office hours or pester mark   int difference = valueBPrevious - valueB;   if (difference > 100){
    println ("Thing happened!");
        xcoord = beginX + (pct * distX);
        ycoord = beginY + (pow(pct, exponent) * distY);
      }
      fill(255);
      ellipse(x, y, 10, 10);  
      pct = 0.0;
  valueBPrevious = valueB; // last thing we do.
}
 
 
//---------------------------------------------------------------
// The processSerial() function acquires serial data byte-by-byte, 
// as it is received, and when it is properly captured, modifies
// the appropriate global variable. 
// You won't have to change anything unless you want to add additional sensors. 
 
/*
The (expected) received serial data should look something like this:
 
 A903
 B412
 A900
 B409
 A898
 B406
 A895
 B404
 A893
 B404
 ...etcetera.
 */
 
ArrayList serialChars;      // Temporary storage for received serial data
int whichValueToAccum = 0;  // Which piece of data am I currently collecting? 
boolean bJustBuilt = false; // Did I just finish collecting a datum?
 
void processSerial() {
 
  while (myPort.available () > 0) {
    char aChar = (char) myPort.read();
 
    // You'll need to add a block like one of these 
    // if you want to add a 3rd sensor:
    if (aChar == 'A') {
      bJustBuilt = false;
      whichValueToAccum = 0;
    } else if (aChar == 'B') {
      bJustBuilt = false;
      whichValueToAccum = 1;
    } else if (((aChar == 13) || (aChar == 10)) && (!bJustBuilt)) {
      // If we just received a return or newline character, build the number: 
      int accum = 0; 
      int nChars = serialChars.size(); 
      for (int i=0; i < nChars; i++) {          int n = (nChars - i) - 1;          int aDigit = ((Integer)(serialChars.get(i))).intValue();          accum += aDigit * (int)(pow(10, n));       }         // Set the global variable to the number we captured.       // You'll need to add another block like one of these        // if you want to add a 3rd sensor:       if (whichValueToAccum == 0) {         valueA = accum;         // println ("A = " + valueA);       } else if (whichValueToAccum == 1) {         valueB = accum;         // println ("B = " + valueB);       }         // Now clear the accumulator       serialChars.clear();       bJustBuilt = true;       } else if ((aChar >= 48) && (aChar <= 57)) {
      // If the char is between '0' and '9', save it.
      int aDigit = (int)(aChar - '0'); 
      serialChars.add(aDigit);
    }
  }
}

#10

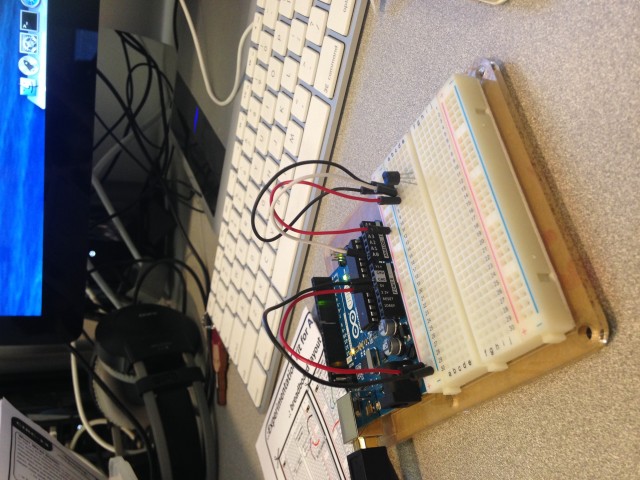
The most exciting part of the video is that ten seconds afterward when I dismantled the circuit, I burned myself on the temperature sensor because I had it plugged in wrong, and also it was one of the transistors and not the temperature sensor.

And then I had to re-shoot the entire video because I deleted the video before I realized it’d look identical either way.

10

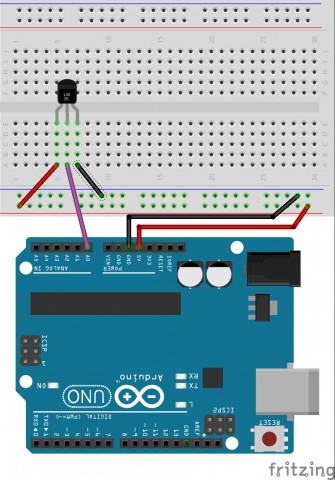
Untitled Sketch 2_bb


/*     ---------------------------------------------------------
 *     |  Arduino Experimentation Kit Example Code             |
 *     |  CIRC-10 .: Temperature :. (TMP36 Temperature Sensor) |
 *     ---------------------------------------------------------
 *   
 *  A simple program to output the current temperature to the IDE's debug window 
 * 
 *  For more details on this circuit: http://tinyurl.com/c89tvd 
 */

//TMP36 Pin Variables
int temperaturePin = 0; //the analog pin the TMP36's Vout (sense) pin is connected to
                        //the resolution is 10 mV / degree centigrade 
                        //(500 mV offset) to make negative temperatures an option

/*
 * setup() - this function runs once when you turn your Arduino on
 * We initialize the serial connection with the computer
 */
void setup()
{
  Serial.begin(9600);  //Start the serial connection with the copmuter
                       //to view the result open the serial monitor 
                       //last button beneath the file bar (looks like a box with an antenae)
}
 
void loop()                     // run over and over again
{
 float temperature = getVoltage(temperaturePin);  //getting the voltage reading from the tem
                    //perature sensor
 temperature = (temperature - .5) * 100;          //converting from 10 mv per degree wit 500
                    // mV offset
                                                  //to degrees ((volatge - 500mV) times 100)
 Serial.println(temperature);                     //printing the result
 delay(1000);                                     //waiting a second
}

/*
 * getVoltage() - returns the voltage on the analog input defined by
 * pin
 */
float getVoltage(int pin){
 return (analogRead(pin) * .004882814); //converting from a 0 to 1023 digital range
                                        // to 0 to 5 volts (each 1 reading equals ~ 5 milliv
                    //olts
}