Looking Outwards – Arduino Parts

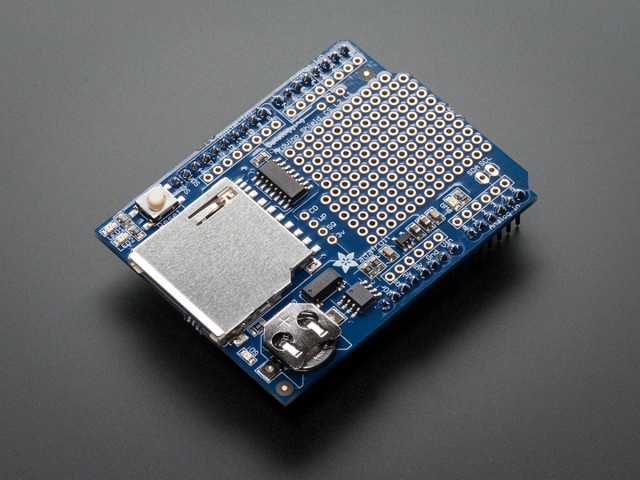
Adafruit Assembled Data Logging Shield

1141-00

Data logging would be essential for any project that required the gathering of information in the real world for later use. This part does what it says on the tin, recording the information to an SD card.

Personally, I immediately thought of a system whereby a worn Arduino that records everything that I say as I go through the world. This would give me a large amount of data for a project that I’ve been considering for a while now.

https://www.adafruit.com/products/1141

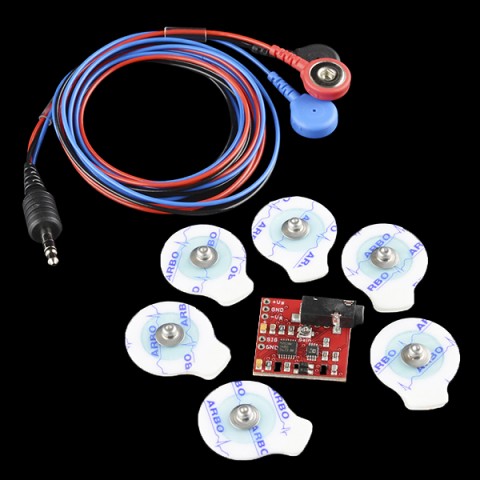
Muscle Sensor v3 Kit

11776-03

This kit allows the Arduino to know when the muscles it is attached to are stressed. This essentially creates a near-invisible, non-physical input directly related to the human body.

While this technology is advertised as a way of creating controllers, I think that a lot of potential lies in these devices being passive. It would be interesting to have a system that knows how you legs are moving when you walk around in the world, and plays with that information.

https://www.sparkfun.com/products/11776
Look outwards

https://www.adafruit.com/product/1487
NeoPixels come in a range of sizes and shapes, they’re durable and the detail and color values of them are very impressive. I immediately thought rave stuff when I saw these. Psychadelic visual/audio effects translated by these leds infused with durability and active use would lead to great rave products. In terms of art though I believe these would be very useful for sets and environments. I’m interested in naturally occuring light patterns and how we can artificially construct them.

https://www.adafruit.com/products/1546
1546-00
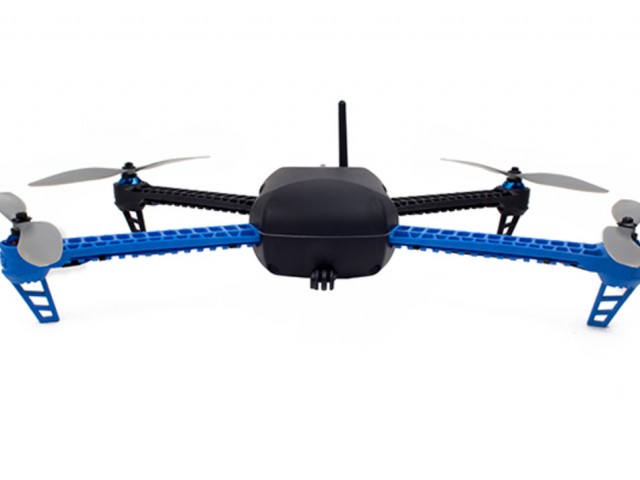
MULTICOPTER!
My childhood fantasies would definitely come true if I had this multicopter. This programmable multicopter would allow for great surveilance, interactivity, and I think highjinks as well as art.

Photoresistor!!

Here’s a video.

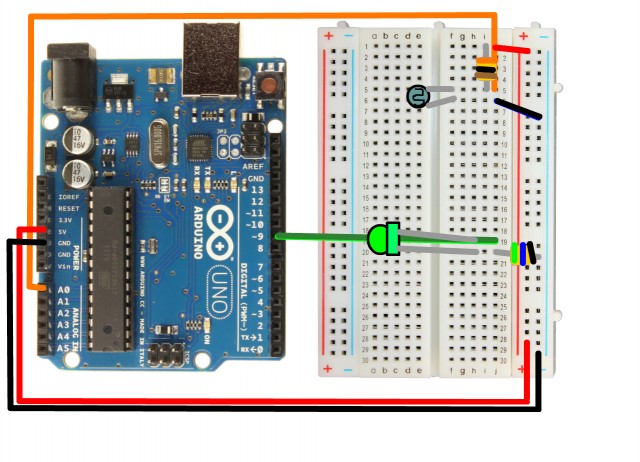
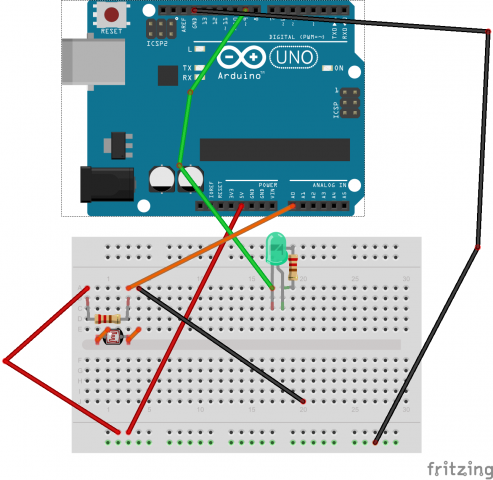
I could not open the Fritzing.org website and now I have to go to the dentist so I made this makeshift diagram that I hope suffices. I apologize.
breadboard

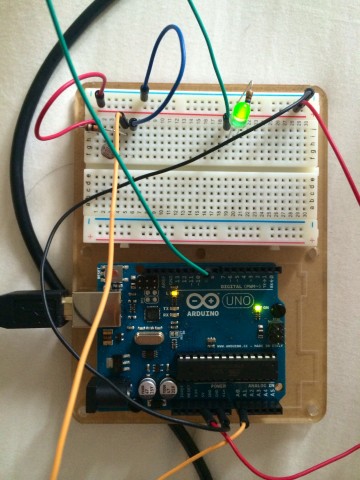
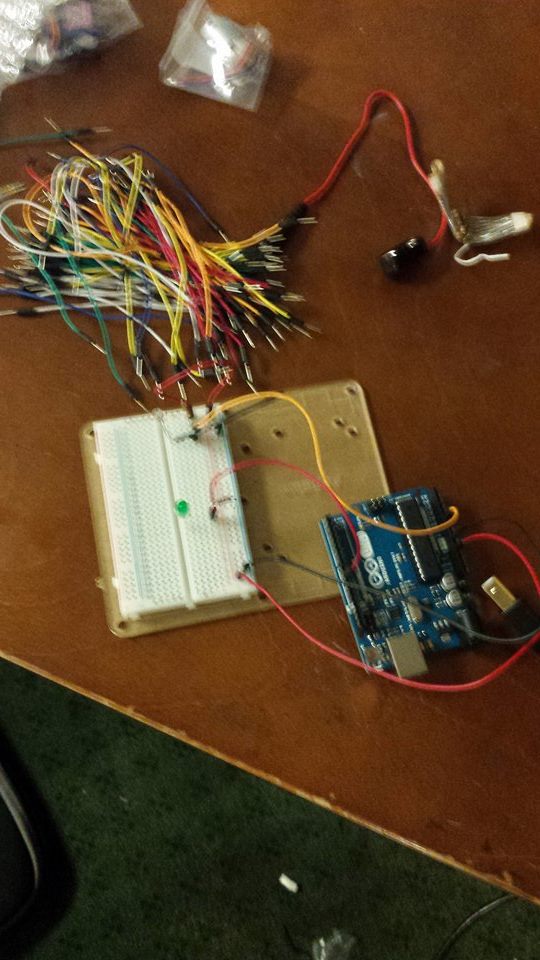
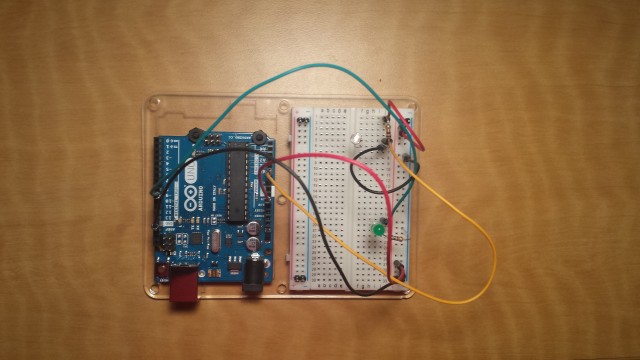
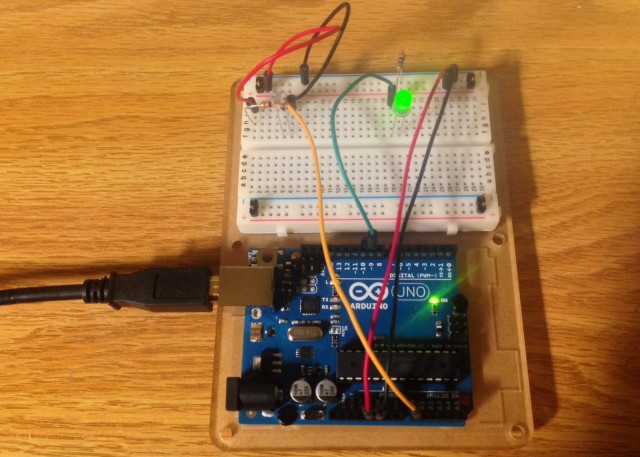
Heres a photo of my arduino all wired up.
IMG_0262

Heres the code

/*
 * A simple programme that will change the intensity of
 * an LED based  * on the amount of light incident on 
 * the photo resistor.
 * 
 */

//PhotoResistor Pin
int lightPin = 0; //the analog pin the photoresistor is 
                  //connected to
                  //the photoresistor is not calibrated to any units so
                  //this is simply a raw sensor value (relative light)
//LED Pin
int ledPin = 9;   //the pin the LED is connected to
                  //we are controlling brightness so 
                  //we use one of the PWM (pulse width
                  // modulation pins)
void setup()
{
  pinMode(ledPin, OUTPUT); //sets the led pin to output
}
 /*
 * loop() - this function will start after setup 
 * finishes and then repeat
 */
void loop()
{
 int lightLevel = analogRead(lightPin); //Read the
                                        // lightlevel
 lightLevel = map(lightLevel, 0, 900, 0, 255); 
         //adjust the value 0 to 900 to
         //span 0 to 255


 lightLevel = constrain(lightLevel, 0, 255);//make sure the 
                                           //value is betwween 
                                           //0 and 255
 analogWrite(ledPin, lightLevel);  //write the value
}

Looking Outwards: Components

sensors_1356-00

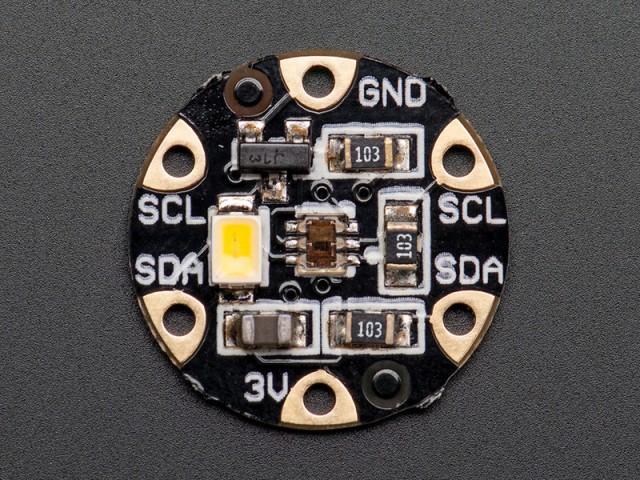
Flora color sensor

Flora Color Sensor is a wearable arduino sensor that detect the color through the sensor and lights the LED with the same color it detected. I think this color sensor has a potential use to many different clothing and fashion ideas and plans. I think it will be nice to make this sensor detect the color of the day, such as grey when it is raining and white(since the snow is white) when it is snowing and reflect it on the jewelry the person is wearing or on the clothing is a fun idea to play with. Or having the clothing be a part of the scene, especially in places where there are many signs such as for instance New York City, might be another idea that can be played with this color sensor

12642-01

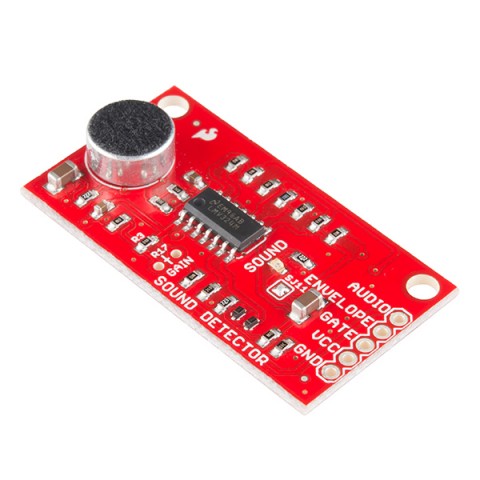
Sound detector

By using this sound detector I think we can make secret knocks for door locks. I got this idea from the movie Frozen where they would knock on the door to some melody that were specific and my cousins would always do that last winter. Since people can make many door knock sounds it might be a fun idea to play with making a special door knock in order to make the door open rather than the old fashioned door locks that has numbers. Also it will make people knock before going into some room which makes the people inside know someone is coming in at the same time.

Photoresistor

So I put together my circuit:

circuti

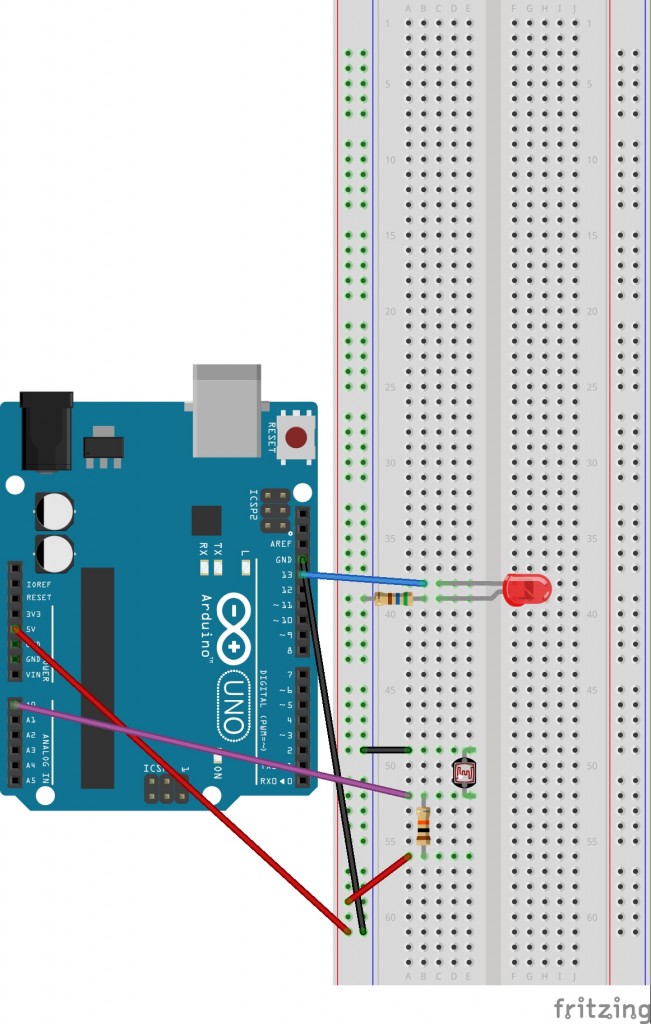
Displayed here in Fritzing form:

photores

Miraculously, I found a way to make it work:

I need to get back into the swing of Arduino… :/

Code:

/*
 * A simple programme that will change the intensity of
 * an LED based  * on the amount of light incident on 
 * the photo resistor.
 * 
 */

//PhotoResistor Pin
int lightPin = 0; //the analog pin the photoresistor is 
                  //connected to
                  //the photoresistor is not calibrated to any units so
                  //this is simply a raw sensor value (relative light)
//LED Pin
int ledPin = 9;   //the pin the LED is connected to
                  //we are controlling brightness so 
                  //we use one of the PWM (pulse width
                  // modulation pins)
void setup()
{
  pinMode(ledPin, OUTPUT); //sets the led pin to output
}
 /*
 * loop() - this function will start after setup 
 * finishes and then repeat
 */
void loop()
{
 int lightLevel = analogRead(lightPin); //Read the
                                        // lightlevel
 lightLevel = map(lightLevel, 0, 900, 0, 255); 
         //adjust the value 0 to 900 to
         //span 0 to 255


 lightLevel = constrain(lightLevel, 0, 255);//make sure the 
                                           //value is between 
                                           //0 and 255
 analogWrite(ledPin, lightLevel);  //write the value
}

Looking Outwards Arduino Parts

When looking at the different extensions, ports and shields available for Arduino I found myself drawn to shields that Arduino could manipulate visually. So with that in mind here’s a list of them I liked:


Adafruit NeoPixel Shield for Arduino- 40 RGB LED Pixel Matrix

Adafruit NeoPixel Shield for Arduino - 40 RGB LED Pixel Matrix


https://www.adafruit.com/products/1430

Basically what this is a shield made out of different colored LED lights. Just looking at this I found myself wondering how I could imagine multiple ways of manipulating the intensity of the lights in different ways. I’d also potentially be interested in using this shield with sound and having the audio manipulate the colors and their intensity. As such, I could see myself working with both this in conjunction with the Adafruit “Music Maker” MP3 Shield.

Adafruit

https://www.adafruit.com/products/1788


2.8” TFT touch shield for Arduino with Resistive Touch Screen


2.8


https://www.adafruit.com/products/1651

I was interested in this extension just because of the interface and the potential manipulation ability the actual user would have in drawing on the screen. It detects finger presses anywhere on the screen which is another capability I could potentially mess with, maybe playing with the intensity of the actual touch and the image created. I think this would be really fun to work with and I’d be interested in potentially using it the most.


Looking Outwards : Components

WiFi Shield

The Ada Fruit CC3000 is an Arduino shield which allows wireless connectivity to the internet. This drastically augments an Arduino’s capabilities, as data can be stored and processed online through server side operations. For instance, a device which takes pictures of a given area once a minute would fill the Arduino’s relatively small storage space very quickly. However, with a WiFi connection, the images could be automatically uploaded onto an imgur account, completely removing any concern of depleting storage space. Next, a program run on a powerful personal computer could access the imgur account and process the image data to see how often different parts of the pictured area are occupied by people. Such a calculation would be impossible with the modest computing power aboard an Arduino Uno. Next, the computer program could generate a ‘heat map’ showing the relative levels of human occupation color coded over the pictured area, and upload it to a different imgur account. The Arduino could then download the processed image and display it on a screen, thus giving the impression of on site calculations when, in truth, the WiFi shield has deferred the bulk of the work to a remote computer.

Fingerprint Scanner

The fingerprint scanner provides a (nearly) bullet proof mechanism for designing personalized interaction. I have been turning over in my mind different methods by which a user could build a personal relationship with an installation. Having personalized interactions requires the installation to identify and remember individual viewers. The most straightforward way would be to establish a user login system, but that would require viewers to both make an account and then subsequently log in every time they visited for the installation to recognize their presence. Facial recognition would be more intuitive, but requires a camera and is quite fallible to facial accessories/hair. A fingerprint scanner, however, provides a quick and easy way for viewers to inform an installation of their specific identity. From there, the installation can build up profiles of each individual in much the same way that we do, adjusting the experience accordingly. For example, an installation which displayed a virtual rabbit, could then keep track of each user’s individual interactions with said rabbit, and alter the behavior of the rabbit based on the user’s previous interactions.

Looking Outwards: Components

The Adafruit CC3000 WiFi Breakout lets your Arduino connect to the internet through a wifi network. This seemed like an obvious choice for the sorts of projects I want to make where internet connectivity is a must. Hopefully this module can connect to the CMU wifi network so that my Arduino can be connected to the internet anywhere on campus!

The Adafruit Ultimate GPS also seemed like a must-have. Being able to react to some input and mark an arbitrary location on a map is very powerful.

It would probably be a good idea to get this sheild with a built in GPS module (micro SD storage) and then connect the wifi module to it.

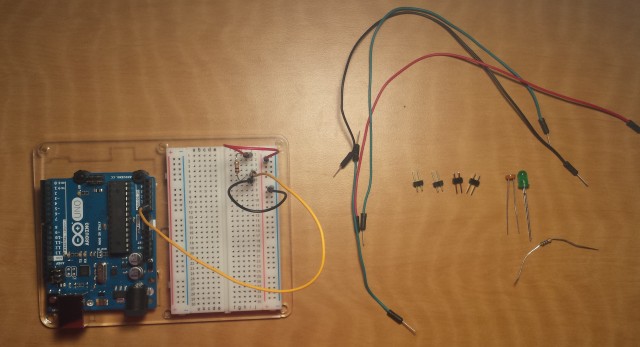
9 Photoresistor

My Photoresister experiment:

Setting Up

Setting Up

Parts:

CIRC-09 Breadboard Sheet

2 Pin Header

Photo-Resistor

Ohm Resistor Brown-Black-Orange

560 Ohm Resistor Green-Blue-Brown

Green LED

Fully functional

Fully functional


Fritzing Sketch:

project 9 sketch_bb2

Project Working on Video:

Project 9 from Elizabeth Agyemang on Vimeo.


Source Code:

/*
* A simple programme that will change the intensity of
* an LED based  * on the amount of light incident on
* the photo resistor.
*
*/

//PhotoResistor Pin
int lightPin = 0; //the analog pin the photoresistor is
//connected to
//the photoresistor is not calibrated to any units so
//this is simply a raw sensor value (relative light)
//LED Pin
int ledPin = 9;   //the pin the LED is connected to
//we are controlling brightness so
//we use one of the PWM (pulse width
// modulation pins)
void setup()
{
pinMode(ledPin, OUTPUT); //sets the led pin to output
}
/*

* loop() - this function will start after setup
* finishes and then repeat
*/
void loop()
{
int lightLevel = analogRead(lightPin); //Read the
// lightlevel
lightLevel = map(lightLevel, 0, 900, 0, 255);
//adjust the value 0 to 900 to
//span 0 to 255


lightLevel = constrain(lightLevel, 0, 255);//make sure the
//value is betwween
//0 and 255
analogWrite(ledPin, lightLevel);  //write the value
}

WHT – Photoresistor Documentation


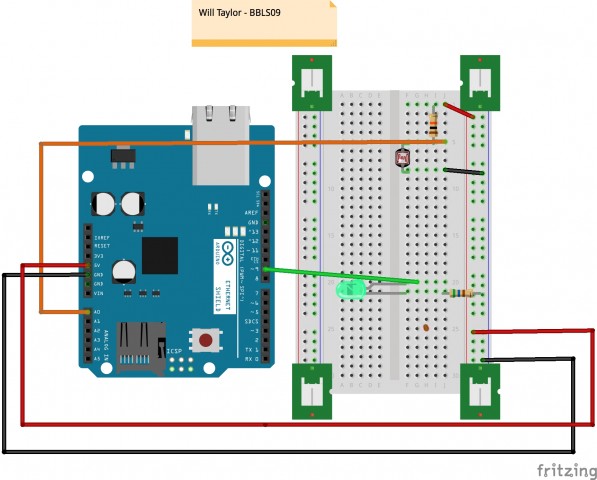
BBLS09 Fritz Diagram


BBLS09 Documentation


/* Will Taylor - S 09
*
* A simple programm that will change the intensity of
* an LED based * on the amount of light incident on
* the photo resistor.
*
*/

//PhotoResistor Pin
int lightPin = 0; //the analog pin the photoresistor is
//connected to
//the photoresistor is not calibrated to any units so
//this is simply a raw sensor value (relative light)
//LED Pin
int ledPin = 9; //the pin the LED is connected to
//we are controlling brightness so
//we use one of the PWM (pulse width
// modulation pins)
void setup()
{
pinMode(ledPin, OUTPUT); //sets the led pin to output
}
/*
* loop() - this function will start after setup
* finishes and then repeat
*/
void loop()
{
int lightLevel = analogRead(lightPin); //Read the
// lightlevel
lightLevel = map(lightLevel, 0, 900, 0, 255);
//adjust the value 0 to 900 to
//span 0 to 255

lightLevel = constrain(lightLevel, 0, 255);//make sure the
//value is betwween
//0 and 255
analogWrite(ledPin, lightLevel); //write the value
}