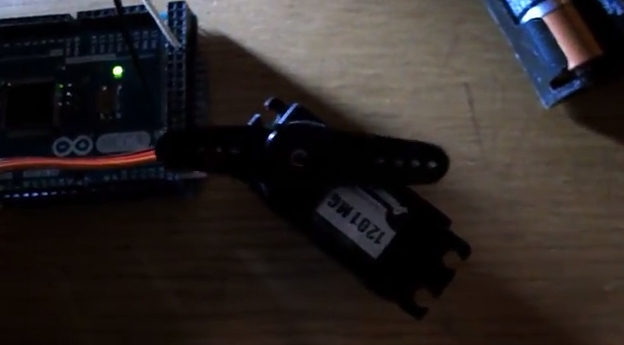
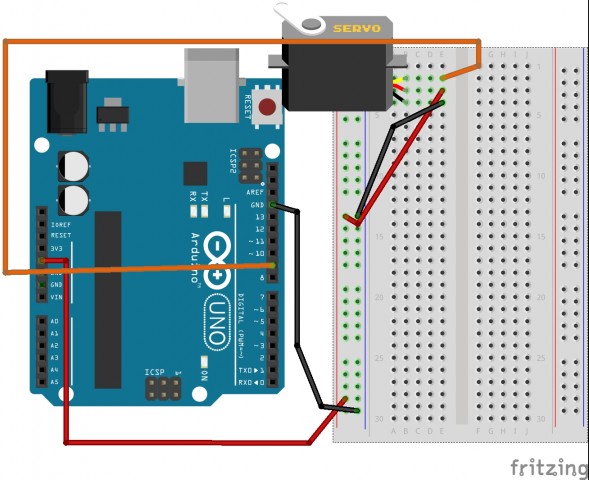
Servo

Video:

Fritzing:

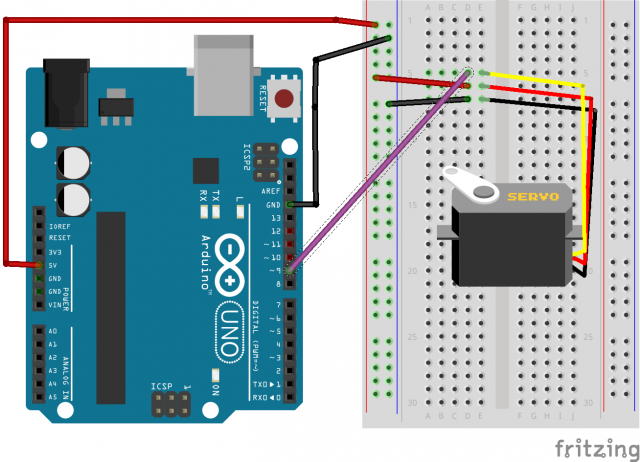
circut4_bb

Code:


// Sweep
// by BARRAGAN  
#include  
Servo myservo; // create servo object to control a servo
int pos = 0; // variable to store the servo position 
void setup() { 
 myservo.attach(9); // attaches the servo on pin 9 to the servo object 
}
void loop() { 
 for(pos = 0; pos < 180; pos += 1) // goes from 0 degrees to 180 degrees 
 { // in steps of 1 degree 
 myservo.write(pos); // tell servo to go to position in variable 'pos' 
 delay(15); // waits 15ms for the servo to reach the position 
 }
 for(pos = 180; pos>=1; pos-=1) // goes from 180 degrees to 0 degrees 
 { 
 myservo.write(pos); // tell servo to go to position in variable 'pos' 
 delay(15); // waits 15ms for the servo to reach the position 
 }
} 

/pre

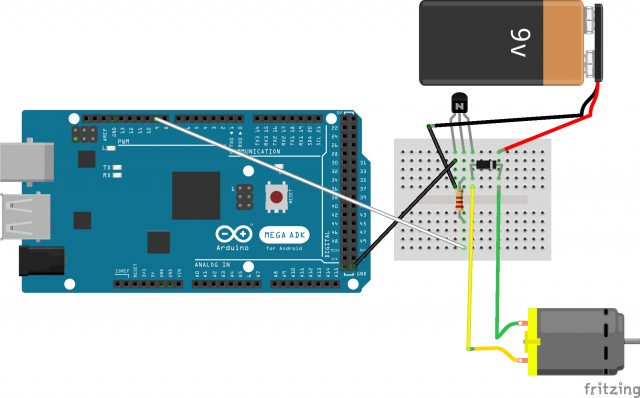
DC Motor

The video:

The Fritzz:

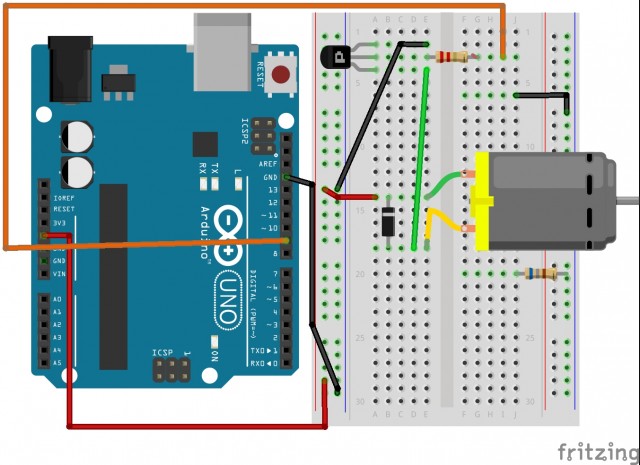
circut3_bb

The code:

/*     -----------------------------------------------------------
 *     |  Arduino Experimentation Kit Example Code               |
 *     |  CIRC-03 .: Spin Motor Spin :. (Transistor and Motor)   |
 *     -----------------------------------------------------------
 * 
 * The Arduinos pins are great for driving LEDs however if you hook 
 * up something that requires more power you will quickly break them.
 * To control bigger items we need the help of a transistor. 
 * Here we will use a transistor to control a small toy motor
 * 
 * http://tinyurl.com/d4wht7
 *
 */

int motorPin = 9;  // define the pin the motor is connected to
                   // (if you use pin 9,10,11 or 3you can also control speed)

/*
 * setup() - this function runs once when you turn your Arduino on
 * We set the motors pin to be an output (turning the pin high (+5v) or low (ground) (-))
 * rather than an input (checking whether a pin is high or low)
 */
void setup()
{
 pinMode(motorPin, OUTPUT); 
}


/*
 * loop() - this function will start after setup finishes and then repeat
 * we call a function called motorOnThenOff()
 */

void loop()                     // run over and over again
{
 motorOnThenOff();
 //motorOnThenOffWithSpeed();
 //motorAcceleration();
}

/*
 * motorOnThenOff() - turns motor on then off 
 * (notice this code is identical to the code we used for
 * the blinking LED)
 */
void motorOnThenOff(){
  int onTime = 2500;  //the number of milliseconds for the motor to turn on for
  int offTime = 1000; //the number of milliseconds for the motor to turn off for
  
  digitalWrite(motorPin, HIGH); // turns the motor On
  delay(onTime);                // waits for onTime milliseconds
  digitalWrite(motorPin, LOW);  // turns the motor Off
  delay(offTime);               // waits for offTime milliseconds
}

/*
 * motorOnThenOffWithSpeed() - turns motor on then off but uses speed values as well 
 * (notice this code is identical to the code we used for
 * the blinking LED)
 */
void motorOnThenOffWithSpeed(){
  
  int onSpeed = 200;  // a number between 0 (stopped) and 255 (full speed) 
  int onTime = 2500;  //the number of milliseconds for the motor to turn on for
  
  int offSpeed = 50;  // a number between 0 (stopped) and 255 (full speed) 
  int offTime = 1000; //the number of milliseconds for the motor to turn off for
  
  analogWrite(motorPin, onSpeed);   // turns the motor On
  delay(onTime);                    // waits for onTime milliseconds
  analogWrite(motorPin, offSpeed);  // turns the motor Off
  delay(offTime);                   // waits for offTime milliseconds
}

/*
 * motorAcceleration() - accelerates the motor to full speed then
 * back down to zero
*/
void motorAcceleration(){
  int delayTime = 50; //milliseconds between each speed step
  
  //Accelerates the motor
  for(int i = 0; i < 256; i++){ //goes through each speed from 0 to 255     analogWrite(motorPin, i);   //sets the new speed     delay(delayTime);           // waits for delayTime milliseconds   }      //Decelerates the motor   for(int i = 255; i >= 0; i--){ //goes through each speed from 255 to 0
    analogWrite(motorPin, i);   //sets the new speed
    delay(delayTime);           // waits for delayTime milliseconds
  }
}

Circ 3 and 4

Circ -03: Motor

Circuit Picture:

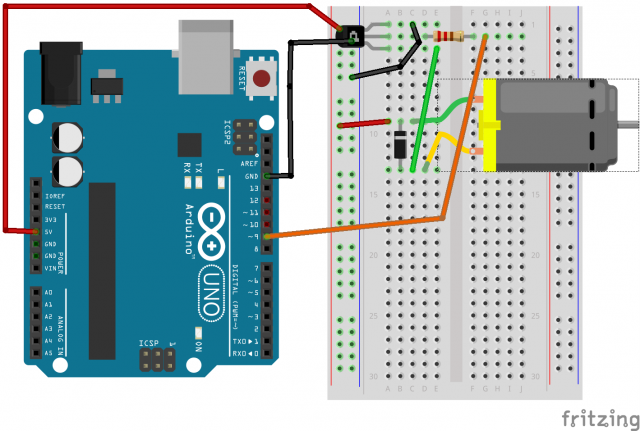
circ03_bb

Youtube:

Code:

/*     -----------------------------------------------------------
 *     |  Arduino Experimentation Kit Example Code               |
  *     |  CIRC-03 .: Spin Motor Spin :. (Transistor and Motor)   |
  *     -----------------------------------------------------------
 * 
  * The Arduinos pins are great for driving LEDs however if you hook 
  * up something that requires more power you will quickly break them.
  * To control bigger items we need the help of a transistor. 
  * Here we will use a transistor to control a small toy motor
  * 
  * http://tinyurl.com/d4wht7
  *
  */

 int motorPin = 9;  // define the pin the motor is connected to
                    // (if you use pin 9,10,11 or 3you can also control speed)

 /*
  * setup() - this function runs once when you turn your Arduino on
  * We set the motors pin to be an output (turning the pin high (+5v) or low (ground) (-))
  * rather than an input (checking whether a pin is high or low)
  */
 void setup()
 {
  pinMode(motorPin, OUTPUT); 
 }


 /*
  * loop() - this function will start after setup finishes and then repeat
  * we call a function called motorOnThenOff()
  */

 void loop()                     // run over and over again
 {
  motorOnThenOff();
  //motorOnThenOffWithSpeed();
  //motorAcceleration();
 }

 /*
  * motorOnThenOff() - turns motor on then off 
  * (notice this code is identical to the code we used for
  * the blinking LED)
  */
 void motorOnThenOff(){
   int onTime = 2500;  //the number of milliseconds for the motor to turn on for
   int offTime = 1000; //the number of milliseconds for the motor to turn off for
   
   digitalWrite(motorPin, HIGH); // turns the motor On
   delay(onTime);                // waits for onTime milliseconds
   digitalWrite(motorPin, LOW);  // turns the motor Off
   delay(offTime);               // waits for offTime milliseconds
 }

 /*
  * motorOnThenOffWithSpeed() - turns motor on then off but uses speed values as well 
  * (notice this code is identical to the code we used for
  * the blinking LED)
  */
 void motorOnThenOffWithSpeed(){
   
   int onSpeed = 200;  // a number between 0 (stopped) and 255 (full speed) 
   int onTime = 2500;  //the number of milliseconds for the motor to turn on for
   
   int offSpeed = 50;  // a number between 0 (stopped) and 255 (full speed) 
   int offTime = 1000; //the number of milliseconds for the motor to turn off for
   
   analogWrite(motorPin, onSpeed);   // turns the motor On
   delay(onTime);                    // waits for onTime milliseconds
   analogWrite(motorPin, offSpeed);  // turns the motor Off
   delay(offTime);                   // waits for offTime milliseconds
 }

 /*
  * motorAcceleration() - accelerates the motor to full speed then
  * back down to zero
 */
 void motorAcceleration(){
   int delayTime = 50; //milliseconds between each speed step
   
   //Accelerates the motor
   for(int i = 0; i < 256; i++){ //goes through each speed from 0 to 255
     analogWrite(motorPin, i);   //sets the new speed
     delay(delayTime);           // waits for delayTime milliseconds
   }
   
   //Decelerates the motor
   for(int i = 255; i >= 0; i--){ //goes through each speed from 255 to 0
     analogWrite(motorPin, i);   //sets the new speed
     delay(delayTime);           // waits for delayTime milliseconds
   }
 }

Circ – 04: The Micro Servo

Circuit Diagram:

circ04_bb

Youtube:

Code:

// Sweep
 // by BARRAGAN  

 #include  
  
 Servo myservo;  // create servo object to control a servo 
                 // a maximum of eight servo objects can be created 
  
 int pos = 0;    // variable to store the servo position 
  
 void setup() 
 { 
   myservo.attach(9);  // attaches the servo on pin 9 to the servo object 
 } 
  
  
 void loop() 
 { 
   for(pos = 0; pos < 180; pos += 1)  // goes from 0 degrees to 180 degrees 
   {                                  // in steps of 1 degree 
     myservo.write(pos);              // tell servo to go to position in variable 'pos' 
     delay(15);                       // waits 15ms for the servo to reach the position 
   } 
   for(pos = 180; pos>=1; pos-=1)     // goes from 180 degrees to 0 degrees 
   {                                
     myservo.write(pos);              // tell servo to go to position in variable 'pos' 
     delay(15);                       // waits 15ms for the servo to reach the position 
   } 
 }

Simple DC Motor

dcmotor1

dcmotor


/*     -----------------------------------------------------------
 *     |  Arduino Experimentation Kit Example Code               |
 *     |  CIRC-03 .: Spin Motor Spin :. (Transistor and Motor)   |
 *     -----------------------------------------------------------
 * 
 * The Arduinos pins are great for driving LEDs however if you hook 
 * up something that requires more power you will quickly break them.
 * To control bigger items we need the help of a transistor. 
 * Here we will use a transistor to control a small toy motor
 * 
 * http://tinyurl.com/d4wht7
 *
 */

int motorPin = 9;  // define the pin the motor is connected to
                   // (if you use pin 9,10,11 or 3you can also control speed)

/*
 * setup() - this function runs once when you turn your Arduino on
 * We set the motors pin to be an output (turning the pin high (+5v) or low (ground) (-))
 * rather than an input (checking whether a pin is high or low)
 */
void setup()
{
 pinMode(motorPin, OUTPUT); 
}


/*
 * loop() - this function will start after setup finishes and then repeat
 * we call a function called motorOnThenOff()
 */

void loop()                     // run over and over again
{
 motorOnThenOff();
 //motorOnThenOffWithSpeed();
 //motorAcceleration();
}

/*
 * motorOnThenOff() - turns motor on then off 
 * (notice this code is identical to the code we used for
 * the blinking LED)
 */
void motorOnThenOff(){
  int onTime = 2500;  //the number of milliseconds for the motor to turn on for
  int offTime = 1000; //the number of milliseconds for the motor to turn off for
  
  digitalWrite(motorPin, HIGH); // turns the motor On
  delay(onTime);                // waits for onTime milliseconds
  digitalWrite(motorPin, LOW);  // turns the motor Off
  delay(offTime);               // waits for offTime milliseconds
}

/*
 * motorOnThenOffWithSpeed() - turns motor on then off but uses speed values as well 
 * (notice this code is identical to the code we used for
 * the blinking LED)
 */
void motorOnThenOffWithSpeed(){
  
  int onSpeed = 200;  // a number between 0 (stopped) and 255 (full speed) 
  int onTime = 2500;  //the number of milliseconds for the motor to turn on for
  
  int offSpeed = 50;  // a number between 0 (stopped) and 255 (full speed) 
  int offTime = 1000; //the number of milliseconds for the motor to turn off for
  
  analogWrite(motorPin, onSpeed);   // turns the motor On
  delay(onTime);                    // waits for onTime milliseconds
  analogWrite(motorPin, offSpeed);  // turns the motor Off
  delay(offTime);                   // waits for offTime milliseconds
}

/*
 * motorAcceleration() - accelerates the motor to full speed then
 * back down to zero
*/
void motorAcceleration(){
  int delayTime = 50; //milliseconds between each speed step
  
  //Accelerates the motor
  for(int i = 0; i < 256; i++){ //goes through each speed from 0 to 255     analogWrite(motorPin, i);   //sets the new speed     delay(delayTime);           // waits for delayTime milliseconds   }      //Decelerates the motor   for(int i = 255; i >= 0; i--){ //goes through each speed from 255 to 0
    analogWrite(motorPin, i);   //sets the new speed
    delay(delayTime);           // waits for delayTime milliseconds
  }
}

Simple Servo

servo1servo

// Sweep
// by BARRAGAN <http://barraganstudio.com> 
// This example code is in the public domain.


#include  
 
Servo myservo;  // create servo object to control a servo 
                // a maximum of eight servo objects can be created 
 
int pos = 0;    // variable to store the servo position 
 
void setup() 
{ 
  myservo.attach(9);  // attaches the servo on pin 9 to the servo object 
} 
 
 
void loop() 
{ 
  for(pos = 0; pos < 180; pos += 1)  // goes from 0 degrees to 180 degrees    {                                  // in steps of 1 degree      myservo.write(pos);              // tell servo to go to position in variable 'pos'      delay(15);                       // waits 15ms for the servo to reach the position    }    for(pos = 180; pos>=1; pos-=1)     // goes from 180 degrees to 0 degrees 
  {                                
    myservo.write(pos);              // tell servo to go to position in variable 'pos' 
    delay(15);                       // waits 15ms for the servo to reach the position 
  } 
} 

Helicopter Game (Sensor Display)

For my sensor display I wanted to make use of the proximity sensor. I chose to create a portrayal of an old flash game I remembered playing. I’m not sure what the origin of it is, but a portrayal of it can be found at http://www.helicopter-game.org/ . However, for my version the helicopter is controlled by the height of the player’s hand over the sensor device. The device is meant to look like a black box which is typically associated with aviation. I made sure to use similar colors for the game and the box.

Here is a video of the project running:

Here are some images:
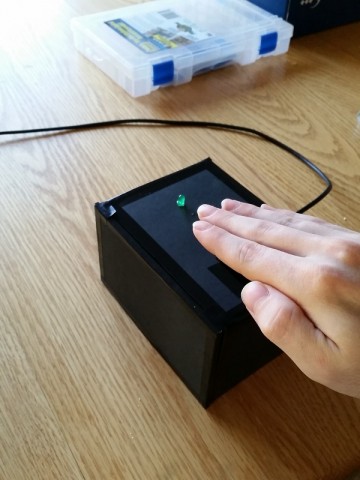
helicopter_boxhelicopter_processing_display

Here is the fritzing diagram:
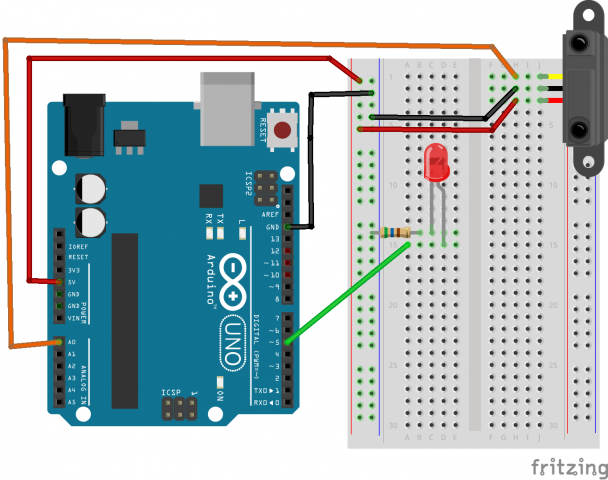
helicopter

Here is the Processing code:

// Helicopter Game
// If available this game will play using input from an arduino based accessory.
// Author: Matthew Kellogg
// Date: October 29, 2014
//Copyright 2014 Matthew Kellogg
// 
 
// Import the Serial library and create a Serial port handler
import processing.serial.*;
import ddf.minim.*;
Serial myPort;   

ArrayList ceilHeight = new ArrayList();
ArrayList floorHeight = new ArrayList();

float heliX = 200.0;
float heliY = 100.0;

color neonGreen = color(20, 200, 40);
int strokeW = 10;

int finalScore = 0;
boolean wrecked = false;

AudioPlayer player;
AudioPlayer explode;
Minim minim; //context
// Hey you! Use these variables to do something interesting. 
// If you captured them with analog sensors on the arduino, 
// They're probably in the range from 0 ... 1023:
int valueA;  // Sensor Value A
int valueB;  // Sensor Value B
 
//------------------------------------
void setup() {
  
  size(1280,800);
  
  // List my available serial ports
  int nPorts = Serial.list().length; 
  for (int i=0; i < nPorts; i++) {     println("Port " + i + ": " + Serial.list()[i]);   }      // Choose which serial port to fetch data from.    // IMPORTANT: This depends on your computer!!!   // Read the list of ports printed by the code above,   // and try choosing the one like /dev/cu.usbmodem1411   // On my laptop, I'm using port #4, but yours may differ.   if (Serial.list().length > 0){
  String portName = Serial.list()[0]; 
  myPort = new Serial(this, portName, 9600);
  serialChars = new ArrayList();
  }
  
  resetBounds();
  
  //audio
  minim = new Minim(this);
  player = minim.loadFile("helicopter-hovering-01.mp3", 2048);
  explode = minim.loadFile("explosion.mp3", 2048);
  player.loop();
}

void stop(){
  player.close();
  explode.close();
  minim.stop();
  super.stop();
}

void resetBounds(){
  ceilHeight.clear();
  floorHeight.clear();
  // ceiling and floor
  for (int i = 0; i -2 <= width/200; i++){
    ceilHeight.add(10);
    floorHeight.add(height - 10);
  }
}

void keyPressed(){
  if ((key == 'R' || key == 'r') && wrecked){
    wrecked = false;
    frameCount = 0;
    finalScore = 0;
    resetBounds();
    player.loop();
    explode.pause();
    explode.rewind();
  }
}

//------------------------------------
void draw() {
  background (10,20,60);
  
  if (wrecked){
    if ((frameCount/5)%2 == 0){
      fill(neonGreen);
      drawHelicopter(200, (int) heliY, false);
    }else{
      fill(255,0,0);
    }
    
    textAlign(CENTER);
    textSize(60);
    text("FINAL SCORE: " + finalScore,width/2, height/2-70);
    text("Press 'R' to restart", width/2, height/2 + 10);
  }else{
    // Process the serial data. This acquires freshest values. 
    if (myPort != null){
      processSerial();
      heliY = 0.9*heliY + 0.1*(map(valueA, 0, 100, height - 14*4, 100));
    }
    else{
      heliY = mouseY;
    }
    
    //Check bounds
    int checkIndex = (0 + 2*(frameCount%100))/100;
    int ceilBound = max((Integer)ceilHeight.get(checkIndex), (Integer)ceilHeight.get(checkIndex +1));
    int floorBound = min((Integer)floorHeight.get(checkIndex), (Integer)floorHeight.get(checkIndex + 1));
    if ((heliY - 100 < ceilBound) ||        (heliY + 60 > floorBound)){
      wrecked = true;
      finalScore = frameCount/5;
      player.pause();
      player.rewind();
      explode.play();
    }
    
    if (frameCount%100 == 0){
      ceilHeight.remove(0);
      floorHeight.remove(0);
      int pCeil = (Integer)ceilHeight.get(ceilHeight.size()-1);
      int pFloor = (Integer)floorHeight.get(floorHeight.size()-1);
      ceilHeight.add((int)random(max(10,pCeil-100), min(pCeil+100, pFloor -350)));
      floorHeight.add((int)random(max(pCeil +350, pFloor -100), min(height, pFloor + 100)));
    }
    
    drawBounds();
    drawHelicopter(200, (int)heliY,false);
      
    //score
    textAlign(RIGHT);
    textSize(30);
    String score = "Score: "+frameCount/5;
    int scoreW = (int)(textWidth(score));
    
    fill(0);
    strokeWeight(strokeW);
    stroke(neonGreen);
    rect(width - scoreW -20, -10, scoreW+30, 80);
    
    fill(neonGreen);
    noStroke();
    text(score, width - 10, 50);
  }
  
}

//draws the ceiling and floor
void drawBounds(){
  fill(0);
  strokeWeight(strokeW);
  stroke(neonGreen);
  beginShape();
  vertex(width+10, -20);
  vertex(-20,-20);
  println("Ceil size is " + ceilHeight.size());
  for (int i = 0; i< ceilHeight.size(); i++){
    vertex(200*i - 2*(frameCount%100), (Integer)ceilHeight.get(i));
  }
  endShape(CLOSE);
  
  beginShape();
  vertex(width+20, height+20);
  vertex(-20, height+20);
  for (int i = 0; i< floorHeight.size(); i++){     vertex(200*i - 2*(frameCount%100), (Integer)floorHeight.get(i));   }   endShape(CLOSE);   strokeWeight(1); } //bounds of the helicopter are -45,-25 to 30, 14 void drawHelicopter(int x, int y, boolean bounds){   pushMatrix();   fill(neonGreen);   noStroke();   translate(x,y);   scale(4, 4);   ellipse(0,-20, 60, 10);   ellipse(0, 0, 25, 16);   rect(-30, -4, 30, 6);   ellipse(-30,0, 15, 15);   if (bounds){     noFill();     rectMode(CORNERS);     rect(-45, -25, 30,14);     rectMode(CORNER);   }   strokeWeight(2);   stroke(neonGreen);   line(-8, 14, 8, 14);   line(8, 14, 12, 10);   popMatrix(); }   //--------------------------------------------------------------- // The processSerial() function acquires serial data byte-by-byte,  // as it is received, and when it is properly captured, modifies // the appropriate global variable.  // You won't have to change anything unless you want to add additional sensors.    /* The (expected) received serial data should look something like this:    A903  B412  A900  B409  A898  B406  A895  B404  A893  B404  ...etcetera.  */   ArrayList serialChars;      // Temporary storage for received serial data int whichValueToAccum = 0;  // Which piece of data am I currently collecting?  boolean bJustBuilt = false; // Did I just finish collecting a datum?   void processSerial() {     while (myPort.available () > 0) {
    char aChar = (char) myPort.read();
 
    // You'll need to add a block like one of these 
    // if you want to add a 3rd sensor:
    if (aChar == 'A') {
      bJustBuilt = false;
      whichValueToAccum = 0;
    } else if (aChar == 'B') {
      bJustBuilt = false;
      whichValueToAccum = 1;
    } else if (((aChar == 13) || (aChar == 10)) && (!bJustBuilt)) {
      // If we just received a return or newline character, build the number: 
      int accum = 0; 
      int nChars = serialChars.size(); 
      for (int i=0; i < nChars; i++) {          int n = (nChars - i) - 1;          int aDigit = ((Integer)(serialChars.get(i))).intValue();          accum += aDigit * (int)(pow(10, n));       }         // Set the global variable to the number we captured.       // You'll need to add another block like one of these        // if you want to add a 3rd sensor:       if (whichValueToAccum == 0) {         valueA = accum;         // println ("A = " + valueA);       } else if (whichValueToAccum == 1) {         valueB = accum;         // println ("B = " + valueB);       }         // Now clear the accumulator       serialChars.clear();       bJustBuilt = true;       } else if ((aChar >= 48) && (aChar <= 57)) {
      // If the char is between '0' and '9', save it.
      int aDigit = (int)(aChar - '0'); 
      serialChars.add(aDigit);
    }
  }
}

Here is the Arduino code:

/* 
 * Helicopter controller
 * Author: Matthew Kellogg
 * Date: October 22, 2014
 */
int ledPin = 5;    // LED connected to digital pin 9

void setup()  { 
  pinMode(ledPin, OUTPUT);
  Serial.begin(9600);
} 

static const int lowThresh = 200;
static const int hiThresh = 612;

void loop()  {
  int val = analogRead(0);
  if (val > lowThresh && val < hiThresh){
    analogWrite(ledPin, map(val, lowThresh, hiThresh, 0, 255));
    //tone(11, map(val, lowThresh, hiThresh, 60, 4400));
    Serial.print("A" + String((int)map(val, lowThresh, hiThresh, 100, 0)) + "\n");
  } else { 
    analogWrite(ledPin, 0);
    //noTone(11);
  }
}
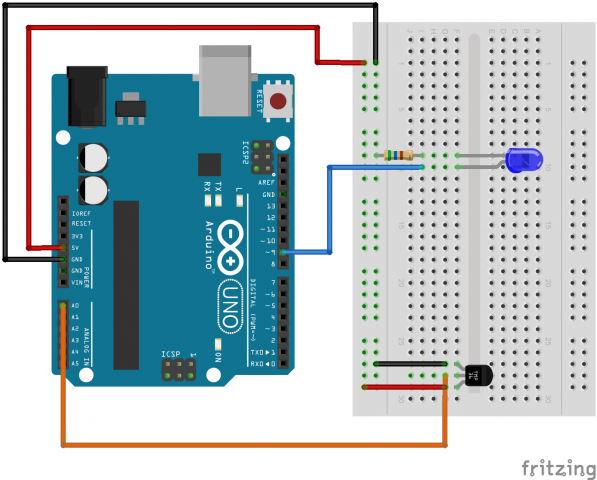
Temperature Resistor

temperature_bb

Code for temperature resistor

/*     ---------------------------------------------------------
 *     |  Arduino Experimentation Kit Example Code             |
 *     |  CIRC-10 .: Temperature :. (TMP36 Temperature Sensor) |
 *     ---------------------------------------------------------
 *   
 *  A simple program to output the current temperature to the IDE's debug window 
 * 
 *  For more details on this circuit: http://tinyurl.com/c89tvd 
 */

//TMP36 Pin Variables
int temperaturePin = 0; //the analog pin the TMP36's Vout (sense) pin is connected to
                        //the resolution is 10 mV / degree centigrade 
                        //(500 mV offset) to make negative temperatures an option

/*
 * setup() - this function runs once when you turn your Arduino on
 * We initialize the serial connection with the computer
 */
void setup()
{
  Serial.begin(9600);  //Start the serial connection with the copmuter
                       //to view the result open the serial monitor 
                       //last button beneath the file bar (looks like a box with an antenae)
}
 
void loop()                     // run over and over again
{
 float temperature = getVoltage(temperaturePin);  //getting the voltage reading from the tem
                    //perature sensor
 temperature = (temperature - .5) * 100;          //converting from 10 mv per degree wit 500
                    // mV offset
                                                  //to degrees ((volatge - 500mV) times 100)
 Serial.println(temperature);                     //printing the result
 delay(1000);                                     //waiting a second
}

/*
 * getVoltage() - returns the voltage on the analog input defined by
 * pin
 */
float getVoltage(int pin){
 return (analogRead(pin) * .004882814); //converting from a 0 to 1023 digital range
                                        // to 0 to 5 volts (each 1 reading equals ~ 5 milliv
                    //olts
}

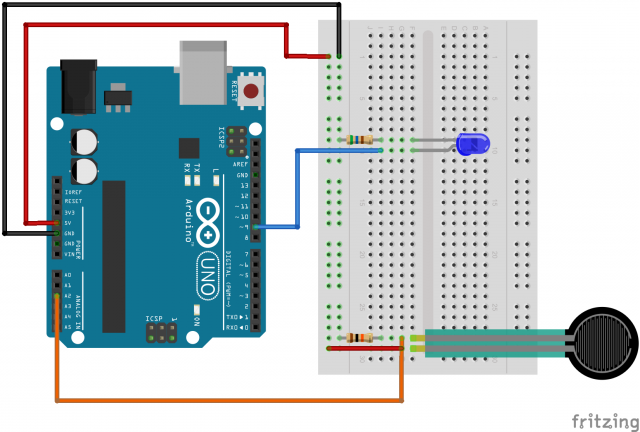
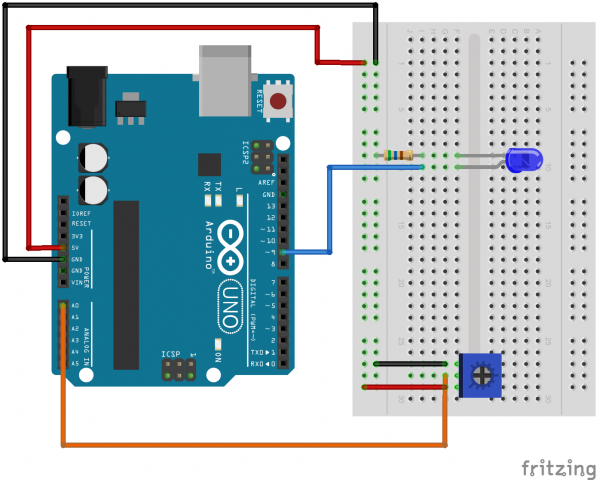
Variable Resistors

Pressure_bb

Potentiometer_bb

Code For potentiometer

/*
Analog Input
Demonstrates analog input by reading an analog sensor on analog pin 0 and
turning on and off a light emitting diode(LED) connected to digital pin 13.
The amount of time the LED will be on and off depends on
the value obtained by analogRead().

The circuit:
* Potentiometer attached to analog input 0
* center pin of the potentiometer to the analog pin
* one side pin (either one) to ground
* the other side pin to +5V
* LED anode (long leg) attached to digital output 13
* LED cathode (short leg) attached to ground

* Note: because most Arduinos have a built-in LED attached
to pin 13 on the board, the LED is optional.

 Created by David Cuartielles
 Modified 16 Jun 2009
 By Tom Igoe
 
 http://arduino.cc/en/Tutorial/AnalogInput
 
 */

int sensorPin = 0;    // select the input pin for the potentiometer
int ledPin = 13;      // select the pin for the LED
int sensorValue = 0;  // variable to store the value coming from the sensor

void setup() {
  // declare the ledPin as an OUTPUT:
  pinMode(ledPin, OUTPUT);  
}

void loop() {
  // read the value from the sensor:
  sensorValue = analogRead(sensorPin);    
  // turn the ledPin on
  digitalWrite(ledPin, HIGH);  
  // stop the program for  milliseconds:
  delay(sensorValue);          
  // turn the ledPin off:        
  digitalWrite(ledPin, LOW);   
  // stop the program for for  milliseconds:
  delay(sensorValue);                  
}

Code for force sensitive resistor

/*
 * Force Sensitive Resistor Test Code
 *
 * The intensity of the LED will vary with the amount of pressure on the sensor
 */

int sensePin = 2;    // the pin the FSR is attached to
int ledPin = 9;      // the pin the LED is attached to (use one capable of PWM)

void setup() {
  Serial.begin(9600);
  pinMode(ledPin, OUTPUT);  // declare the ledPin as an OUTPUT
}

void loop() {
  int value = analogRead(sensePin) / 4; //the voltage on the pin divded by 4 (to scale from 10 bits (0-1024) to 8 (0-255)
  analogWrite(ledPin, value);        //sets the LEDs intensity proportional to the pressure on the sensor
  Serial.println(value);              //print the value to the debug window
}

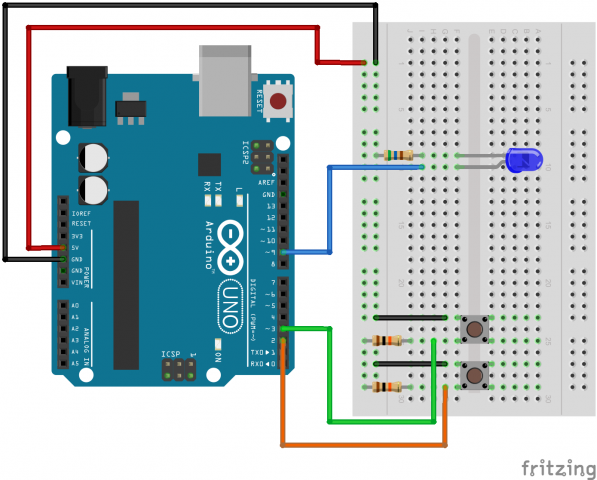
Buttons

Buttons_bb

int ledPin = 9; // choose the pin for the LED 
int inputPin1 = 3; // button 1 
int inputPin2 = 2; // button 2 
  
void setup() { 
  pinMode(ledPin, OUTPUT); // declare LED as output 
  pinMode(inputPin1, INPUT); // make button 1 an input 
  pinMode(inputPin2, INPUT); // make button 2 an input 
} 
  
int value = 0; 
void loop(){ 
  if (digitalRead(inputPin1) == LOW) { value--; } 
  else if (digitalRead(inputPin2) == LOW) { value++; } 
  value = constrain(value, 0, 255); 
  analogWrite(ledPin, value); 
  delay(10); 
} 

Assignment-10C: Temperature (Circuit 10)

Assignment-10C: Temperature (Circuit 10) + Serial

Temperature Circuit Temperature Circuit

As the user places their hand over the temperature sensor the numbers on the screen spike rapidly.


Fritzing diagram Fritzing diagram


Code:

/*     ---------------------------------------------------------
 *     |  Arduino Experimentation Kit Example Code             |
 *     |  CIRC-10 .: Temperature :. (TMP36 Temperature Sensor) |
 *     ---------------------------------------------------------
 *   
 *  A simple program to output the current temperature to the IDE's debug window 
 * 
 *  For more details on this circuit: http://tinyurl.com/c89tvd 
 */

//TMP36 Pin Variables
int temperaturePin = 0; //the analog pin the TMP36's Vout (sense) pin is connected to
                        //the resolution is 10 mV / degree centigrade 
                        //(500 mV offset) to make negative temperatures an option

/*
 * setup() - this function runs once when you turn your Arduino on
 * We initialize the serial connection with the computer
 */
void setup()
{
  Serial.begin(9600);  //Start the serial connection with the copmuter
                       //to view the result open the serial monitor 
                       //last button beneath the file bar (looks like a box with an antenae)
}
 
void loop()                     // run over and over again
{
 float temperature = getVoltage(temperaturePin);  //getting the voltage reading from the tem
                    //perature sensor
 temperature = (temperature - .5) * 100;          //converting from 10 mv per degree wit 500
                    // mV offset
                                                  //to degrees ((volatge - 500mV) times 100)
 Serial.println(temperature);                     //printing the result
 delay(1000);                                     //waiting a second
}

/*
 * getVoltage() - returns the voltage on the analog input defined by
 * pin
 */
float getVoltage(int pin){
 return (analogRead(pin) * .004882814); //converting from a 0 to 1023 digital range
                                        // to 0 to 5 volts (each 1 reading equals ~ 5 milliv
                    //olts
}