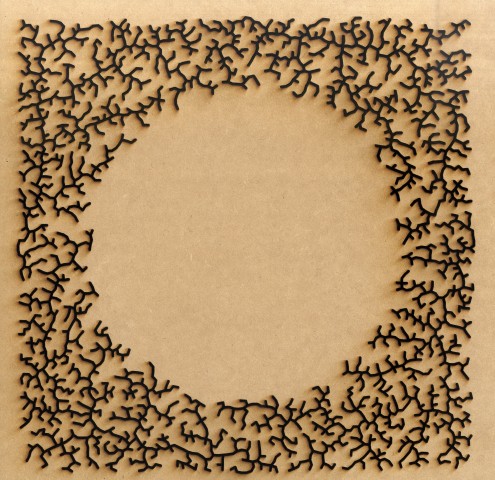
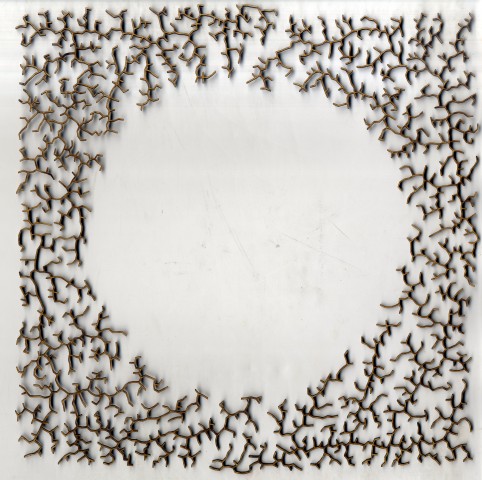
Segregation and Other Intolerant Algorithms [Lasercut Screen]

./wp-content/uploads/sites/2/2013/10/output1.pdf

Drawing loosely from the Nervous System presentation, I began thinking about processes I could exploit to churn out varied, yet unified designs. While searching for information about laplacian growth, I found this pithy sketch by echoechonoisenoise on OpenProcessing, which employs a grid of automata to generate a segregation pattern.

My cells are similarly situated in a grid, wherein three main processes occur. First, a matrix of cells is seeded by a scaled noise field, which is in turn refined and restricted using the modulus operator and a threshold. This design is problematic out of the tube, since the laser cutter wants lines and not filled blobs.

Filled blobs, before the outlines are isolated

So the second step is to use a neighbor-counting technique similar to echoechonoisenoise’s to isolate the border of the blob shapes. (If a cell has three out of eight possible neighbors, I can assume with some confidence that it is a bordering cell.) Third, to convert a set of disparate points to vector lines, I plot lines from each cell to the nearest available living cell.

Disclaimer: I try to produce smooth-ish lines in a relatively straight-forward fashion, but I admit that there are instances of weirdo trickery in my code:

import processing.pdf.*;

float cells[][];
float noiseScale = 100.0;
float scaleFactor = 1;
int dist = 3;
//density of pattern
int bandWidth = 1200;
//noise seed
int seed = 9;
int[] rule = {
  0, 0, 0, 1, 0, 0, 0, 0, 0
};
int searchRad = 12;
int cellCount = 0;

void setup() {
  size(900, 900); 
  cells = new float[width][height];
  generateWorld();
  noStroke();
  smooth();
  beginRecord(PDF, "output.pdf");
}

void generateWorld() {
  noiseSeed(seed);
  //Using a combination of modulus and noise to generate a pattern
  for (int x = 0; x < cells.length; x++) {
    for (int y = 0; y < cells[x].length; y++) {       float noise = noise(x/noiseScale, y/noiseScale);       if (x % int(bandWidth*noise) > int(bandWidth*noise)/2) {
        cells[x][y] = 0;
      }
      else if (y % int(bandWidth*noise) > int(bandWidth*noise)/2) {
        cells[x][y] = 0;
      }
      else {
        cells[x][y] = 1;
      }
    }
  }
}

void draw() {
  background(255);
  drawCells();
  //Draw the world on the first frame with points, connect the points on the second frame
  if (frameCount == 1) updateCells();
  else {
    for (int x = 0; x < cells.length; x++) {
      for (int y = 0; y < cells[x].length; y++) {         if (cells[x][y] > 0) {
          stroke(0);
          strokeWeight(1);
          //Arbitrary 
          for (int i = 0; i < 20; i++) {
            PVector closestPt = findClosest(new PVector(x, y));
            line(x * scaleFactor, y * scaleFactor, closestPt.x*scaleFactor, closestPt.y*scaleFactor);
          }
        }
      }
    }
    endRecord();
    println("okay!");
    noLoop();
  }
}

//Finds closest neighbor that doesn't already have a line drawn to it
PVector findClosest(PVector pos) {
  PVector closest = new PVector(0, 0);
  float least = -1;
  for (int _y = -searchRad; _y <= searchRad; _y++) {
    for (int _x = -searchRad; _x <= searchRad; _x++) {
      int x = int(_x + pos.x), y = int(_y + pos.y);
      float distance = abs(dist(x, y, pos.x, pos.y));
      if (x < 900 && x > 0 && y < 900 && y > 0) {
        if (distance != 0.0 && (cells[x][y] == 1) && ((distance < least) || (least == -1))  
          && cells[x][y] != 2) {
          least = distance;
          closest = new PVector(x, y);
        }
      }
    }
  }
  cells[int(closest.x)][int(closest.y)] = 2;
  if (closest.x == 0 && closest.y == 0) return pos;
  else return closest;
}

//If the sum of the cell's neighbors complies with the rule, i.e. has exacly 4 neighbors,
//it is left on, otherwise it is turned off. This effectively removes everything but the 
//outlines of the blob patterns. 
void updateCells() {
  for (int x = 0; x < cells.length; x++) {
    for (int y = 0; y < cells[x].length; y++) {
      cells[x][y] = rule[sumNeighbors(x, y)];
      if (cells[x][y] == 1) cellCount ++;
    }
  }
}
int sumNeighbors(int startx, int starty) {
  int sum = 0;
  for (int y = -1; y <= 1; y++) {
    for (int x = -1; x <= 1; x++) {
      int ix = startx + x, iy = starty + y;
      if (ix < width && ix >= 0 && iy >= 0 && iy < width) {
        if (cells[ix][iy] == 1) {
          if (x != 0 || y != 0) sum++;
        }
      }
    }
  }
  return sum;
}

void drawCells() {
  loadPixels();
  for (int x = 0; x < cells.length; x++) {
    for (int y = 0; y < cells[x].length; y++) {
      int index = (int(y*scaleFactor) * width) + int(x*scaleFactor);
      if (cells[x][y]==1) {
        pixels[index] = color(255);
      }
    }
  }
  updatePixels();
}

void mousePressed() {
  saveFrame(str(random(100)) + ".jpg");
}
 

Laser Cut – Fallen Leaves

./wp-content/uploads/sites/2/2013/10/screen_output.pdf

This is my first attempt at data visualization. Each leaf represents the amount of deaths per 100,000 people caused by a category of cancer in 2009. The size of each leaf is proportional to square root of 5 to those numbers.

The tree is also generated by Processing by consecutively drawing smaller rectangles. The leaves are made from Bezier curves.

I was inspired by “Epilogue” by The Antlers in regards to cancer.

Thanks to CDC for their data.

http://apps.nccd.cdc.gov/uscs/cancersbyraceandethnicity.aspx

int square_width = 15;
import processing.pdf.*;


PVector[] leaves;

// these represent cancer death rate per 100,000 people in 2009 US
// data from CDC http://apps.nccd.cdc.gov/uscs/cancersbyraceandethnicity.aspx
float[] rates = {3.7, 54.6, 64.3, 1.5, 5.7, 0.3, 22.4, 13.7,
				 0.1, 5.3, 0.8, 8.6, 4.2, 9.5, 1.5, 14.9};

void setup() {
  randomSeed(15251);
  smooth();
  noLoop();
  size(640, 640 , PDF, "output.pdf");
  //size(640, 640);
}

void draw() {
	background(255);
	fill(0);
	
	pushMatrix();
	translate(width/2-50, 0);
	scale(0.75, -0.75);
	draw_trunk(0, 0, 30.0, 200, 30);
	popMatrix();
	noFill();

	leaves = new PVector[rates.length];
	for(int i = 0; i < rates.length; i++)
	{
		pushMatrix();
		float r = rates[i];
		float x = random(30, width - 30);
		float y = 250+4*r+random(-30, 200);

		// loop through old leaves
		for(int j = 0; j < i; j++)
		{
			float old_x = leaves[j].x;
			float old_y = leaves[j].y;

			// if similar position, set new
			if((old_x + 50.0 > x && old_x - 50.0 < x) ||
			   (old_y + 50.0 > y && old_y - 50.0 < y))
			{
				x = random(30, width - 30);
				y = 250+4*r+random(-30, 200);
			}
		}

		leaves[i] = new PVector(x, y);

		translate(x, y);
		rotate(radians(random(-170, -10)));
		scale(pow(r, 0.2), pow(r, 0.2));
		draw_leaf(0.0,0.0);
		popMatrix();
	}
	exit();
}

  void draw_leaf(float x, float y)
  {
    bezier(x+10, y-3, 
           x+5, y-8, 
           x-5, y-8, 
           x-10, y);
    bezier(x+10, y+3, 
           x+5, y+8, 
           x-5, y+8, 
           x-10, y);

    strokeWeight(0.7);
    bezier(x+15, y, 
           x+12, y-2, 
           x-2, y+2, 
           x-5, y);

    strokeWeight(0.3);
    line(x+7, y, x+5, y-3);
    line(x+7, y, x+5, y+4);

    line(x+3, y+0.2, x+1, y-3);
    line(x+3, y+0.2, x+1, y+4);

    line(x-1, y+0.2, x-3, y-3);
    line(x-1, y+0.2, x-3, y+3.5);
    strokeWeight(1);
    
  }

void draw_trunk(int x, int y, float tree_thickness, int tree_height, int segments)
{
  pushMatrix();
  float current_tree_thickness = tree_thickness;
  float segment_height = tree_height/segments;

  translate(x,y);

  for(int i = 0; i < segments; i++)
  {
    translate(0, -segment_height);
    rect(0, 0, current_tree_thickness, segment_height*2.0);
    rotate(random(-0.1,0.1));
    current_tree_thickness *= 0.97;
  }

  for(int i = 0; i < 10; i++)
  {
    float random_scale = random(0.3, 3.0);
    draw_branch(0,0,radians(random(-30,40)),random_scale, random_direction());
  }

  popMatrix();
}

void draw_branch(int x, int y, float theta, float curve_scale, int direction)
{

  float len = 20.0;
  float branch_width = 5.0;

  pushMatrix();
  translate(x,y);
  rotate(theta*-1*direction);
  scale(direction, 1);
  
  if(direction < 0.0)
    translate(-25,0);
  else
    translate(-20,0);

  int branch_blocks = (int)random(2, 6);


  for(int i = 0; i < 80; i++)
  {
    translate(len, 0);
    rotate(random(-0.15, 0.05));
    rect(0,0,len,branch_width);
    branch_width *= 0.9;
    len = len*0.9;
  }
  popMatrix();
}

int random_direction()
{
  if(random(-1,1) > 0)
    return 1;
  else
    return -1;
}

Laser-cut screen (in Progress)

I wanted to incorporate two factors into my screen: first, text. I know this may look slightly bizarre after having been laser cut — Ds and Os will be simply cut from the screen — but I do not feel this is disadvantageous. There are some beautiful examples in the codelab for design students on the level below EMS which to me feel typographic rather than incomplete. The second was some kind of setup such that there was more text towards the top. This is because the most light would shine through the screen at the top in this setup, which would be much more visually balanced. I also wanted some of the words, like “rain” to show vertically rather than horizontally.
[pictures would be helpful — pending]

To implement this I decided to try to use the mutual repulsion spring system we were shown as this would be an opportunity to use a particle system without having to pack but I could still use (reverse) gravity to draw the text upwards towards the top of the screen. I’m still having trouble getting it to work, though, as text() does not work in quite the same way as ellipse(), particularly when one is trying to retreive words from an array…

(If anyone could shed some light on this, it would be great…)

In the mean time, here is my code:

ArrayList myWords;

void setup() {
myWords = new ArrayList();
//*
//* for (int i = 0; i < 10; i++) { //* float rx = random(width); //* float ry = random(height); //* //myWords.add(); //* myWords += randomWord; //* } // } void draw(){ background(255); float gravityForcex = -0.005; float gravityForcey = 0; float mutualRepulsionAmount = 1.0; for (int i = 0; i< 20; i++) { words nextWord = myWords.get(i); float wx = nextWord.wx; float wy = nextWord.wy; if (mousePressed) { nextWord.addForce (gravityForcex, gravityForcey); } //this part I essentially copied... I just couldn't think of a better way to do it... but I worked through the whole thing. for (int j=0; j 1.0) {

float componentInX = dx/dh;
float componentInY = dy/dh;
float proportionToDistanceSquared = 1.0/(dh*dh);

float repulsionForcex = mutualRepulsionAmount * componentInX * proportionToDistanceSquared;
float repulsionForcey = mutualRepulsionAmount * componentInY * proportionToDistanceSquared;

nextWord.addForce( repulsionForcex, repulsionForcey);
nextWord.addForce(-repulsionForcex, -repulsionForcey);
}
}
}

for (int i=0; i<50; i++) {
myWords.get(i).update(); //update
}

for (int i=0; i<50; i++) {
myWords.get(i).render(); // reeendering!!
}
}

// this is my other tab...
class words {
float wx;
float wy;
float vx;
float vy;
float mass;

words(float x, float y) {
wx = x;
wy = y;
vx = 0;
vy = 0;
mass = 1.0;
}

void addForce(float fx, float fy) {
float ax = fx/mass;
float ay = fy/mass;
vx+=ax;
vy += ay;
}

void update() {
wx +=vx;
wy += vy;
if (wx

Ralph-LookingOutwards-03

“Rewind” by Pauline Saglio is a series of digital clocks whose interface reacts to a certain manner of physical interaction. For example, when a gear is turn, it would start to unwind and the drawings on the clock would come to life while telling the time. I find this piece enjoyable to watch and well-crafted because it breaks the mold of the simple Campbell formula. The work does not react just to touch, but to a specific action, like turning a gear, and it seems to react in a plausible way to the physical input. What really surprised me was that the little elements in the clock were hand-drawn, rather than computationally generated. This quality sets the clocks apart from any old arduino-rigged digital clock, and becomes something quite personal. The only thing I wish to see would be just more of these clocks that react to different input, or one all-encompassing clock that can react to all of the different inputs and let those inputs interact in complicated ways.

The kinograph is a rig consisting of a digital camera, arduino, raspberry pi, and a bunch of 3D printed parts which work together to digitize films. This is a project that is utilitarian, but highly beneficial to the preservation of the arts. I can appreciate that this is just as important as the arts themselves. I know for a fact that many classics and landmark films have regrettably been lost and/or destroyed in fires. It is distressing for me to think how parts of our culture have been permanently lost, like losing something that has sentimental value to my history. The kinograph does not completely democratize film digitization (the cost of $3200 is nothing to sneeze at), but it is a huge improvement from the standard hundreds of thousands of dollars. It provides a much better alternative for private collectors and film studios, and it is a significant step forwards towards a complete democratization of the process, possibly saving thousands of pieces of our cultural history as well as preparing them for mass distribution.

https://www.youtube.com/watch?v=bFXJa_1_bHg

“Missing” is an installation produced by The xx. Because it’s the brainchild of an extremely famous band, it seems to have a lot of ambition and professional polish. The form of the space and its function are both very well-crafted. As for the form, the way the lightbulbs, speakers, and wires are all arranged makes it look like the set of a high-budget music video, and the fact that it functions as an installation piece that reacts to its audience puts it streets ahead of other music video sets. What really surprised me was the resourcefulness of the creators. The piece was completed from scratch in the span of six weeks with relatively modest means. I would love to actually visit this site, since the piece can only be appreciated through direct presence and sound. I would also enjoy seeing the piece re-appropriated as a music video set, or otherwise interacting with something other than just random people walking through.

Chloe – LookingOutwards03

LEVI’S STATION TO STATION PROJECT

Personally I’m always a fan of collaborations, particularly when it involves a large corporation attempting to get in sync with the current culture and connect with its consumers. Here, Levi’s agency, AKQA hired  Fake Love to redesign antique objects as web-enabled tools and traveled on Levi’s Station to Station project across the country in the Summer of 2013.

  • Still Camera (1939 Graflex) >> Instagram
  • Video Camera (1953 Bolex B8) >> Instagram Video
  • Typewriter (1901 Underwood No. 5) >> Twitter
  • Guitar(1953 Gibson E-125) >> SoundCloud

The objects relied on a combination of many new technologies, including the Rasperry Pi camera module, custom printed circuit boards, embedded AVR systems, Wi-Fi, Bluetooth, RFID, and OLED screens as well as a variety of buttons, switches, knobs and other input/output peripherals.

I loved the idea of revitalizing the old to update it for the now. On the hardware end, bringing what would be simply virtual services into a tangible state, especially on its classical origins that bring a new-found appreciation for what might be seen as old junk. At the same time, the fact that these devices connect its input to the social web adds a whole new dimension of community, further expanding the poetic effect that it has on me.

CHIAROSCURO by SOUGWEN CHUNG

CHIAROSCURO — Installation by Sougwen Chung from sougwen on Vimeo.

In an attempt to bring the art of drawing to a modern, interdisciplinary context, Chung’s Chiaroscuro makes use of large installed drawings with projection mapping, sensors and lights to immerse viewers in a world of contrasts. The project makes use of Arduino Teensy 3.0 to monitor a light sensor, used to adjust the brightness to the ambient light intensity, and a frequency analyzer (from Bliptronics) is used to analyze the sound spectrum to enhance the interplay of music, the forms of the drawings, and the lights of the projection mappings.

While the subdued role of Arduino being nothing more than a light emitter turned out to be rather disappointing, I find myself strongly attached to the project simply by its mesmerizing, dream-like aesthetics. For me, it is a reminder that while the advent of technology in art is amazing, it is ultimately the human element that really makes a piece.

SUPER ANGRY BIRDS by ANDREW SPITZ & HIDEAKI MATSUI

Super Angry Birds – a Tangible Controller from Andrew Spitz on Vimeo.

This project brings back the tactile sensation of a slingshot into the modern classic of Angry Birds by using a force feedback USB controller–essentially a hacked motorized fader found in audio mixing consoles to simulate the force one would feel when using a slingshot. For controlling the hardware, Spitz and Matsui used an Arduino-based microcontroller called Music & Motors developed by the CIID, programmed with Max/MSP.

I really appreciate the way the artifacts were so designed to stay true to its original inspirations, making the device a far more effective bridge over the gap between the real and the virtual. On the programming end, I was pleased to see that the controller was quite precise yet still stable despite the small scale of the controller (which I’d imagine would be quite difficult for those with shaky hands). A way that this project could be extended is if the tab on the slingshot could somehow change its graphics according to which bird one was using in the game. At the same time though, part of me wonders if there could be any other applications for these types of controls beyond this particular game, or the realm of gaming at all.

Happy No Grumpy

Happy No Grumpy from Chloe Chia on Vimeo.

As a favor for a friend obsessed with Grumpy Cat, I decided I would bring the meme to life by having him appear and judge the participant whenever a ‘smile’ was detected. After all, I’ve always been curious about the cutesy ‘smile detection technologies’ that some consumer cameras have, where the picture is only taken when all the faces detected in it are smiling. In my project, a ‘smile’ was determined by a rather crude set of ratios between the heights and width of the mouth in proportion to other properties on the face. Other data points used from the OSC included positioning and size, which helped determine the nature of the ‘neutral’ character, as well as the positioning of Grumpy Cat’s eyes, which in person, makes it seem as though he is looking at you regardless of how you are positioned towards the computer.

If it weren’t for time constraints I think I would’ve loved to pursue this further, smoothen the performance of the smile detection, and perhaps making use of OSC’s 3D capabilities to make for more a more natural neutral character, as well as the shifting of Grumpy Cat so that his judgement may rain ever more accurately.

Lasercut 2.0 – Cracks

./wp-content/uploads/sites/2/2013/10/cracks3.pdf

The results:

img001

img002

I changed my idea for the lasercut after the lecture today. Because of the limitations on shapes you can make with the lasercut, I decided to go back to using simple lines. I remembered back to the Recursive Trees code in the book Form + Code by Casey Reas and decided to search around the internet for similar code. Most trees had the problem of intersecting lines that would be impractical to lasercut. I was also thinking about the instructional art we had to engineer in an earlier assignment, because it was able to stop drawing lines once it detected another line.

Then I was looking at particle systems on OpenProcessing and found this one code called “Roots” that uses nodes like particles, and creates new nodes based on their distance from other nodes. His inspiration was Rapidly-exploring Random Trees (RRT). The link to that person’s code is here: https://openprocessing.orgsketch/38518

So I thought that would be very applicable to a lasercut, where everything has to be intact. I studied and grossly simplified the code to the point where I could understand it and modeled the growth of the nodes to match the Lissajous curves we learned in class. (Although, the circle still looked the best out of the various PDFs I saved…)

Here are my sketches:

photo (2)

photo (3)

Unfortunately, my code doesn’t work in Javascript so I can’t show it on OpenProcessing, but it is below:

// Credit goes to Alexander Mordvintsev for his code "Roots"
// which was inspired by RRT (Rapidly-exploring Random Trees)
// See here: https://openprocessing.orgsketch/38518

import processing.pdf.*;

ArrayList nodes;
int     branching    = 100;
float   branchLength = 5.0;
 
void setup()
{
  size(500,500);
  background(255);
  strokeWeight(1);
  smooth();
  nodes = new ArrayList();
  beginRecord(PDF, "cracks1.pdf");
}

void draw() {
  // Adds the parent node
  if (nodes.size() == 0)
    nodes.add(new Node(width-20,height/2));
  // Accelerates the amount of growth per frame
  for (int i=0; i<10; i++)
    grow();
}

void keyPressed() {
  endRecord();
  exit();
}

Node findNearest(Node p) {
  float minDist = 1e10;
  int minIndex  = -1;
  for (int i=0; i sq(branching));
  x += px;
  y += py;
  
  // Boundaries for the frame of the lasercut
  if(x>20 && x20 && y= branchLength) {
      Node newNode = new Node(base, sample);
      nodes.add(newNode);
      newNode.display();
    }
  }
}

class Node
{
  PVector pos;
  Node parent;
 
  Node(float x, float y) {
    pos = new PVector(x,y);
  }
  
  Node(Node base, Node sample) {
    PVector step = PVector.sub(sample.pos,base.pos);
    step.limit(5.0);
    pos = PVector.add(base.pos,step);
    parent = base;
  }
 
  float dist(Node other) {
    return PVector.dist(pos,other.pos);
  }
  
  // Draws a line between nearest node and new node
  void display() {
    if (parent!=null) {
      line(parent.pos.x, parent.pos.y, pos.x, pos.y);
    }
  }
}

Kimpi


(The video was laggy because my computer was having trouble handling Processing, FaceOSC, and video capture at the same time. Welp.)

I bit off a bit more than I can chew with trying to do things in 3D. I thought it would be cool to make a 3D game controlled by head movements that makes use of 3-D information provided by FaceOSC. The idea is to have a critter run on a grid and fire beams from its mouth to destroy obstacles. Properties used: face rotation, mouth height. The design of Kimpi (the critter) is supposed to include more complicated patterns, but I haven’t quite figured out how to draw them on correctly yet (too much math and pixel-manipulating). After making the general movements work, I realized that my visions of this game doesn’t really fit using FaceOSC very well – FaceOSC loses track of face easily, especially when the face is turned too much, so it is not fit for a slightly fast-paced game I wanted.

Task queue if/when time/interest allows/persists. As I was typing this, I realized this is way too ambitious even if I duplicated myself for the sole completion of this task:
– make Kimpi bounce up/down instead of glide (shouldn’t be hard)
– draw designs on Kimpi
– make keyboard controls
– include board tilt – Kimpi slides rapidly to one side
– include obstacles that can be destroyed when beam lands on them
– include enemies that actively attack Kimpi (flocking?) that can be destroyed by beam

Code for Kimpi Demo, Kimpi outward of screen and mirrors head movements. Made for testing Kimpi object class:

import oscP5.*;
OscP5 oscP5;

int     found;
PVector poseOrientation = new PVector();
float mouthHeight;

Kimpi kimpi = new Kimpi(50);

void setup() {
  size(400, 400, OPENGL, P3D);
  background(200);
  oscP5 = new OscP5(this, 8338);
  oscP5.plug(this, "found", "/found");
  oscP5.plug(this, "poseOrientation", "/pose/orientation");
  oscP5.plug(this, "mouthHeightReceived", "/gesture/mouth/height");

}
  
void draw() {
  background(200);
  translate(width/2, height/2, 0);
  spotLight(255, 255, 255, width/2, height/4, height*2, 0, 0, -1, PI/4, 2);

  if (found>0) {
    rotateY (poseOrientation.y); 
    rotateX (0-poseOrientation.x); 
    rotateZ (0-poseOrientation.z);
    println(mouthHeight);
  }


  kimpi.update(mouthHeight);
  kimpi.drawKimpi();

}


//----------------------------------
public void found (int i) { 
  found = i; 
}
public void poseOrientation(float x, float y, float z) {
  poseOrientation.set(x, y, z);
}
public void mouthHeightReceived(float h) {
  println("mouth height: " + h);
  mouthHeight = h;
}

class Kimpi{
  float radius;
  float headpieceW;
  float headpieceL;
  float mouthR = 0;
  float mouthRmax = 6;
  float eyeH;
  PFont f = createFont("Courier New Bold",16,true);
  
  Kimpi(float r){
    radius = r;
    headpieceW = radius/2;
    headpieceL = 5*headpieceW;
    eyeH = radius/12;
  }
  
  void update(float r){
    if (r<0) {
      mouthR = 0;
    }
    else if (r>mouthRmax) {
      mouthR = mouthRmax;
    }
    else {
      mouthR = r;
    }
  }

  void drawKimpi(){
    noStroke();
    fill(255,255,255);
    sphere(radius);
    
    float hx = 0;
    float hy = -radius;
    float hz = 0;
    
    pushMatrix();
    noFill();
    stroke(0,0,255,200);
    int nLines = 30;
    for (int i=0; i0) {
      rotateX(-PI/6);
      stroke(100);
      strokeWeight(3);
      noFill();
      beginShape();
      float theta = map((mouthR-1)/mouthRmax,0,mouthRmax,0,PI);
      for (int i=0; i< =20; i++){
        float phi = map(i,0,20,0,TWO_PI);
        float x = radius * sin(theta) * cos(phi); 
        float y = radius * sin(theta) * sin(phi); 
        float z = radius * cos(theta/2);
        vertex(x, y, z);
      }
      endShape();
      
      if ((mouthR-2>0)){
        float temp;
        if (mouthR-2<0) {
          temp = 0;
        } else {
          temp = mouthR-2;
        }
        stroke(200,220,255,200);
        float theta1 = map(temp/mouthRmax,0,mouthRmax,0,PI);        
        for (int i=0; i< =20; i++){
          float phi1 = map(i,0,20,0,TWO_PI);
          float x1 = radius * sin(theta1) * cos(phi1); 
          float y1 = radius * sin(theta1) * sin(phi1); 
          float z1 = radius * cos(theta1/2);
        
          line(x1,y1,z1,x1,y1-height/6,z1+height);
        }
      }
    }
    popMatrix();
  }
}

Code for Kimpi Beam, Kimpi faces into screen and travels on a grid:

import oscP5.*;
OscP5 oscP5;

int found;
PVector poseOrientation = new PVector();
float mouthHeight;

Kimpi kimpi = new Kimpi(20);

float unitSize = 30;
int nFrames0 = 50;
int nFrames = nFrames0;
float VX;
float VZ;
float maxV = 2;

Grid floor;

void setup() {
  size(800, 400, P3D);
  background(255,255,255);
  //  colorMode(HSB, 100);  
  floor = new Grid(width/2,height/5);
  
  oscP5 = new OscP5(this, 8338);
  oscP5.plug(this, "found", "/found");
  oscP5.plug(this, "poseOrientation", "/pose/orientation");
  oscP5.plug(this, "mouthHeightReceived", "/gesture/mouth/height");
  
  VX = sin(0)*maxV;
  VZ = cos(0)*maxV;
}

void draw() {
  background(255,255,255);
  
  float percentComplete = (float)(frameCount%nFrames)/ (float)nFrames;
  float runPercent = percentComplete;

  pushMatrix();
  translate(width/2,height/2,0);
  rotateX(PI/2.2);
  if (found>0) {
    VX = -sin(poseOrientation.y)*maxV;
    VZ = cos(poseOrientation.y)*maxV;
  }
  else {
    VX = sin(0)*maxV;
    VZ = cos(0)*maxV;
  }
  floor.drawGrid(percentComplete);
  popMatrix();
  
  
  pushMatrix();
  noStroke();
  fill(255,255,255);
  translate(width/2, 8.3*height/16, height/2);
  spotLight(255, 255, 255, width/2, height/4, height*2, 0, 0, -1, PI/4, 2);
  scale(1,1,-1);
  rotateX(PI/6);
  if (found>0) rotateY(poseOrientation.y);
  kimpi.update(mouthHeight);
  kimpi.drawKimpi();
  popMatrix();

}


class Grid {
  float left;
  float top;
  float currTX = 0;
  float currTZ = VZ;
  int dimension = int(2*width/unitSize);

  Grid(float cx, float cy) {
    left = cx-3*width/2;
    top = cy-height/1.5;
  }

  void drawGrid(float percent) {
    currTX+=VX;
    currTZ+=VZ;
    if (currTX>unitSize) currTX-=unitSize;
    if (currTZ>unitSize) currTZ-=unitSize;
    pushMatrix();
    translate(currTX,currTZ,0);
    stroke(0,240,255);
    fill(0);
    for (int i=0; imouthRmax) {
      mouthR = mouthRmax;
    }
    else {
      mouthR = r;
    }
  }

  void drawKimpi(){
    noStroke();
    fill(255,255,255);
    sphere(radius);
    
    float hx = 0;
    float hy = -radius;
    float hz = 0;
    
    pushMatrix();
    noFill();
    stroke(0,0,255,200);
    int nLines = 30;
    for (int i=0; i0) {
      rotateX(-PI/6);
      stroke(100);
      strokeWeight(3);
      noFill();
      beginShape();
      float theta = map((mouthR-1)/mouthRmax,0,mouthRmax,0,PI);
      for (int i=0; i< =20; i++){
        float phi = map(i,0,20,0,TWO_PI);
        float x = radius * sin(theta) * cos(phi); 
        float y = radius * sin(theta) * sin(phi); 
        float z = radius * cos(theta/2);
        vertex(x, y, z);
      }
      endShape();
      
      if ((mouthR-2>0)){
        float temp;
        if (mouthR-2<0) {
          temp = 0;
        } else {
          temp = mouthR-2;
        }
        stroke(200,220,255,200);
        float theta1 = map(temp/mouthRmax,0,mouthRmax,0,PI);        
        for (int i=0; i< =20; i++){
          float phi1 = map(i,0,20,0,TWO_PI);
          float x1 = radius * sin(theta1) * cos(phi1); 
          float y1 = radius * sin(theta1) * sin(phi1); 
          float z1 = radius * cos(theta1/2);
        
          line(x1,y1,z1,x1,y1-height/6,z1+height);
        }
      }
    }
    popMatrix();
  }
}

Adam-Looking-Outwards-03

My Little piece of privacy | Niklas Roy

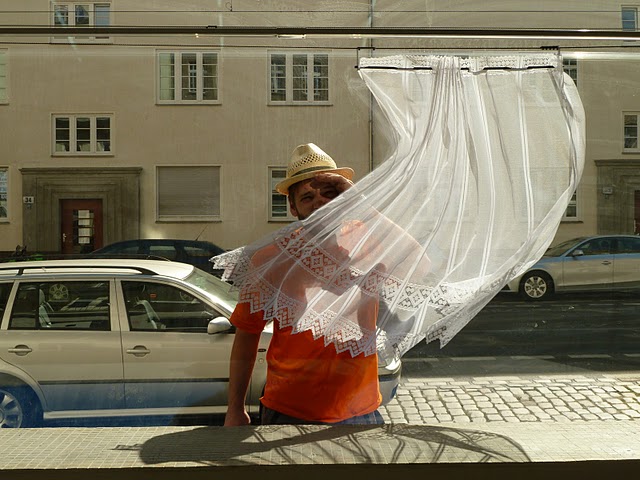
A really delightful piece in which a small lace curtain is motorised along a track. A camera is used to do some motion tracking and as people walk past the window the curtain is propelled in-front of them in an effort to protect the privacy of the buildings occupance. I like the idea of this “robot” trying so earnestly to protect and shield its owner. Arduino is used to send commands from the computer to the large servo controlling the curtain.

Eunoia | Lisa Park

http://www.metalocus.es/content/en/system/files/file-images/ml_eunoia_02_1024.png

Eunoia from Lisa Park on Vimeo.

Lisa uses Arduino to translate her brain activity into vibrations in the 5 dishes that sit around her.
There is something beautiful about taking something as subtle and intangible as a brain wave and converting it into something so visible and powerful.

Troblion | Stefan Schwabe

https://www.creativeapplications.net/wp-content/uploads/2010/12/troblion1.jpg

TROBLION from stschwabe on Vimeo.

I think that this work has a lot of potential, but that it wasn’t achieved in the project.
I love this idea of a robotic sphere with no clue as it its orientation. Actually it doesn’t have external orientation…
I also like how it slowly gets covered in red clay, camouflaging itself. You could almost mistake it for something organic. It would have been interesting to see if they clay that gets peeled off its “body” could be fired and used – perhaps a bowl?

Laser Tadpole Things – WIP

./wp-content/uploads/sites/2/2013/09/frame-1217.pdf

My original idea for this was to have tadpole-looking creatures playing follow-the-leader with the mouse cursor. I’d hoped an image of them flocking together would be cool, but as you can see from the PDF, it may not translate well into a lasercut. (I tried filling the forms in black so the hole shapes would be more apparent). Alas, I did not figure out how to get the tails to move, how to keep them completely separate from each other, or keep them away from the edges. I could have them die if they get too close to the edge, but that would look unnatural. Also, even though I have been trying to study Daniel Shiffman’s code very closely, I’m not totally understanding the built-in functions and methods he uses, so pretty much all of the code is from his tutorials and simulation.

And that is why I’m pretty much stumped right now. But playing with the particles is actually really fun. I made it so you can click on the screen so the tadpoles will appear. I added the attractor and repeller classes, but I didn’t use them in the PDF. I saved the PDF by hitting a keyboard button. Here is the thing below:

* Note that the tadpoles are dying very unnaturally because of the shift from Java to JS