Assignment 04
This assignment is due Thursday, September 12th. This has been moved from Tuesday to Thursday, to allow for more worktime.
This assignment has four components:
- Looking Outwards: Processing / Generativity
- Reproduce Schotter (1968) by Georg Nees
- An Iterative Design (Wallpaper/Fabric Design)
- A Looping, Animated, Computationally Generated GIF
Looking Outwards: Processing and/or Generativity
For this sub-assignment, you are asked to do a Looking Outwards that focuses on works created with Processing, and/or computational works that are generative in nature.
Consider the following sites that document and collect projects made in Processing:
- The Processing Exhibition site. Note that there are about 13 pages of featured works (the numbered links to other pages are at the bottom of the page).
- Projects categorized with Processing from CreativeApplications.net.
- Projects tagged with Processing from the video-sharing site, Vimeo.
- Projects tagged with Processing from the image-sharing site, Flickr.
- Projects tagged with OpenProcessing from Flickr.
- Projects from OpenProcessing.org. (Note that many of these projects are Java applets which, since 2012, are blocked by many browsers.)
Additionally, consider this large list of links to artists who create generative art.
Now:
- Do a “Looking Outwards” that focuses on 3 projects which are either made with Processing, and/or that use computational generative principles.
- If you don’t see something that interests you, keep looking.
- Try to choose diverse things. Or things which interest you in different ways.
- For each project, embed an image and/or video, and write a paragraph about why you found it interesting. Be sure to attribute the project correctly (title, creators).
- Peek at the code for each of them, if the code is given.
- Remember to categorize your blog post with LookingOutwards.
Reproducing Schotter (1968) by Georg Nees
[From Gerald King]: Perhaps you are wondering why artists copy paintings in museums, as I am doing. The answer is to study, to learn, and to find inspiration from the great masters of the past. Copying directly from works of art gives the artists insight into the creative process — insights which cannot be learned from any other source.
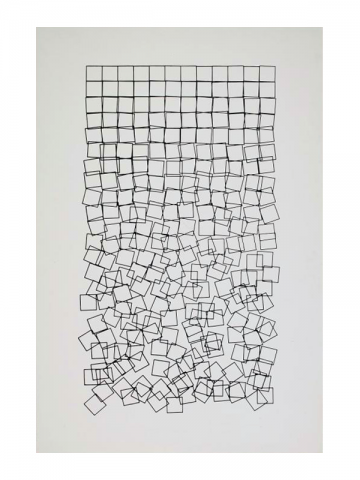
In this exercise, we will hone our skills, as artists have done for centuries, by copying a masterwork. Schotter (1968) by Georg Nees is one of the earliest computer artworks ever created, and a fit subject for study. 
Georg Nees is one of the pioneers of computer art. Born in Germany in 1926, he was a pupil of Max Bense, the founder of the Information Aesthetics movement. It is believed that Nees’ solo show at the University of Stuttgart in February 1965 was the first exhibition of computer art. One of Georg Nees’ signature pieces is Schotter (“Gravel” in German), a plotter/lithograph artwork from 1968. It is now in the collection of the Victoria & Albert Museum, London.
For this project, you will reproduce Schotter in Processing (JavaScript) or Processing.js. Don’t forget to include the following:
- Create a blog post, entitled YourName-Schotter.
- Embed the Processing.js active object in your post. To do this, upload it to OpenProcessing.org, and then use their iframe code to embed it in your post.
- Embed an image of your results (maximum width 600 pixels, please).
- Embed your Processing code into your blog post, using the WP-Syntax plugin. Instructions for doing so are here and here. Note that you may need to switch to the WordPress text (not Visual) editing mode at this point. (Otherwise, code with < and > characters can get messed up.)
- Please label your blog post with the WordPress Category, Assignment-04-Schotter.
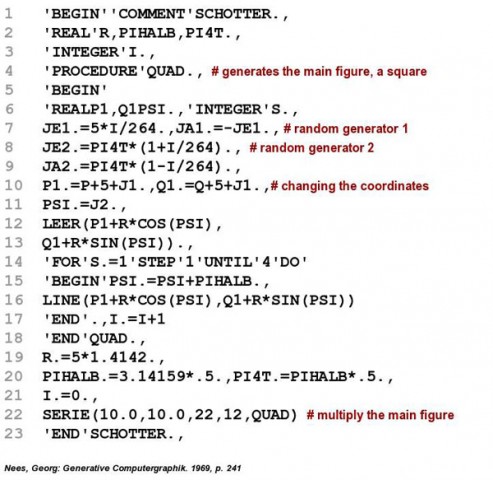
In case you’re curious, here is Nees’ original code, and his commentary about how the piece was generated: 
«Image 38 [«Schotter»] is produced by invoking the SERIE procedure […]. The non-parametric procedure QUAD serves to generate the elementary figure which is reproduced multiple times in the composition process controlled by SERIE. QUAD is located in lines 4 through 15 of the generator. This procedure draws squares with sides of constant length but at random locations and different angles. From lines 9 and 10, it can be seen that the position of a single square is influenced by random generator J1, and the angle placement by J2. The successively increasing variation between the relative coordinates P and Q, and the angle position PSI of a given square, is controlled by the counter index I, which is invoked by each call from QUAD (see line 14).»
Generative Wallpaper
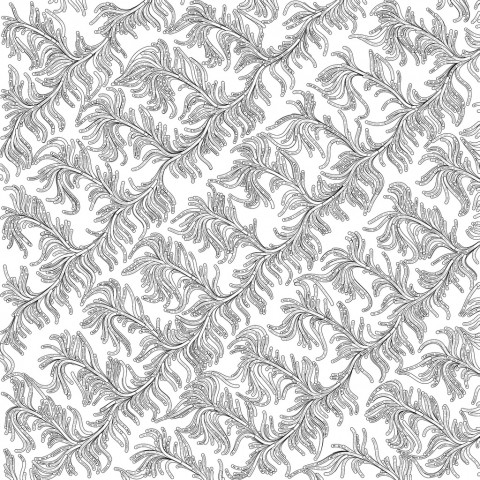
We continue our formal studies. In this project, you will use generative techniques to design a repeating pattern to generate an attractive wallpaper or fabric.
For some mathematical inspirations, see
- Uniform tilings
- List of Convex Uniform Tilings
- Tiling by Regular Polygons
- Wallpaper Groups
- Escher Web Sketch (Java applet)
Incidentally, wallpaper can be interesting as well as beautiful. For example, here’s some recent work by the Italian group ToDo, developed using the visual programming toolkit Nodebox.js: Spamghetto Wallpaper.
Now:
- SKETCH FIRST! Seriously, sketch first: to design a repeating pattern which would make an attractive wallpaper or fabric. Give consideration to symmetry, proportions, details. If you use color, use it well.
- Create a composition which generates a wallpaper or fabric pattern. Do a nice job. Make something that you might want to upload to a fabrication-on-demand service, like:
- http://constrvct.com/ (custom-printed clothing)
- http://www.spoonflower.com/ (custom-printed fabric, wallpaper, decals, gift wrap, etc.)
- Here’s some additional information on coding nested iteration, FWIW. I also have some detailed examples I wrote for last year’s class.
- Per your artistic inclination, you may include subtle randomness for visual interest.
- Upload your work to our OpenProcessing classroom.
The Processing toolkit is not limited to rendering graphics to a computer’s screen device; it can also render and export PDF files. Now you will modify your above design to be exported via PDF, such that the deliverable is a high-resolution PDF vector file (embedded in a blog post) and an associated paper printout.
- Instead of drawing to the screen, we can draw your wallpaper to a (vector based) PDF file. First, review the documentation of Processing’s PDF export library. Use the techniques described there to produce a PDF version of your wallpaper. I recommend the templates for either ”Single Frame (With Screen Display)” or ”Single Frame from an Animation (With Screen Display)”.
- Print out your PDF onto an 11×17″ sheet of paper and bring it to class for a pinup critique. Color or B&W are both fine; up to you. Portrait or landscape orientations are both fine, too. Please have your work printed before class begins.
- Additionally, embed your PDF in a blog post, categorized “Assignment-04-Wallpaper”. We are using the Embed PDF plugin. To embed the PDF in your blog post:
- Click on the little “Add Media” button in the WordPress editor (
 ), just above the text-formatting toolbar containing buttons for Bold, Italic, etc.
 - Upload your PDF to the course server;
- Be sure to grab the “Link URL” of your PDF image (it will look like ./wp-content/uploads/sites/2/2013/09/yourname-wallpaper.pdf or something). This is important! Because…
- You will now embed the PDF into your WordPress blog post, using a specially-formatted “shortcode”, which will cause it to be viewed with the Google Docs PDF Viewer. To do this, simply include the URL for your specific PDF document on its own line, or wrapped in the embed tag as shown below — and the plugin will embed the PDF into the page. The URL of your document must end with
.pdf. - Note: no credit for this project will be given for screenshots or other raster graphics. You actually have to generate a PDF file.
- Click on the little “Add Media” button in the WordPress editor (
Here’s what the HTML for your embedded PDF will look like in WordPress:
./wp-content/uploads/sites/2/2013/09/golan-wallpaper.pdf
And here’s how your PDF should appear when it is successfully embedded (naturally, your composition will be much more interesting):
./wp-content/uploads/sites/2/2013/09/golan-wallpaper.pdf
A Looping, Animated, Computationally Generated GIF
In this assignment, you will create a looping, animated GIF from computationally generated graphics in Processing. First, some inspiration:

- Study the work of DVDP (Davidope): http://dvdp.tumblr.com/. (Be sure to click on the links (–) at the bottom of the site to see previous pages.)
- Study the work of Paolo Čerić: http://patakk.tumblr.com/. (Again, be sure to click on the “older” links to see previous pages.) There is also a survey of some of his work in ThisIsColossal.
- Syed Reza Ali has been using animated GIFs to document his lovely work. For Ali, they are a compact, lightweight and durable format. His software may not be easy to get running in ten years, but the GIFs will still work reliably.
- The British experimental animator, Cyriak Harris, is a prodigious creator of weird and disturbing animated GIFs.
- If you’ve got time to kill, there’s also this epic NSFW GIF mashup by Evan Roth:
[vimeo https://vimeo.com/14782834]
Now:
- SKETCH FIRST! Before doing anything, make some (real) sketches in your notebook.
- Write Processing code which creates a (seamlessly) looping animation. You may use the code template below to get started.
- Your design may be abstract, figurative, etc. according to your tastes. I recommend that your image be 600 pixels wide, and that you restrict yourself to just a few colors. Remember, GIFs must represent all of your frames with a single a palette of just 256 colors.
- Export a series of frames, and compile these into an animated GIF. Here is a helpful tutorial for creating animated GIFs from folders of images, using Photoshop. Remember to set its duration to “forever”. Your GIF can be any length, but keeping it under 2MB would be sensible, and there is a hard upload limit of 12MB per file for our WordPress site.
- In a blog post, upload and embed your animated GIF.
- Write a paragraph about the experience of creating the piece. Critique your work: where you feel you succeeded, where you feel you fell short of what you’d hoped to achieve.
- Include a scan or photo of your pen-and-paper sketches.
- Embed your Processing code into the blog, using the WP-Syntax plugin. Instructions for doing so are here and here. Note that you may need to switch to the WordPress text (not Visual) editing mode at this point. (Otherwise, code with < and > characters can get messed up.)
- Label your blog post with the Category, Assignment-04-GIF.
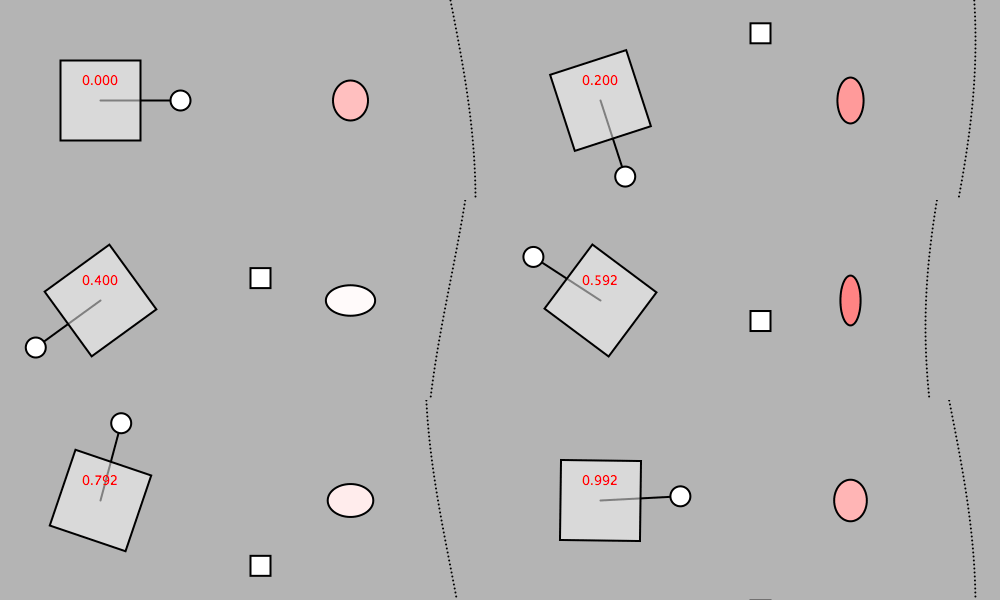
Here is an animated GIF, and the Processing code template that produced it: 
// This is a template for creating a looping animation in Processing.
// When you press a key, this program will export a series of images
// into an "output" directory located in its sketch folder.
// These can then be combined into an animated gif.
// Prof. Golan Levin, September 2013 - CMU EMS2A

//===================================================
// Global variables.

int     nFramesInLoop = 120;
int     nElapsedFrames;
boolean bRecording;

//===================================================
void setup() {
  size (500, 200);
  bRecording = false;
  nElapsedFrames = 0;
}
//===================================================
void keyPressed() {
  bRecording = true;
  nElapsedFrames = 0;
}

//===================================================
void draw() {

  // Compute a percentage (0...1) representing where we are in the loop.
  float percentCompleteFraction = 0;
  if (bRecording) {
    percentCompleteFraction = (float) nElapsedFrames / (float)nFramesInLoop;
  } else {
    percentCompleteFraction = (float) (frameCount % nFramesInLoop) / (float)nFramesInLoop;
  }

  // Render the design, based on that percentage.
  renderMyDesign (percentCompleteFraction);

  // If we're recording the output, save the frame to a file.
  if (bRecording) {
    saveFrame("output/myname-loop-" + nf(nElapsedFrames,4) + ".png");
    nElapsedFrames++;
    if (nElapsedFrames < (nFramesInLoop+1)) {
      bRecording = false;
    }
  }
}

//===================================================
void renderMyDesign (float percent) {

  // This is an example of a function that renders a temporally looping design.
  // It takes a "percent", between 0 and 1, indicating where we are in the loop.
  // This example uses two different graphical techniques.
  // Use or delete whatever you prefer from this example.
  // Remember to SKETCH FIRST!

  //----------------------
  // here, I set the background and some other graphical properties
  background (180);
  smooth();
  stroke (0,0,0);
  strokeWeight (2);

  //----------------------
  // Here, I assign some handy variables.
  float cx = 100;
  float cy = 100;

  //----------------------
  // Here, I use trigonometry to render a rotating element.
  float radius = 80;
  float rotatingArmAngle = percent * TWO_PI;
  float px = cx + radius*cos(rotatingArmAngle);
  float py = cy + radius*sin(rotatingArmAngle);
  fill    (255);
  line    (cx, cy, px, py);
  ellipse (px, py, 20, 20);

  //----------------------
  // Here, I use graphical transformations to render a rotated square.
  pushMatrix();
  translate (cx, cy);
  float rotatingSquareAngle =  percent * TWO_PI * -0.25;
  rotate (rotatingSquareAngle);
  fill    (255, 128);
  rect (-40, -40, 80, 80);
  popMatrix();

  //----------------------
  // Here's a linearly-moving square
  float squareSize = 20;
  float topY = 0 - squareSize - 2;
  float botY = height + 2;
  float yPosition = map(percent, 0,1, topY,botY);
  fill (255,255,255);
  rect (250, yPosition, 20,20);

  //----------------------
  // Here's a pulsating ellipse
  float ellipsePulse = sin ( 3.0 * percent * TWO_PI);
  float ellipseW = map(ellipsePulse, -1,1, 20,50);
  float ellipseH = map(ellipsePulse, -1,1, 50,30); ;
  float ellipseColor = map(ellipsePulse, -1,1, 128,255);
  fill (255, ellipseColor, ellipseColor);
  ellipse (350,cy, ellipseW, ellipseH);

  //----------------------
  // Here's a travelling sine wave
  for (int sy=0; sy < height; sy+=4){
    float t = map (sy, 0,height, 0.0,0.25);
    float sx = 450 + 25.0 * sin ((t + percent)*TWO_PI);
    point (sx,sy);
  }

  //----------------------
  // If we're recording, I include some visual feedback.
  if (bRecording) {
    fill (255, 0, 0);
    textAlign (CENTER);
    String percentDisplayString = nf(percent, 1, 3);
    text (percentDisplayString , cx, cy-15);
  }
}
