Graphical Score – Generative Music – Looking outwards

by chaotic*neutral @ 11:32 am 26 February 2011

Since I have my performance at Bakery Square coming up at the end of March, I will merge/mod my game event actions sending out OSC (generative sound) to a graphic score for a percussion ensemble to play live. These are my bookmarks for references.

my first quick test in OF

references


guitar hero is a natural graphical score with gaming


http://blog.wfmu.org/freeform/2007/01/gallery_of_musi.html

Huaishu Peng + Charles Doomany: Project 3- Neurospasta

by cdoomany @ 3:22 am 25 February 2011

Neurospasta (Greek word usually translated as “puppets”, which means “string-pulling”, from nervus, meaning either sinew, tendon, muscle, string, or wire, and span, to pull), is a game without any defined objective or goal, but rather a platform for experimentation and play.

Neurospasta is am interactive two-player game in which the player’s physical movements are mapped to a 2D avatar. The game’s graphic interface consists of a set of manipulation functions which enable players to interact with their avatar as well as the other player’s.

In terms of software, we used Open NI for the skeletal tracking and OpenFrameworks for the UI and texture mapping.

*For future consideration, Neurospasta would include a larger selection of manipulation functions and in an ideal environment would be able to capture and generate avatar textures for accommodating new player identities.

Susan Lin + Chong Han Chua — Balloon Grab, Project 3 Final

by susanlin @ 12:42 pm 23 February 2011

The Technical Magic

Technically, this project was lots of fun and frustration, all in the same sentence. The kinect depth map is not a very stable in general. Blob detection tends to be unstable across frames as a result.

The hand detection algorithm is overtly complex but it works like this:

  1. For every depth of 15 values or so, it thresholds front and back.
  2. For the thresholded image, it uses the openCV contour finder to look for blobs within a certain range.
  3. Cull if the blobs are too high or low in the frame.
  4. Calculate the ratio between blob and boundingRect.
  5. Calculate the distances between the centroid and the perimeter. Cull if there are no more than 4 peaks in the difference in distances. The idea is to start the recognition by looking at an open hand.
  6. Iterate through current row of hands. If there is already an existing hand in the same location, assume they are the same and merge them together.
  7. If not, add a new hand.
  8. There is also a lifetime function to calculate basically a confidence level for the blob. Because the kinect drop frames, it is essential to actually “remember” that there was a hand in the same location.

The closed hand detection uses the above, but looks if the smaller blob overlaps the existing larger area. As we can observe in the video, it is fairly good but not entirely robust. There are a few techniques to improve detection going forward.

  1. Use real dimensions to calculate length. We can estimate hand size by using real measurements.
  2. Use bounding polygon versus blob instead of bounding rect. This way we can account for the “holes” in the hand and get a more accurate result.
  3. Remember the size, depth and location and guess intelligently.

The rest of the sketch uses box2d and various other enhancements such as a gradient drawer that takes in any arbitrary RGB color on each end. Another challenge that we had in the project was to deal with C++ code. C++ is en entirely too verbose language compared even to Java, which says alot. Another bug that I encountered was that the vector class actually uses the copy constructor on the push_back function. This actually led to 2 different copies of the same object at one point in the program. In short, pointers is such a big hairy mess. However, this was solved in the version demoed, hence the animations.

All in all, pretty fun! I’ll continue in working on the robustness of the hand detection and hopefully able to get some hand gestures going on.

Process + Back-story

At first, we were planning to generate the art using code. The first two prototypes were done in Flash and Processing, to get the feel for the physics of the floating and collisions. However, when porting to C++ it became evident that our project’s scope was somewhat large. We cut trying to generate images and having implementing a system that animated the pngs.

As for the story, we wanted to play with the idea of the “Red String of Fate.” Ran out of the time, but ideally, the hands would be tied together with red string and the players would not be able to float unless all participants were clenching their hands (grabbing balloons). There was a lot of thought for all the cases. Here’s a snippet:

2 Hands:
Co-op
Rise: can only rise when both hands are closed
Fall: when EITHER hand is open

1 open, 1 closed: balloon hand goes to top of screen, but balloon bursts due to lack of co-op

3 Hands:
Co-op with “weighted” areas on string
Rise: all 3
Fall: any 1 hand
1 open, 2 closed: can’t even float up
2 open, 1 closed: balloon hand goes to top of screen, but balloon bursts due to lack of co-op

shawn sims-roboScan-Project3

by Shawn Sims @ 12:36 pm

roboScan is a 3D modeler + scanner that uses a Kinect mounted on a ABB4400 robot arm. Motion planning and RAPID code are produced in Robot Studio and Robot Master. This code sends movement commands and positions to the robot as well as the 3D position of the camera. C++ and openFrameworks are used to plot the depth data of Kinect in digital 3D space to produce an accurate model of the environment.

This work was done by Shawn Sims and Karl Willis as the first project of the research group Interactive Robotic Fabrication. The facilities of the Digital Fabrication Lab in the School of Architecture at Carnegie Mellon were used in the making of this project.

There were many technical hurdles along the way. We needed to “teach” the robot the coordinates of the Kinect IR camera in order to accurately move the perspective through 3D space. We also attempted to calibrate the Kinect. We successful did this but it is in fact hard to tell if it made a difference. All-in-all we learned a lot about the robot and about the difficulties of moving a camera around and still trying to extract continuous and accurate data.

Many thanks to dFab, Zach Ali, and Jeremy Ficca

Project 3 | Kinect Flock | Alex Wolfe and Ray Lin

by Alex Wolfe @ 12:36 pm

Developed using Cinder + OpenNI + NITE +Xbox Kinect

After seeing what the Kinect was capable of, we were interested in using it to generate a particle system that would respond to user movement and depth placement. By pulling out the depth map, we were able to isolate the user to an extremely high level of accuracy.

The particles flock to the silhouette of the user when he or she is still and exhibits flocking/swarming behavior otherwise, creating mesmerizing shapes that ebb and flow between the recognizable and unknown.

Creation Process

Each point  that comprises my body pulled from the kinect depth map has a gravitational pull on one particle in the simulation. The strength of this force is inversely related to how fast I’m moving, so when I stand perfectly still the particle zooms to the point it corresponds to, and when I move its free to wander and behave on its natural flocking tendency. Thus you get these really compelling visuals as my silhouette breaks and reforms depending on how fast I’m moving.

Ray set out getting the kinect to actually work with Windows and pull the depth map/user data out from it using the OpenNI library and NITE drivers. Almost all of the current kinect support is for Macs, so this was no small feat! We attempted our project in Processing and Openframeworks, but finally settled on Cinder for our developing environment.

early concept sketch


Here’s a short clip of some process sketches I did in Processing in order to explore the flocking behavior before porting it over with some more hard hitting graphics to Cinder. And countless thanks to Robert Hodgin for his fantastic “Hello Cinder” tutorial


more from Alex: alexwolfe.blogspot.com

more from Ray:

Kinect VJ’ing

by chaotic*neutral @ 10:30 am

playing around testing the kinect @ brillobox pittsburgh with Keeb$, Cutups, and Freddy Todd (detroit)
stackinpaper.com/​

Openframeworks.cc
tuio.org/​
osculator.net/​
OF, FFT OSC, MSA 3D Shape, Kinect, TUIO

SamiaAhmed-Final-Interactttt!

by Samia @ 9:48 am

Process:

I wanted to create an interaction that was  physically reactive — given that the kinect requires you to engage physically, it made sense to me to bring the interaction off of the screen and into a real space. Golan pointed me towards Marie Sester’s Access project, which does exactly that, engage an inbetween space with a spotlight that automatically follows people.


There were lots of techincal challenge in this project for me — getting the right drivers, learning about working with hardware and sending information over serial, dmx protocol, as well as working with the kinect, (very, very) basic image processing, blob tracking.

I approached the project from two ends, first, working with a strobe light (which has only 4 channels) and blob tracking separately, and then finally meeting in the middle so that the blob position controlled the light position of a moving light.

In the end math got in the way a little bit, instead of calculating the position of where the lights should pan and tilt to using trig, I created a grid over the kinect data, and plotted the light movement to points, which was conceptually easier for me to understand. It works, but there’s some choppy-ness.

OF 3d

by chaotic*neutral @ 9:27 am

Initial graphics for integrating with networked kinect skeletons.

Project 3 – Huaishu Peng & Charles Doomany

by huaishup @ 1:06 pm 21 February 2011

Neurospasta

a Kinect based 2-player interaction game


CONCEPT

For our main concept we will be developing an experimental game in which two players have the ability to manipulate their own avatar as well as the other player’s avatar. The players will have the choice to interact, fight with their avatar against one another, or just simply explore different ways of manipulating the appearance and/or ability of their avatar.
The player’s avatar will consist of a rag-doll/skeletal model which will mimic the actions of the player via kinect video/depth capture.

The graphic interface will provide a menu for selecting a specific body part and a manipulation function menu for changing certain characteristics or abilities of the selected part.


THE GAME

After trying really hard for a week, we implemented Neurospasta (Greek word usually translated as “puppets”, which means “string-pulling”, from nervus, meaning either sinew, tendon, muscle, string, or wire, and span, to pull), a game without any defined objective or goal, but rather a platform for experimentation and play.

Neurospasta is am interactive two-player game in which the player’s physical movements are mapped to a 2D avatar. The game’s graphic interface consists of a set of manipulation functions which enable players to interact with their avatar as well as the other player’s.
In terms of software, we used Open NI for the skeletal tracking and OpenFrameworks for the UI and texture mapping.


FUTURE PLAN

*For future consideration, Neurospasta would include a larger selection of manipulation functions and in an ideal environment would be able to capture and generate avatar textures for accommodating new player identities.

Meg Richards – Project 3

by Meg Richards @ 1:01 pm

Mix & Match Interactive Toy


Mix and match toys and games are a popular activity for children. It typically appears as an upright cylinder or rectangular prism with multiple standing human or animal figures independently painted or carved into the surface. The shape is divided into thirds that rotate independently, allowing the different heads, torsos, and legs of the painted or carved figures to align. They have existed in many forms of media and targeted different age groups over their two-hundred year history. Changeable Gentlemen, a card game published around 1810 targeting adults, was one of the earliest manufactured mix and match games. Adaptations in base material and figure subjects made it more suitable for a younger audience, and modern incarnations are generally as a classic toy for children.

I chose a mix and match toy as the interaction subject because it’s a ubiquitous toy and gives almost all the players a baseline familiarity. Also, while the media and figures are numerous over the last two hundred years, the method of interaction has always been hand manipulation. The Kinect enables the player to use their entire body to control the figure. The figures are from a card game “Mixies” published in 1956 by Ed-U-Cards. The player can rotate through different heads, torsos, and feet by swiping above, at, or below the player’s midsection, respectively. Swiping to the left will rotate to the next card to appear, and swiping to the right will rotate to the previous card. The figure will follow a player’s horizontal and vertical movement, bending, and if they turn around.


I used OpenFrameworks, ofxKinect, and OpenNI. Once the skeleton is detected, the images are overlayed at the position and angle of the corresponding section. Hands and arms do not directly affect card placement, so they are free to control the card rotation. Sweep/wave detection is simply a matter of the end of the left or right arm moving over a certain horizontal distance within a time threshold. If the user’s back is turned, the back of the card is displayed instead of the obverse.

Project 3 – Paul Miller and Timothy Sherman

by ppm @ 12:53 pm

Magrathea uses the kinect camera to dynamically generate a landscape out of any structure or object. The kinect takes an depth reading of what’s built on the table in front of it, which is then rendered live onscreen as terrain using openFrameworks and OpenGL.

The depth image is used as a heightmap for the terrain. A polygon mesh gradually morphs to match the heightmap, creating a nice rise and fall behavior. Textures are dynamically applied based on the height and slope of the mseh. For example, steep slopes are given a rocky texture, and flatter areas a grassy one. As the user builds and removes, the landscape correspondingly grows and sinks out of the ocean, shifting into a new configuration.

Landscapes can be made from anything, such as blocks, boxes, the human body, and even a giant mound of dough.

We both learned OpenGL and openFrameworks for this project.

If we were to continue this project further, we’d do so by adding more textures with more complex conditions, learning shaders and improving the graphics, populating the world with flora and fauna based on certain conditions, and possibly allowing for color-coded objects that could be recognized and rendered as specific features, say, a statue, or giant Yggdrasil like tree.

Project 3–Interaction–Kinect Hand Waving

by Ben Gotow @ 10:16 am

What if you could use hand gestures to control an audio visualization? Instead of relying on audio metrics like frequency and volume, you could base the visualization on the user’s interpretation of perceivable audio qualities. The end result would be a better reflection of the way that people feel about music.

To investigate this, I wrote an OpenFrameworks application that uses depth data from the Kinect to identify hands in a scene. The information about the users’ hands – position, velocity, heading, and size – is used to create an interactive visualization with long-exposure motion trails and particle effects.

There were a number of challenges in this project. I started with Processing, but it was too slow to extract hands and render the point sprite effects I wanted. I switched to OpenFrameworks and started using OpenNI to extract a skeleton from the Kinect depth image. OpenNI worked well and extracted a full skeleton with wrists that could be tracked, but it was difficult to test because the skeletal detection took nearly a minute every time the visualization was tested. It got frustrating pretty quickly, and I decided to do hand detection manually.

Detecting Hands in the Depth Image
I chose a relatively straightforward approach to finding hands in the depth image. I made three significant assumptions that made realtime detection possible:

  1. The users body intersects the bottom of the frame
  2. The user is the closest thing in the scene.
  3. The users hands are extended (at least slightly) in front of their body

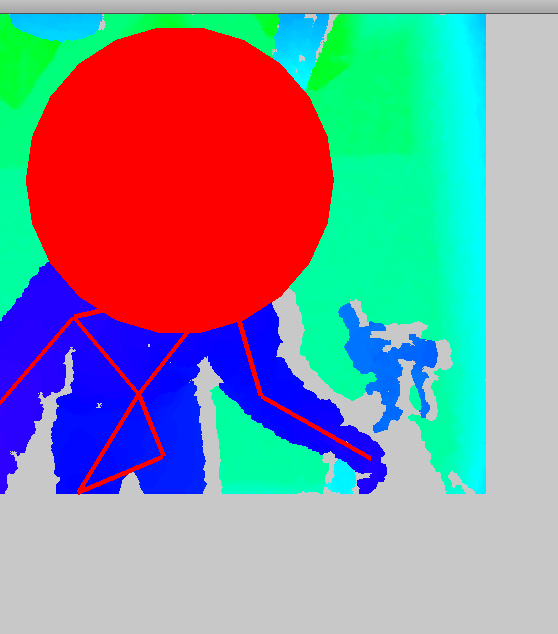
Assumption 1 is important because it allows for automatic depth thresholding. By assuming that the user intersects the bottom of the frame, we can scan the bottom row of depth pixels to determine the depth of the users body. The hand detection ignores anything further away than the user.

Assumptions 2 and 3 are important for the next step in the process. The application looks for local minima in the depth image and identifies the points nearest the camera. It then uses a breadth-first search algorithm to repeatedly expand the blob to neighboring points and find the boundaries of hands. Each pixel is scored based on it’s depth and distance from the source. Pixels that are scored as part of one hand cannot be scored as part of another hand and this prevents near points in the same hand from generating multiple resulting blobs.

Interpreting Hands
Once pixels in the depth image have been identified as hands, a bounding box is created around each one. The bounding boxes are compared to those found in the previous frame and matched together, so that the user’s two hands are tracked separately.

Once each blob has been associated with the left or right hand, the algorithm determines the heading, velocity and acceleration of the hand. This information is averaged over multiple frames to eliminate noise.

Long-Exposure Motion Trails
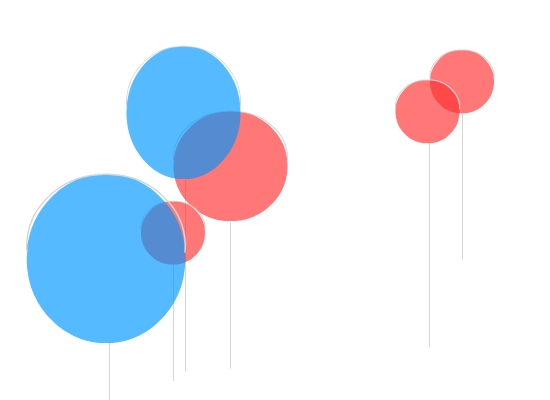
The size and location of each hand are used to extend a motion trail from the user’s hand. The motion trail is stored in an array. Each point in the trail has an X and Y position, and a size. To render the motion trail, overlapping, alpha-blended point sprites are drawn along the entire length of the trail. A catmul-rom spline algorithm is used to interpolate between the points in the trail and create a smooth path. Though it might seem best to append a point to the motion trail every frame, this tends to cause noise. In the version below, a point is added to the trail every three frames. This increases the distance between the points in the trail and allows for more smoothing using catmul-rom interpolation.

Hand Centers
One of the early problems with the hand tracking code was the center of the blob bounding boxes were used as the input to the motion trails. When the user held up their forearm perpendicular to the camera, the entire length of their arm was recognized as a hand. To better determine where the center of the hand was, I wrote a midpoint finder based on iterative erosion of the blobs. This provided much more accurate hand centers for the motion trails.

Particle Effects
After the long-exposure motion trails were working properly, I decided that more engaging visuals were needed to create a compelling visualization. It seemed like particles would be a good solution because they could augment the feeling of motion created by the user’s gestures. Particles are created when the hand blobs are in motion, and more particles are created based on the hand velocity. The particles stream off the motion trail in the direction of motion, and curve slightly as they move away from the hand. They fade and disappear after a set number of frames.

Challenges and Obstacles
This is my first use of the open-source ofxKinect framework and OpenFrameworks. It was also my first attempt to do blob detection and blob midpoint finding, so I’m happy those worked out nicely. I investigated Processing and OpenNI but chose not to use them because of performance and debug time implications, respectively.

Live Demo
The video below shows the final visualization. It was generated in real-time from improv hand gestures I performed while listening to “Dare you to Move” by the Vitamin String Quartet.

Le Wei and James Mulholland – Project 3 Final Will o’ the wisp

by Le Wei @ 8:47 am

temporary!

James will be posting the video at his post here.

Eric Brockmeyer and Jordan Parsons – Project 3 – Interaction

by eric.brockmeyer @ 8:26 am

We created a path mapping system which projects a graphic visualization of a user’s path on the ground behind and on top of them. The setup included a ceiling mounted projector, a 45 degree hanging mirror, two computers (Mac OS and Windows 7), and a Microsoft Kinect Sensor. We used the openframeworks libraries ofxOSC, ofxKinect, and ofxOpenCV to track users, communicate between machines and generate graphics.

Tasks
The code for interpreting video (and later Kinect) data, was a challenge for us because we wanted to include a beginning and end point as well as a unique ID for each path. We accomplished this using vectors in C++ which allowed for continuous creation and destruction of paths. This path data was sent to the graphics machine in packets including the ID, x position, y position, and state (begin, middle, end).

The graphics program took this information and created classes of paths. These paths interpret the direction of the user and create a varied color palette that refreshes upon the creation of each new path. In the wake of the user, circles expand and dissolve in subtle pattern. The memory of the path fades quickly and allows for more users to enter the space.

We also had to design and build a mirror mount to ‘fold’ our projection giving it a slightly larger footprint in our space. The CNC milled mount is made from oriented strand board (OSB) which notches together and has adjustable height and rotation. The mirrored acrylic, screwed and taped to the mount, was donated by Max Hawkins (Thanks Max!).

Challenges
We are both new to C++ and openframeworks so we took it upon ourselves to develop this project exclusively on that platform. There were problems in handling the amount of data that came in and was sent between machines. Getting smooth clean data from the openCV library proved to be a challenge. Also, using depth values from the Kinect remains unresolved.

Sorting through the paths and nodes within those paths was a challenge. We had to properly parse all incoming data to be added to the correct path and pathholder (place holder).

Kinect Tracer from eric brockmeyer on Vimeo.

Room For Improvement
We would like to utilize our start and end functions in some graphical manner. We would like to figure out why our depth data in the Kinect was so imprecise. We also would like to further debug our data transmission and improve our parsing data structures.

Project 3 :: Caitlin Boyle & Asa Foster :: We Be Monsters

by Caitlin Boyle @ 7:42 am

Asa and I were clear and focused from the very beginning: from the moment we got our Kinect, we were hoping to make a puppet. We wound up with something that can be controlled with our bodies, which is a step in the right direction, but I think we hold the most stock in the process that got us there and what we can do to improve our project.

The first major problem was my laptop… which refused to install OSCeleton, which did all of the talking in between Processing and OpenNI. Because of this itsy bitsy snafu, all debugging and the majority of programming had to be done on Asa’s computer, which was only possible when both of us were free. Despite this, once we got things running on Asa’s laptop(which didn’t happen until Wednesday of last week) we took off running, using primarily a Processing sketch by OSCeleton’s creator Sensebloom,  Stickmanetic. Our original plan was to create a series of puppets that could be controlled by two or more users, using Kitchen Budapest’s Animata software, but we quickly hit our second wall: Animata can only take in one set of skeleton points at a time, as it uses a limited OSC mode that does not send user# information. We could not use Animata, as we had planned, to make cooperative puppets: after trying and failing to get max.msp.jitter working with .pngs (max isn’t really an image-friendly software, it much prefers sound and video), we decided to bite the bullet and try to re-create a very basic Animata in Processing.

We wanted to make puppets that would be interesting to interact with, and that did not adhere to human anatomy; I sketched up a Behemoth, a Leviathan, and a dragon and handed them over to Asa to get cleaned up and separated into puppet parts in Flash.

my behemoth

my leviathanWilliam Blake's version

Our Puppet - so full of hope and possibilities.

We brought the .pngs into Processing, got Processing to recognize two separate users and assign them puppet parts, and we got the puppet parts following our skeletons, but then ran into a problem that took up the rest of our night, and ultimately spelled our defeat: ROTATE. We were trying to link the .pngs with pivot points that the pieces would rotate around as if they were riveted down, but no matter what we tried we could not get the rotating pieces to behave correctly. In the interest of keeping the puppet from flying off into the abyss, we scrapped the rotate function-for now- and made a much stiffer puppet that sits directly on our skeletons, rather than a puppet that is controlled  by our skeleton but keeps it’s own, non-humanoid skeleton. (Click any of the following images to view a video of the Behemoth doin’ it’s thing).

click for video

Behemoth’s got chickin’ legs (for now- we drew bones from the hip to the knee on each leg as a temporary fix for Wandering Foot Syndrome).

click for video

Asa and I trying to work out how to walk forward, back to back (documentation of our physical puppetry process on it’s way).

click for video

DESTROY THE COUNTRYSIDE.

It is incredibly difficult to control coherently- it takes a lot of back and forth conversation between the front and back half of the behemoth to get anything that looks like a solid creature; in the featured video, I am controlling the front and Asa has the back. It’s also challenging to move your body the way the puppet needs to be moved, but I think this works FOR the puppet… in order to be the puppeteer, you have to learn how to move your limbs in counter intuitive ways.


We re-wrote our code, and got our Behemoth off the ground!

Project 3: Interact – Behemoth

by Asa Foster @ 4:35 am

The skeletal tracking that we are capable of accessing through the Kinect and OpenNI is a freaking goldmine. The initial setup of getting it all to work properly was one of the hardest parts, as there were about 8 different drivers and libraries and terminal banter that all needed to be installed before the damn thing would spit out coordinates. But once we got it all running on my laptop (but not Caitlin’s, which presented us with our second largest problem throughout the whole project) everything got going. We got coding and had a lot of examples and some of our own code up and running in no time. As a side note, I wrote up a skeletal tracking visualizer in Max/MSP, something I haven’t seen anywhere else on the web. It was a good bit of encouragement to know that I have more kung-fu than I originally expected.

The original plan was to create a series of drawn puppets that would be controlled by two or more users. Our first idea was to use Kitchen Budapest’s Animata software, but we realized that there would be no easy way to include our most important feature, multi-user interface, within Animata. It became apparent that we were, more or less, going to have to write our own Animata-like program in Processing. Starting with Sensebloom’s example Processing app “Stickmanetic” that came with OSCeleton (a basic stick-figure gui for the skeleton tracker), we tweaked it to be the controls for our puppet.

As for content, we wanted to go with something that wasn’t humanoid. Having a human puppet, i.e. waving an arm and seeing an arm wave, would be pretty banal. Thus, we decided to go with something mythological. We originally wanted to do two or three puppets, so the pair of Old Testament beasts, the Leviathan and Behemoth, seemed spot on. Behemoth was to be a two person puppet, and Leviathan a four user. We had a three user dragon in there as well, but as soon as the project’s scope would be somewhat unfeasible, we decided just to make one kick-ass Behemoth and maybe come back to the other two for a future project. The Behemoth puppet itself is a drawing I did in Flash using Caitlin’s (amazing) original puppet sketches.

After chugging along and getting the parts following the skeleton points, we came upon our single most debilitating hurdle: rotate. No matter what we tried (and try we did for hours), we couldn’t get the images to rotate around a fixed point, which is what we needed to be able to chain the puppet parts together with rivets. We spent most of the night trying to get rotate working and it just never did. Things were always showing up in completely illogical places, if they even showed up at all.

Finally we decided to go for broke and throw together a completely linear puppet (just placing the images on the skeletal points as is). The thing looked disconnected and jumpy, and the legs were attached with god-awful elastic orange bones. But at least we had something:

During the second full day of working on this thing we finally found a massively overcomplicated but functional way of computing the rotation using trigonometry. When all was said and done we had one humongous trig function that got the knees working that looked something like this:

Although the function ended up working and we eventually got a rough but pretty solid model working. Albeit choppy, everything worked like it should. 72 hours, one all-nighter, and many many expletives later, we had both a functional puppet and an earth-shattering realization: the exact solution to the problem was in the goddamned examples folder. And to just rub some salt in it, it happened to be under “basics”.

And thus we embark once again to rebuild this thing in a much better and much simpler fashion. Because, as Golan says, “when it sucks less, it will suck a LOT less”.

Kinect Subway Hack

by Max Hawkins @ 8:02 am 14 February 2011

testOutput_901263350_4

I think we’ve reached the point where we can stop calling them hacks now, but I’ll do it anyway.

I’m still not sure what this project is trying to do, but it sure is pretty.

As I see it this fits squarely into the beautiful quadrant of Wattenberg’s triangle. It’s nice to see some Kinect projects working in the realm of pure aesthetics.

Many of the projects up until now have been about technogeekery.

[flickr]

zDepth hack OpenNI

by chaotic*neutral @ 12:55 pm 9 February 2011

Hey guys I did a simple mod to the openNI library to allow you to get some z space depth information. This is just a quick hack to ofxTrackedUser.cpp

It takes the x position of the right shoulder, subtracts the difference in distance to the x position of the left shoulder, then draws a circle to the neck begin. The radius of the circle is mapped to the difference in distance between the two shoulders. SO IN SHORT: the further away the subject, the closer together the shoulder points, therefore the less distant between the two, in result a smaller head. Vice versa.

This will give you a head and z depth. Please feel free to improve it, as I just did this in a few minutes and thought I’d share.

NOTE: this is just a quick hack, if you turn shoulders (their x coordinates line up, it will shrink the head) Anyone have some other solutions?

 
#include "ofxTrackedUser.h"
#include "ofxDepthGenerator.h"
#include "ofxUserGenerator.h"
 
float xL;
float yL;
float xR;
float yR;
float zDEPTH;
 
ofxTrackedUser::ofxTrackedUser(
	 ofxUserGenerator* pUserGenerator
	,ofxDepthGenerator* pDepthGenerator
) 
:neck(XN_SKEL_HEAD, XN_SKEL_NECK)
 
// left arm + shoulder
,left_shoulder(XN_SKEL_NECK, XN_SKEL_LEFT_SHOULDER)
,left_upper_arm(XN_SKEL_LEFT_SHOULDER, XN_SKEL_LEFT_ELBOW)
,left_lower_arm(XN_SKEL_LEFT_ELBOW, XN_SKEL_LEFT_HAND)
 
// right arm + shoulder
,right_shoulder(XN_SKEL_NECK, XN_SKEL_RIGHT_SHOULDER)
,right_upper_arm(XN_SKEL_RIGHT_SHOULDER, XN_SKEL_RIGHT_ELBOW)
,right_lower_arm(XN_SKEL_RIGHT_ELBOW, XN_SKEL_RIGHT_HAND)
 
// upper torso
,left_upper_torso(XN_SKEL_LEFT_SHOULDER, XN_SKEL_TORSO)
,right_upper_torso(XN_SKEL_RIGHT_SHOULDER, XN_SKEL_TORSO)
 
// left lower torso + leg
,left_lower_torso(XN_SKEL_TORSO, XN_SKEL_LEFT_HIP)
,left_upper_leg(XN_SKEL_LEFT_HIP, XN_SKEL_LEFT_KNEE)
,left_lower_leg(XN_SKEL_LEFT_KNEE, XN_SKEL_LEFT_FOOT)
 
// right lower torso + leg
,right_lower_torso(XN_SKEL_TORSO, XN_SKEL_RIGHT_HIP)
,right_upper_leg(XN_SKEL_RIGHT_HIP, XN_SKEL_RIGHT_KNEE)
,right_lower_leg(XN_SKEL_RIGHT_KNEE, XN_SKEL_RIGHT_FOOT)
 
,hip(XN_SKEL_LEFT_HIP, XN_SKEL_RIGHT_HIP)
,user_generator(pUserGenerator)
,depth_generator(pDepthGenerator) 
,xn_user_generator(&user_generator->getXnUserGenerator())
,is_tracked(false)
{
}
 
void ofxTrackedUser::updateBonePositions() {
	updateLimb(neck);
 
	// left arm + shoulder
	updateLimb(left_shoulder);
	updateLimb(left_upper_arm);
	updateLimb(left_lower_arm);
 
	// right arm + shoulder
	updateLimb(right_shoulder);
	updateLimb(right_upper_arm);
	updateLimb(right_lower_arm);
 
	// upper torso
	updateLimb(left_upper_torso);
	updateLimb(right_upper_torso);
 
	// left lower torso + leg
	updateLimb(left_lower_torso);
	updateLimb(left_upper_leg);
	updateLimb(left_lower_leg);
 
	// right lower torso + leg
	updateLimb(right_lower_torso);
	updateLimb(right_upper_leg);
	updateLimb(right_lower_leg);
 
	updateLimb(hip);	
}
 
void ofxTrackedUser::updateLimb(ofxLimb& rLimb) {
	if(!xn_user_generator->GetSkeletonCap().IsTracking(id)) {
		//printf("Not tracking this user: %d\n", id);
		return;
	}
 
	XnSkeletonJointPosition a,b;
	xn_user_generator->GetSkeletonCap().GetSkeletonJointPosition(id, rLimb.start_joint, a);
	xn_user_generator->GetSkeletonCap().GetSkeletonJointPosition(id, rLimb.end_joint, b);
	if(a.fConfidence < 0.3f || b.fConfidence < 0.3f) {
		rLimb.found = false; 
		return;
	}
 
	XnPoint3D pos[2];
	pos[0] = a.position;
	pos[1] = b.position;
	depth_generator->getXnDepthGenerator()
		.ConvertRealWorldToProjective(2, pos, pos);
 
	rLimb.found = true;
	rLimb.begin.set(pos[0].X, pos[0].Y);
	rLimb.end.set(pos[1].X, pos[1].Y);
	ofSetColor(255, 0, 0);
	//ofCircle(pos[0].X, pos[0].Y, 5);
 
	float xL = left_upper_arm.begin.x;
	float yL = left_upper_arm.begin.y;
 
	float xR = right_upper_arm.begin.x;
	float yR = right_upper_arm.begin.y;
 
	zDEPTH = xR - xL;
 
}
 
void ofxTrackedUser::debugDraw() {
	neck.debugDraw();
 
	// left arm + shoulder
	left_shoulder.debugDraw();
	left_upper_arm.debugDraw();
	left_lower_arm.debugDraw();
 
	// right arm + shoulder
	right_shoulder.debugDraw();
	right_upper_arm.debugDraw();
	right_lower_arm.debugDraw();
 
	// upper torso
	left_upper_torso.debugDraw();
	right_upper_torso.debugDraw();
 
	// left lower torso + leg
	left_lower_torso.debugDraw();
	left_upper_leg.debugDraw();
	left_lower_leg.debugDraw();
 
	// right lower torso + leg
	right_lower_torso.debugDraw();
	right_upper_leg.debugDraw();
	right_lower_leg.debugDraw();
 
	hip.debugDraw();
	ofDrawBitmapString(ofToString((int)id),neck.begin.x+ 10, neck.begin.y);
 
	ofCircle(neck.begin.x, neck.begin.y, zDEPTH);
 
}

A really simple tutorial for installing kinect & openNI on PC

by huaishup @ 11:47 am

First of all, there is a video tutorial you can follow:

—————here is the tutorial————–
Basically you need 3 things: OpenNI, Kinect Driver, NITE.

1. OpenNI
OpenNI-Bin-Win32-v1.0.0.25.exe (http://www.openni.org/downloadfiles/openni-binaries/latest-unstable/25-openni-unstable-build-for-windows-v1-0-0/download)

Install it.

2. SensorKinect (https://github.com/avin2/SensorKinect/raw/master/Bin/SensorKinect-Win32-5.0.0.exe)
This is the driver. Just click the file and run it.

3. After install the driver, plugin the kinect. Your PC should find the device automatically. (BTW, the audio driver doesn’t work, but it doesn’t matter)

4. NITE( for skeleton)
(http://www.openni.org/downloadfiles/openni-compliant-middleware-binaries/latest-unstable/46-primesense-nite-unstable-build-for-windows-v1-3-0/download)
Install it, use the free key: 0KOIk2JeIBYClPWVnMoRKn5cdY4=

Now you can try some samples under C:\Program Files\OpenNI\Samples\Bin\Release
Recommendation: the NiUserTracker.exe is one that can detect multi-users and do the skeleton mapping thing.

Enjoy.

Huaishu

Charles Doomany + Huaishu Peng: Project 3 Concept Sketch

by cdoomany @ 12:25 am

For our main concept we will be developing an experimental game in which two players have the ability to manipulate their own avatar as well as the other player’s avatar. The players will have the choice to interact, fight with their avatar against one another, or just simply explore different ways of manipulating the appearance and/or ability of their avatar.
The player’s avatar will consist of a 3D rag-doll/skeletal model which will mimic the actions of the player via kinect video/depth capture.

The graphic interface will provide a menu for selecting a specific body part and a manipulation function menu for changing certain characteristics or abilities of the selected part.

Some examples of the manipulation functions may include:
• altering mass/gravity
• scale
• add weapon or projectile to a limb
• etc.

« Previous PageNext Page »
This work is licensed under a Creative Commons Attribution-Noncommercial-Share Alike 3.0 Unported License.
(c) 2023 Interactive Art & Computational Design / Spring 2011 | powered by WordPress with Barecity