This page contains project resources by Prof. Paolo Pedercini in our department.
Virtual Sculpture Project Template
For the “Virtual Sculpture” mini-project, download THIS UNITY PACKAGE (“virtual-sculpture-museum-and-materials“), and import it into a new Unity project.
This is a more sophisticated project template than above; it has some materials to play with described in the materials video below, and some other useful things.
Finding and Importing Assets from Online
There are plenty of websites with free assets online but some of them are a bit sketchy, and the models aren’t “game-ready”, so always start searching in the Unity Asset Store and Sketchfab.
Some Free 3D Models & Textures:
-
- The Unity Asset Store (filter by free)
- http://www.davidoreilly.com/library
- https://sketchfab.com/3d-models/
- https://www.turbosquid.com/
- https://polyhaven.com/
- https://free3d.com/3d-models/fbx
- https://3dwarehouse.sketchup.com/search/?searchTab=model
- https://opengameart.org/
- https://www.kenney.nl/assets
Free Skyboxes at the Unity Asset Store:
Advice:
- The best type of files are FBX and OBJ. You can import .blend if you have Blender installed.
- Look for generic-looking stuff to assemble and recombine in new ways. Don’t use models that are already digital sculptures, highly stylized, or full scenes.
- Some models will not import properly. If they have messy geometry, dark faces or holes, it’s probably easier to find an alternative model. Some textures and materials may not work; it happens (repairing faulty 3D models can require significant expertise). I recommend changing any materials within Unity for this assignment.
This video (below) by Prof. Pedercini explains how to import 3D models from the Unity Asset Store, and how to import more complex models (with textures) from sites like SketchFab.com (though your mileage may vary). Watch from the beginning until 19’30”.
This video is also helpful in explaining how to import meshes into Unity, especially if they have been built in Blender:
Use Low-Poly Models!
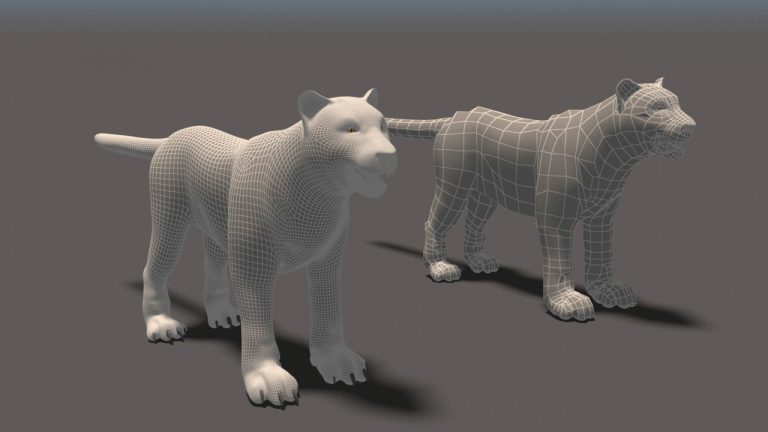
Remember: we are working in real time, so we need “low poly” models (models with few polygons)!
What does “low poly” count mean? It’s relative. For a character or prop, the model on the right is preferable. If, when visualizing the wireframe, the edges are too dense to distinguish, then the model is definitely too detailed for the purpose of this assignment.
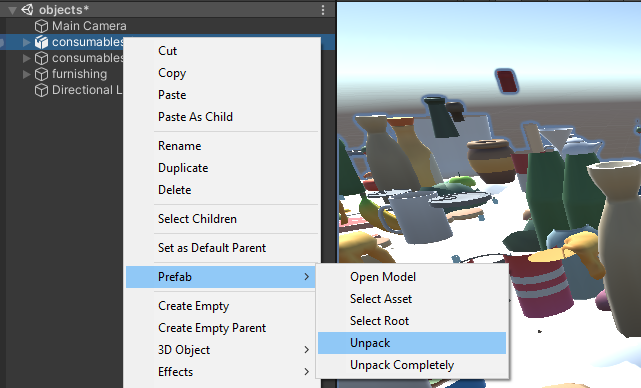
Imported objects might appear as prefab: prepackaged objects with associated components. Their icon will look different in the hierarchy. To work with a prefab (e.g. copy-pasting an object within it) you’ll need to unpack it:
Lighting
The light game objects are straightforward components to use. However, in a 3D engine, how lighting affects an object depends on a variety of factors such as:
- Materials: Materials contain information like color, texture, and how they reflect light (or better, simulate light reflection). The logic that governs light reflection (and more) in a material is defined by scripts called shaders.
- Textures: Texture images are properties of the materials but their mapping, or how they wrap around meshes, depends on the model. Designing texture maps is a complex process that can’t be done in Unity. If a model comes with a texture properly mapped, you can attempt to alter the texture image in Photoshop, but creating your own textures is beyond the scope of this class.
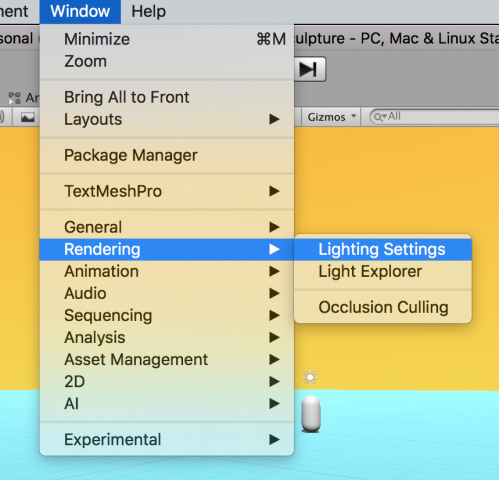
- Ambient light and other global settings: there are a lot of settings, and they are in the “lighting” panel. You should always keep it open next to the inspector (menu window > rendering > lighting settings). We’ll just look at the skybox and the fog. We will not get into baking lights and other rendering pipelines.
- Post-processing effects – they are a bit like Instagram filters applied to the entire screen after the scene has been rendered. Activating post-processing effects is a bit tricky [YouTube tutorial] but the template provided to you should have them already set up. Just add the effects on the “Post Processing Effects” object, and activate each.
One of the many tutorials covering lights:
Advanced lighting tutorial by Prof. Pedercini, including post-processing effects:
Materials and Shaders
The easiest way to customize a found 3D asset is by changing the material. Here’s a video going though the “chicken museum” scene included in the template above. It gets a bit technical; don’t worry if you don’t understand certain things.
Optional: Advanced Modeling with Blender
If you are interested in learning 3D modeling, or you are already familiar with it: you can import, clean up, and manipulate the assets in Blender before importing them in Unity. This is the sequence of technical tutorials for Blender that Prof. Pedercini has created:


