Looking-Outwards (Simulation): Simulation of Biological Systems

by mghods @ 11:06 pm 18 February 2010

Below are some videos related to creating art by simulating Biological Systems:

Here are some links to great resources regarding Simulation of Biological Systems:

http://www.red3d.com/cwr/ (Steering Behaviour, Flocking, and Artificial Life)

http://www.alife.org/links.html (Artificial Life – Links to great small software)

http://www.cc.gatech.edu/~turk/bio_sim/index.html ( a course taught in Georgia Tech)

http://staff.aist.go.jp/utsugi-a/Lab/Links.html (lots of links to java applets related to Neural Networks and Artificial Life as well as lots of dead links)

http://www.generation5.org/articles.asp?Action=List&Topic=Artificial%20Life (Generation5 deals with all AI topics including robotics, neural networks, genetic algorithms, AI programming, home automation)

And finally something unrelated but fun:

http://sodaplay.com/ (A creative community making marvelous things simulating physics laws)

Project 2 – Making Faces

by jsinclai @ 3:29 pm

For this project, I made faces.

I was really intrigued by the Chernoff faces, not necessarily as a method of visualizing data, but just as a way to, for lack of a better term, express expression. They’re also really cute and fun to look at.

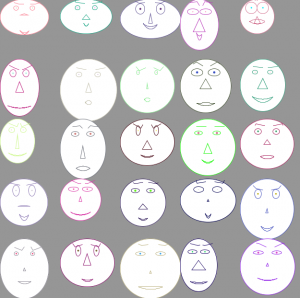
I created faces by randomly adjusting 20 different values associated with the head size and shape, the eyebrow size and shape, the eye size and shape, the pupil size and color, the nose size and shape, and the mouth size and shape.


I spent a lot of time tweaking how the different facial features interacted with each other to find positions and sizes that fit and made sense. And as you can see from the next photo, I also spent some time creating (and debugging with squares) more natural looking heads and smiles.

Alright, now I’ve got a bunch of faces…What next?

At first, I thought about breeding faces based on user input. But I think the world already has a notion of what an “ideal face” looks like.

So instead, I decided to reveal some identity behind this cartoony face. To do this, I hired people on Mechanical Turk to “name a face.” And name a face they did. In five hours, there were already over 400 names accumulated for my faces. The video below showcases some random faces and their names.

Project 2: Making Faces from Jordan Sinclair on Vimeo.

But why stop with a video? You can checked out random faces here: http://www.jonkantro.com/jordan/faceviewer/. And even try naming some faces yourself here: http://www.jonkantro.com/jordan/STIAProj2/

Looking outward:

There are two directions I would love to pursue. The first would involve creating life-like chernoff faces to visualize data, though, I could certainly see social issues arising.

The second direction would be to visualize these names and their faces. What does “John” look like? How about Bertrand? Or Francois? Perhaps I could create a limited set of faces and names, and visualize the connection between faces and names.

For those inclined, you can take a peek at one version of the code here: Chernoff_02_normalFaceToJavascript

Jon Miller – Looking Outwards 5 – The Scale of the Universe

by Jon Miller @ 8:48 pm 17 February 2010

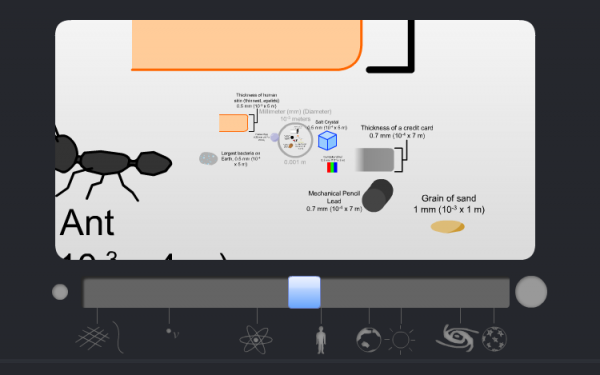
The Scale of the Universe

View it here: link

I think this is a particularly well done project. This idea has been done before, but the zoom ability makes it more accessible and easier to compare the relative sizes of things. I like his selection of objects, as well as his occasional commentary about some of the chosen items. It is a contemplative piece.

Project 2- Simulating Condensation

by caudenri @ 2:21 pm

Well, at least an attempt. From the discussion today I have a lot more I want to do to work on this program.
caryn_condensation

Not so sure the iframe is working for me, but the link is working so you can see the project there.

Project 2: Dynamic Brush Simulation

by Michael Hill @ 9:04 am


More information to come, for now, check it out here!

*Feb 21, 2010: Updated to work properly without tablet

Icicle Synthesis

by Max Hawkins @ 9:00 am

Patterns in icicle formation

Icicle Formation Mystery Solved

Project 2 & Looking Outwards

by aburridg @ 7:33 am

Logistics:
Project 2: “Queen, version Valentine” applet.

Woo-hoo! Got my applet to work. Here’s my poor quality video anyway (the cursor isn’t visible though):

Instructions:

There are three modes to choose from–Breeder, Hunter, and Prey. In each mode, the user assumes the named role.

Breeder Role:
Click to spawn a heart organism. Organisms follow wander and flock behavior.

Hunter Role:
Click to destroy nearby organisms. Organisms follow flee behavior from cursor location (no flocking, they just scatter).

Prey Role:
Click to place food for the organisms at a location. The organisms will follow seek and flock behavior to each set piece of food. The food will grow smaller as they devour it, and organisms will grow the more food they eat (organisms have a maximum growth size).

Inspiration:

Mostly I wanted to experiment with Craig Reynold’s behavior models, shown here. I also wanted to create a piece that the user could interact with, rather than a piece that just ran and simulated something organic.

Experience:
The hardest part of this project was determining how I wanted the organisms to interact during the different modes. I borrowed a lot of code from Daniel Shiffman, but, in order to manipulate his code, I also had to relearn a lot of calculus and vector arithmetic. I also learned about a very useful Processing class called PVector…very, very useful and awesome and made this project a whole lot easier.

Originally, I was going to use pigeons for the organisms, bread crumbs for the food, and a hawk for the hunter, but decided to change it to a Valentine’s Day theme (got the idea during the critique on Monday, hehe). I sent it to my family members and friends and they all really, really enjoyed it! Especially if they were up too late and thus easily amused.

Overall, I’m happy with the way it turned out. There are a few glitches, but I think it’s charming (although a little cheesy). And, it gives a very interesting perspective on how organisms flock, swarm, and scatter. I did learn a lot about something I otherwise wouldn’t have known until a boss or something asked me to simulate a heard or a large amount of organisms. And, again, I feel better prepared for simulating another organic aspect of the world.

Hooray for being cheesy, again (although it’s true, and I did have a lot of fun with this! :D).

——————————
Looking Outwards–Manipulating Simulated Organic Life with Music:

Some Examples…

Magnetosphere revisited (audio by Tosca) from flight404 on Vimeo.

Nova (audio by Helios) from flight404 on Vimeo.

I’m very interested in this…and wondering if I could combine these behaviors with the flocking, seek, and wandering behavior I worked with during Project 2. I’m seriously considering creating a final project around this idea instead–and maybe getting my own audio from a music major friend who would be interested in this (so that I could make a video that looks aesthetically pleasing since I would be able to control the aspects of the audio with my friend).

Form Constant Visualization

by Max Hawkins @ 1:44 pm 15 February 2010

The above visualization will only work in Safari on a Mac. If you’re in another browser on a Mac you can download the composition and run it in quicktime.

The visualization is based on the Retinocortical Map, a simple polar logarithmic mapping between the eye and the cortex that is thought to produce these complex hallucinatory patterns.

For more information check out this page

Project 2: DLA Playground

by mghods @ 8:31 am

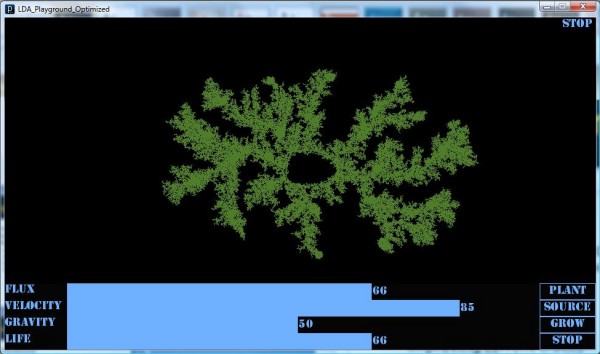
DLA Playground, written in Processing, is an applet, where user can plant seeds and create sources to grow the seeds. The sources create and distribute particles which can aggregate on seeds . The software simulate growth of seeds using Diffusion Limited Aggregation. You can find the applet here.

DLA Playground UI is consist of three parts, buttons, scrolls, and sketchpad. There are 4 buttons which one can use in order to switch between 4 different modes of applet, Plant, Source, Grow, and Stop. In each mode the sketchpad usage is different. In  Plant mode, user can plant seeds by dragging mouse on sketchpad. In Source mode, user can create radial source by clicking on sketchpad, or create linear source by dragging mouse on it. Before creating a source user can define the behavior of source based on source flux of particles, particles velocity, gravity, and life, using scroll-bars. By pressing Grow button, applet start simulating growth of seeds based on seeds plantation and sources distribution.

There are, also, another version of the applet here, that simulates how sources distribute particles on sketchpad. One can create firework images using this applet.

Below is the presentation of the project:

GDE Error: Unable to load profile settings

You can download full packages below:

Optimized Version/ Particle Distribution Simulator

Woims

by xiaoyuan @ 8:17 am

Get Adobe Flash player

Jon Miller – Project 2

by Jon Miller @ 7:32 am

Get Adobe Flash player

Update (2/17/10)
I have updated the project. The footprints are now smaller, and after several optimizations, the flash does not slow down. Thanks for the tips everyone!

Note: The flash is above: it begins as complete whitespace.
Controls
left arrow/esc: reset
up arrow: spawn footprints quickly
down arrow: spawn footprints leisurely
numbers 1-9: level of independence, or “propensity to carve one’s own path”
clicking and dragging the mouse across the screen: suggest new paths

Zip file containing flash and noResizeHtml page:

link
(zip this to your desktop and open the html file to view).

Initial Murmurings – Conceptual Development
I have spent a lot of time walking through snow recently, and so my first idea was to procedurally generate lots of different kinds of footprints. The idea was to create all kinds – reptilian, mammalian, hooves, paws, claws, etc – some similar to existing animals and many created through random chance. As I began to work on this project, I began to think about how the footprints should travel across the page.
I noticed when walking through snow that it’s much easier to take a path already traveled, even if it doesn’t lead directly to my destination. I decided to work on modeling this behavior, where footprints tend to follow pre-existing paths. I dropped my original idea because I felt this new development was interesting enough and different shapes and sizes of prints would clutter the screen.

Underlying Tech
To create this behavior, I initialized a 40×30 vector field that spans the screen that would gradually be altered as footprints traveled across it. For example, a footprint traveling east would influence the vector field in the locale of the footprints in an easterly direction. Secondly, I added the vectors local to the footprint as a weighted average to the footprint’s original trajectory – thus, it both influences the vector field as it travels across it, and its path is influenced by the field. As time passes, vectors which coincide become stronger, leading more footprints to more firmly stick to the path. Eventually, clear routes are
visible.

Playing with the Program
I allowed the user to manipulate several parameters. Namely, they can influence the vector field using the mouse, allowing for users to create their own path, either on the fly or before running the simulation. They can also change how “independent” the footprints are using the number keys – highly independent footprints will not follow preexisting paths as much while highly suggestible footprints will almost immediately join previous tracks. Both of these can lead to a variety of terrains appearing with their own subtleties. The controls are listed near the top.

Looking Ahead
The next step, I believe, is to render it in three dimensions, with mountains and valleys dynamically forming from traveled paths. With 3D topography, I think the project would become aesthetically inspiring as terrain formed in front of you.
Secondly, there are a number of other behaviors that could be modified or added. For example, currently footprints will tend towards the most commonly traveled path, seemingly forgetting (or never having had) a destination to begin with. This leads to river-like behavior. However, with a set destination, perhaps road-like routes would form.
Another consideration would be to add an interface to allow people other than me to use the program. However, since the project is currently in its infancy, I think simply describing the controls is sufficient.

Jon Miller

Project 2 : PixWeaver

by ryun @ 4:44 am

PixWeaver – Simple image editor/Artistic image generator for novice users.

IDEA
The project name is “PixWeaver”. Since the Valentine’s day was coming, I tried to build some image editing tool as a gift for my fiance. She is a music composer and has no idea about how to edit the photos. Photoshop is a very powerful tool but it is expensive and not easy to use for novice users ( Too many buttons and features sometimes make users overwhelmed ). So, I decided to make a simple image editing tool so that she can make her own artistic images and upload them to her Facebook.

PROCESS
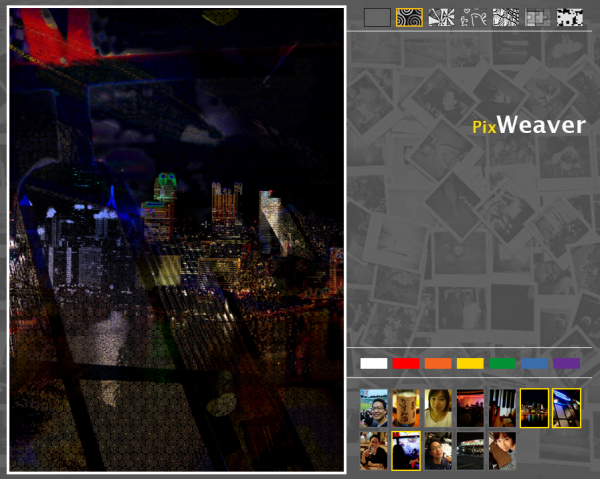
PixWeaver is a simple image editing/blending tool. First you would do is to put your favorite images in a single folder(data/photos). And run this application, then it will show the small image icons on the bottom. On the top, there are pattern icons, on the middle there are color palette. Once you click the images one by one you will see them blended nicely. You can apply the patterns if you would like to. You can also apply tint to the image. If you would like one of the images outstanding, you simple mouse over the corner of the image. I had no time to create the function but supposedly, if you press “s” or “spacebar” your artistic image is saved in your folder.

CONCLUSION
I tried to make this system as simple as possible because the target is a novice user. For this reason, there are a lot of limits that you can not do with this system and some features are not very very flexible. I showed this application to my fiance and she loved it and got amazed. I performed a user test on her. Usability wise there still a lot to fix.(bugs, layout design, flow…) But I am pretty happy with it. Here are some screen sample images.

Download the source file

Project 2: Decorated Initials

by Nara @ 4:27 am
A

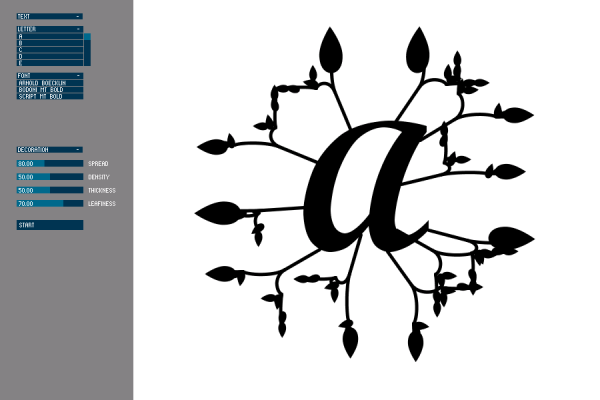
I got my inspiration for this project from Daily Drop Cap. The designer Jessica Hirsche posts one letter of the alphabet each day, highly decorated drop caps like a modernized version of the gilded initial caps in very old books. Many of the decorations come in the shapes of vines, leaves, and swirls, so when I read that the purpose of this assignment was to simulate nature, I wondered if it would be possible to simulate a vine effect algorithmically, and mimic the way Jessica Hirsche does some of her drop caps by hand. There would be more limitations, of course. For example, from the very start I decided I would not deal with color — that added dimension would overcomplicate the project far too much. The basic idea was fairly straightforward: given a letter, grow vines or swirls out of its edges.

The reality turned out to be much more complicated, and I’m ashamed to say that this project was rather a failure. It took me a VERY long time just to find a way to get the points on the outside of a letter — and even now it isn’t perfect, since it will also give you points from the counterform of the letter (such as the hole inside of an ‘O’). I’ve gotten around this for most letters by cheating and only grabbing the first 2/3 of the points (since the outer edge generally comes before any inner edges) and then choosing a set of starting points from there. However, this is optimized for letters like the ‘A’ below and doesn’t necessarily yield good results for, say, the letter ‘N’.

Screenshot of program

I had planned to go for a much more swirling, viney look, but I had trouble procedurally generating the vines and producing nice curves. I ended up adapting a version of the Processing tree with Bezier curves instead of straight lines. It wasn’t exactly the look I had been trying to achieve, but it produced the best results with the least overlap and interference between vines.

As shown above, the user is given several input options; namely, you can choose the letter, a font, and then play with a few sliders that will affect the output of the vines/swirls, such as the density, the thickness of the lines, and the size of the leaves at the end of the vines. I had ideas for other user input options (such as symmetry vs. randomness of the output) but did not have time to implement them.

Initially, my plan was to generate the output in such a way so that the resulting decorated letterform could then be lasercut and turned into a stamp. Obviously, I gave up on this idea, as there just wasn’t enough time to pursue it.

All in all, this has been a very frustrating and exhausting project, and I wish I’d known what I was getting myself into when I first conceived it. I’m glad I tried, but I do think it was too ambitious for a project of this length. As Patrick suggested, though, I may continue this for my final project and flesh it out a lot more.

ZIP file of project.

Project 2 guribe

by guribe @ 2:04 am

Simulating Organic Behavior through Music

Music Visualization: Erection by The Faint

Music Visualization: I\’m a Lonely Little Petunia by Imogen Heap

Music Visualization: Time to Pretend by MGMT

Where the idea came from

When looking at examples of simulations during class, I was inspired by the work of Robert Hodgin. I was interested in the way he simulated organic behaviors that were directly responding to sound. I decided to create a similar project, using my own aesthetic and my own parameters.

My work process

The first step I took in developing this program was finding a library that could analyze sound. I found a library by Krister Olsson called Ess. This library “ allows sound sample data to be loaded or streamed (AIFF, WAVE, AU, MP3), generated in real-time (sine, square, triangle and sawtooth waves, white and pink noise), manipulated (raw or via built-in filters), saved (AIFF, WAVE), analyzed (FFT) or simply played back.” I used it to analyze the sound using Fast Fourier Transforms to isolate the volume components of each freuency.

After discovering this library, I found source code for two other projects that I used to help me program the project: Flocking by Daniel Shiffman and Input FFT from Olsson’s Ess library website.

After reading and understanding the code, I was able to use the basic ideas from these projects in my own work, merging, tweaking, and rewriting the code to fit my own vision.

My self-critique

Although I was happy with the results, there are a few things I would have done if I could work further.

First of all, my original intention was to have the boids flock with one another. However, I adjusted the boids’ velocities to match the frequencies volume in a way that made it difficult for me to figure out how to implement the flocking behavior.

A second change I would make would be to make the visuals appear more spatial. Although I am content with the current aesthetic, it is a bit flat looking.

Overall, I was extremely excited with this project and content with my results.

Project 2 – Lightning

by rcameron @ 1:29 am

OSX Executable (512k)

So, I initially set out to make an awesome procedurally-generated 3D landscape. Eventually, I sat in front of this kinda dull, circa 2002 CG world and, thanks to another pair of eyes, realized it needed more to bring it to life. So, I decided to try to generate some lightning for the environment. In the end, the lightning turned out decent, but didn’t spruce up my environment enough to make it much better though it seemed to look good on nighttime landscape photos. Built with Processing.

The following papers helped provide some insight into visualizing lightning:

Visual Simulation of Lightning by Reed & Wyvill

Fast Animation of Lightning Using an Adaptive Mesh by Kim & Lin

Efficient Rendering of Lightning Taking into Account Scattering Effects due to Clouds and Atmospheric Particles by Dobashi et al.

The Central Dimension of Human Personality

by paulshen @ 9:40 pm 14 February 2010

Read all about it: http://in.somniac.me/2010/02/14/the-central-dimension-of-human-personality/

Project 2 Kuan-Ju – Trees Cycle

by kuanjuw @ 9:23 pm

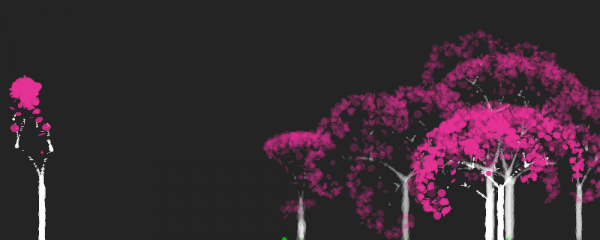
Motivation

Thinking of living creatures, I came up with trees.

Trees are amazing. Started from a small seed, it becomes a huge structure. From a tiny guy to a big body, that takes a long long time. The growth of trees is interesting. They collect the energy from the ground, the air,and the sun and transmit the energy to branches and leaves. After they became a big enough trees, they make seeds. From one to infinity. Sometime trees die, because of shortage of energy, or harsh living situation. But that is trees cycle.

Concept

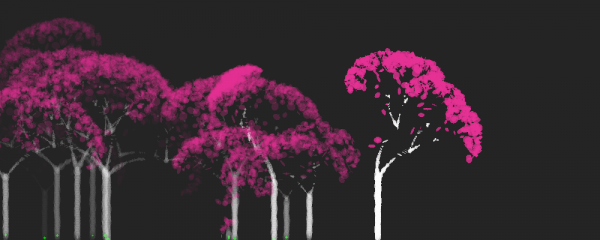
Start from three seeds. Each seed grows a tree. Trees generate more seeds.

When there are too many trees, old trees fad out, and die eventually.

Program

applet


Further work

Add a wine effect, so the leaves fall and the branches band.

What’s else in a forest? little creatures like birds or rabbits.

When the trees die, what left for the living trees?

Project 2 – Hot Potato: Finding the Most Awesome Mr. Potato Head

by sbisker @ 7:43 pm

For my project on computer simulation, I decided to focus my project on the children’s toy Mr. Potato Head. Mr. Potato Head allows children to explore their creativity by placing body parts and accessories in a toy potato in any configuration they wish. With twelve parts included and nine positions on which parts can be placed, there are literally tens of thousands of possible ways Mr. Potato Head can be assembled. I became curious as to how I could apply simulation techniques to search through the space of possible Mr. Potato Head assemblies. In particular, could I figure out which configuration of parts makes the most “awesome” Mr. Potato Head?
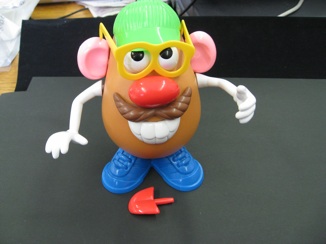
I started by using simple genetic algorithms to create a population of 10 Mr. Potato Heads, starting from naked bodies (containing just the shoes, to insure each generation is able to stand upright.)
These 10 initial spuds were produced by an algorithm (developed in Processing) that would go through each hole on the body, one by one, and either place a part on that hole in the body (chosen at random) or leave that hole empty. Special rules had to be created for the Hat, Moustache and Glasses parts, given their unusual physical operation – the hat could only be placed when it was placed on the head hole (causing the hat to be extremely unlikely), the glasses could only be placed when the eyes are also present (causing glasses to appear fairly infrequently), and the moustache would always be placed under the piece called for previously (making the moustache itself somewhat common, but any particular combination of moustache and specific part hard to pass on).
This produced a set of directions on how to create the initial 10 Mr. Potato heads, output in a text file in the format shown below.
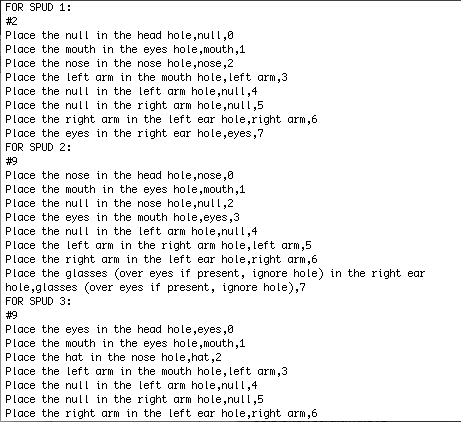
In addition to construction instructions, the file also contains # signs for each spud, which mark placeholders for me to type in information about that spud later.

With these instructions, me (and my girlfriend) constructed each of the 10 configurations and took a picture of Mr. Potato Head in that configuration. This allowed us to “realize” each Mr. Potato Head specified by the algorithm.

Then, with all ten configurations photographed, we uploaded those photographs to Mechanical Turk and paid people for their opinions on them. We instructed 20 Turkers to look at all 10 configurations and tell us which ones that they considered “awesome”. We made it clear that Turkers should use their personal judgement and opinion in deciding which (if any) were “awesome”, with the only stipulation being that they interpret the word “awesome” as “cool, neat or interesting, not as in powerful”.
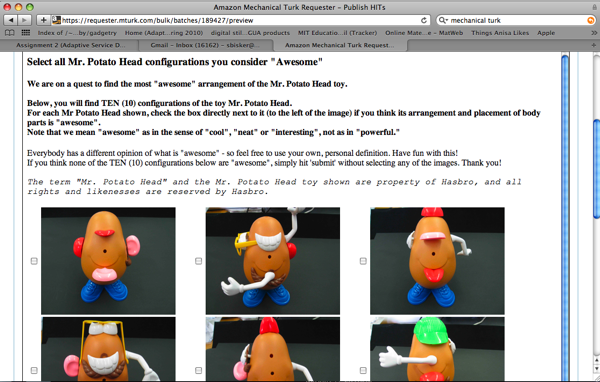
These votes on the Mr. Potato Heads from the Turkers were tallied and used to rank the various configurations against each other. The four Mr. Potato Heads receiving the most votes are then chosen to “reproduce” with each other and themselves, in order to create the next generation of spuds.

With no real genes to speak of, no real concept of gender, and a limited number of parts, Mr. Potato Head reproduction is a bit of an odd process. (Yes, there’s Mrs. Potato Head, but we’ll leave her as an exercise for the reader.) For each hole on the child, a coin is tossed, and depending on the outcome the mom or the dad is allowed to place their part in that hole into the child. If that part has already been used in a previous hole, the dad places his part in the hole instead, and if that is not possible, the hole is left empty. There is also a 20% chance of “mutation” for any given hole, which means that the contributions of both parents are ignored and the hole is instead filled with a piece at random still available for the body (or, sometimes, is left empty).

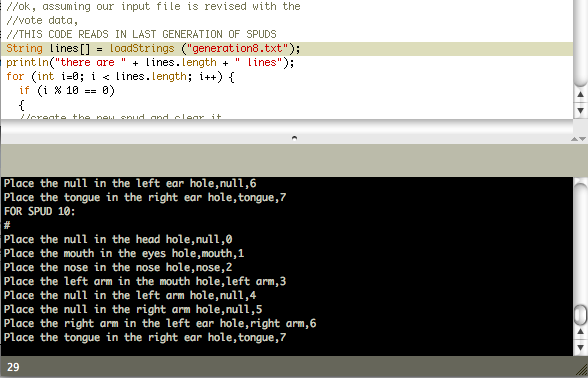
An example of this evolution in progress (as shown through debug code) can be seen below. The row of numbers at the top of represents the algorithm taking in the vote counts, sorting them and picking the best four spuds for reproduction.
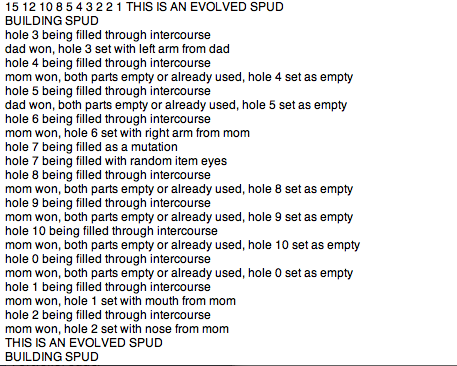
This continued for 8 rounds of evolution, creating 10 spuds, uploading them, collecting Turker vote feedback and using that feedback to evolve instructions for the next batch of 10 spuds. (Specifically, the vote counts for the current round are typed into the outputted instruction file for that round, and that file is given as input to the Processing script to select and rebuild the winning spuds so they can reproduce to make the next round’s spuds.)

Below, you see the results from all 8 rounds of evolution, with checkmarks indicating which four spuds were selected from that round to seed the next:


and, as voted by Mechanical Turkers at the final round of spud evolution, here are the two Mr. Potato Heads tied for the title of Most “Awesome” :
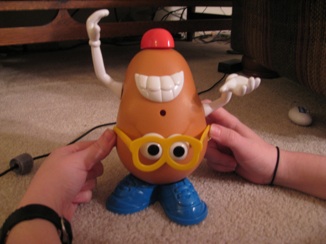
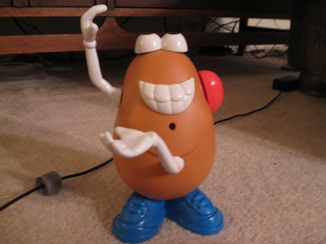
Analysis:
There are a few things that jump out from this little experiment in pseudo-genetics:
*People really find it “awesome” when the hat is on top, and when the glasses are on the eyes. Those are two recessive traits, as they only occur when two parts are pulled up in combination – but when they do occur, they tend to survive to the next generation.
*Unexpected combinations that make the spud still look “lifelike” but that are different from the “expected” placements tended to fair well. For instance, a combination where the eyes are on the head and the mouth is on the eyes survived for multiple generations, likely because the resulting spuds looked like they were normal Mr. Potato Heads, but simply “looking upward.”
*We have at least anecdotal evidence that the “awesomeness” improved over time. One Turker who participated in both an early and a later batch commented “I am completely stunned.:). The poses are awesome. It has improved greatly.:)”
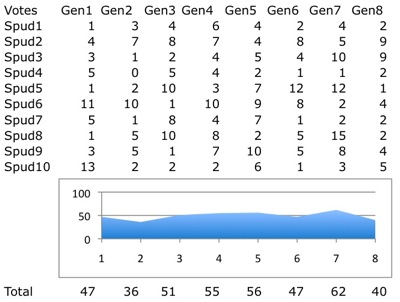
However, as the chart of votes below shows, it seemed that people did not mark more spuds as awesome in later rounds as in earlier rounds. The top-scoring spuds in the later rounds got a similar number of votes to the top-scoring spuds in earlier rounds. However, this may speak more to how people restrain their praise in surveys than the “absolute” level of awesomeness present.
*When performing this experiment, I really felt like I was building based on a script, and that a computer was telling me what to do. At the same time, the Turkers were expressing quite a bit of autonomy, even having a lot of fun with the assignment (see Turker comments below.) This caused me to feel like I was the one doing the work for the Turkers, not the other way around (despite me paying them for their efforts.) The people at Threadless do very similar work to this, making shirts based on the orders of an online community of designers and voters – but somehow this process feels depersonalized, and I don’t feel like the “curator of community” that Threadless makes themselves out to be. Perhaps it’s because it is evolution, luck, making the final calls as to what an “awesome” spud means in terms of how votes influence the next round, not solely the votes of the Turker community themselves.
*People really do take seriously their own opinions of what makes a configuration “awesome.” In that sense, Turker votes were a perfectly valid and usable fitness function for consistently gauging “awesomeness.”

Below is just some of the feedback and comments I got on this experiment from Turkers. Full feedback is included in the code download.

“To be really honest I think that this toy is horrible. And I think that these configurations simply suck, mostly because they all lack symmetry and I can’t really stand asymmetric things.”
“Hello Sir, I do appreciate your kindness of understanding that we are entitled to our own opinion and so I would like to support the pictures that I didn’t choose with an explanation.:) I didn’t choose 3 out of 10. Those images of Mr. Potato appear to be vague in nature and didn’t depict much of Mr. Potato’s character. I also could not agree it to be part of the “awesome” as in the sense of “cool”, “neat” or “interesting” group because of it didn’t show enough action or emotion. I hope that you will not take what I said as something negative but it’s just a constructive criticism to help you improve.:). Best Regards, Christine”
“the one i picked looks awesome because its misleading, hat could be sideways or forward because the lips are on the side, but the teeth are on the front”
“The arms give him so much personality but I like the one with the mustache the best. I think I might buy a Mr. Potato Head again, I really enjoyed the one I had when I was young.”
“Why don’t you use both ears? I would have thought the one with the one arm in the head and the other in the mouth would have been cool with both ears. It looks off balance.”
“Thanks. Very funny and lots of fun. It would have been nice to have the normal non-awesome configuration to compare each of your configurations with.”

The project code, vote counts, evolution output and Turker feedback can all be downloaded here: Source code and supporting files
Project 2 – Evolving Shapes

by Karl DD @ 6:44 pm

Concept

This project is an experiment with how arbitrary shape forms can be evolved using a genetic algorithm. The idea is to provide a drawing tool with brushes formed by mating and mutating shapes.

Background

I have long held and interest in evolutionary algorithms and have followed with interest as researchers, designers, artists, etc… have tried to apply them to a wide range of domains. There is a lot of background material here, and it is is quite a divisive subject – some researchers have a great passion for them, others won’t go near them. Some noteworthy books include: Evolutionary art and computers and Evolutionary design by computers.

One paper that fascinated me was Evolved Line Drawings by Ellie Baker and Margo Seltzer. Partly because they used the combination of raw sketching and faces as subject matter to evolve imagery. Below you can see an illustration of how the interface is used to mate together different faces. This general idea has recently been applied to creating police facial composites (and it also seems to double as a teleporter into the uncanny valley).

Evolved Line Drawings by Ellie Baker and Margo Seltzer

I have for the last 3 years been developing a sketch application called ‘Alchemy‘. Blurb as follows:

Alchemy is an open drawing project aimed at exploring how we can sketch, draw, and create on computers in new ways. Alchemy isn’t software for creating finished artwork, but rather a sketching environment that focuses on the absolute initial stage of the creation process. Experimental in nature, Alchemy lets you brainstorm visually to explore an expanded range of ideas and possibilities in a serendipitous way.

The project has been surprisingly popular within the Concept Art community – the last release garnered close to 30,000 downloads. Part of the challenge is to come up with new ways to sketch out form and create a broad enough shape vocabulary. It seemed to make sense to develop a module for Alchemy that would allow the artist to evolve a set of shapes that could then be used as brushes. The artist would have control over the shapes that were inputed into the system, then they could evolve the shapes to be as diverse or as similar as desired.


Evolve Shapes

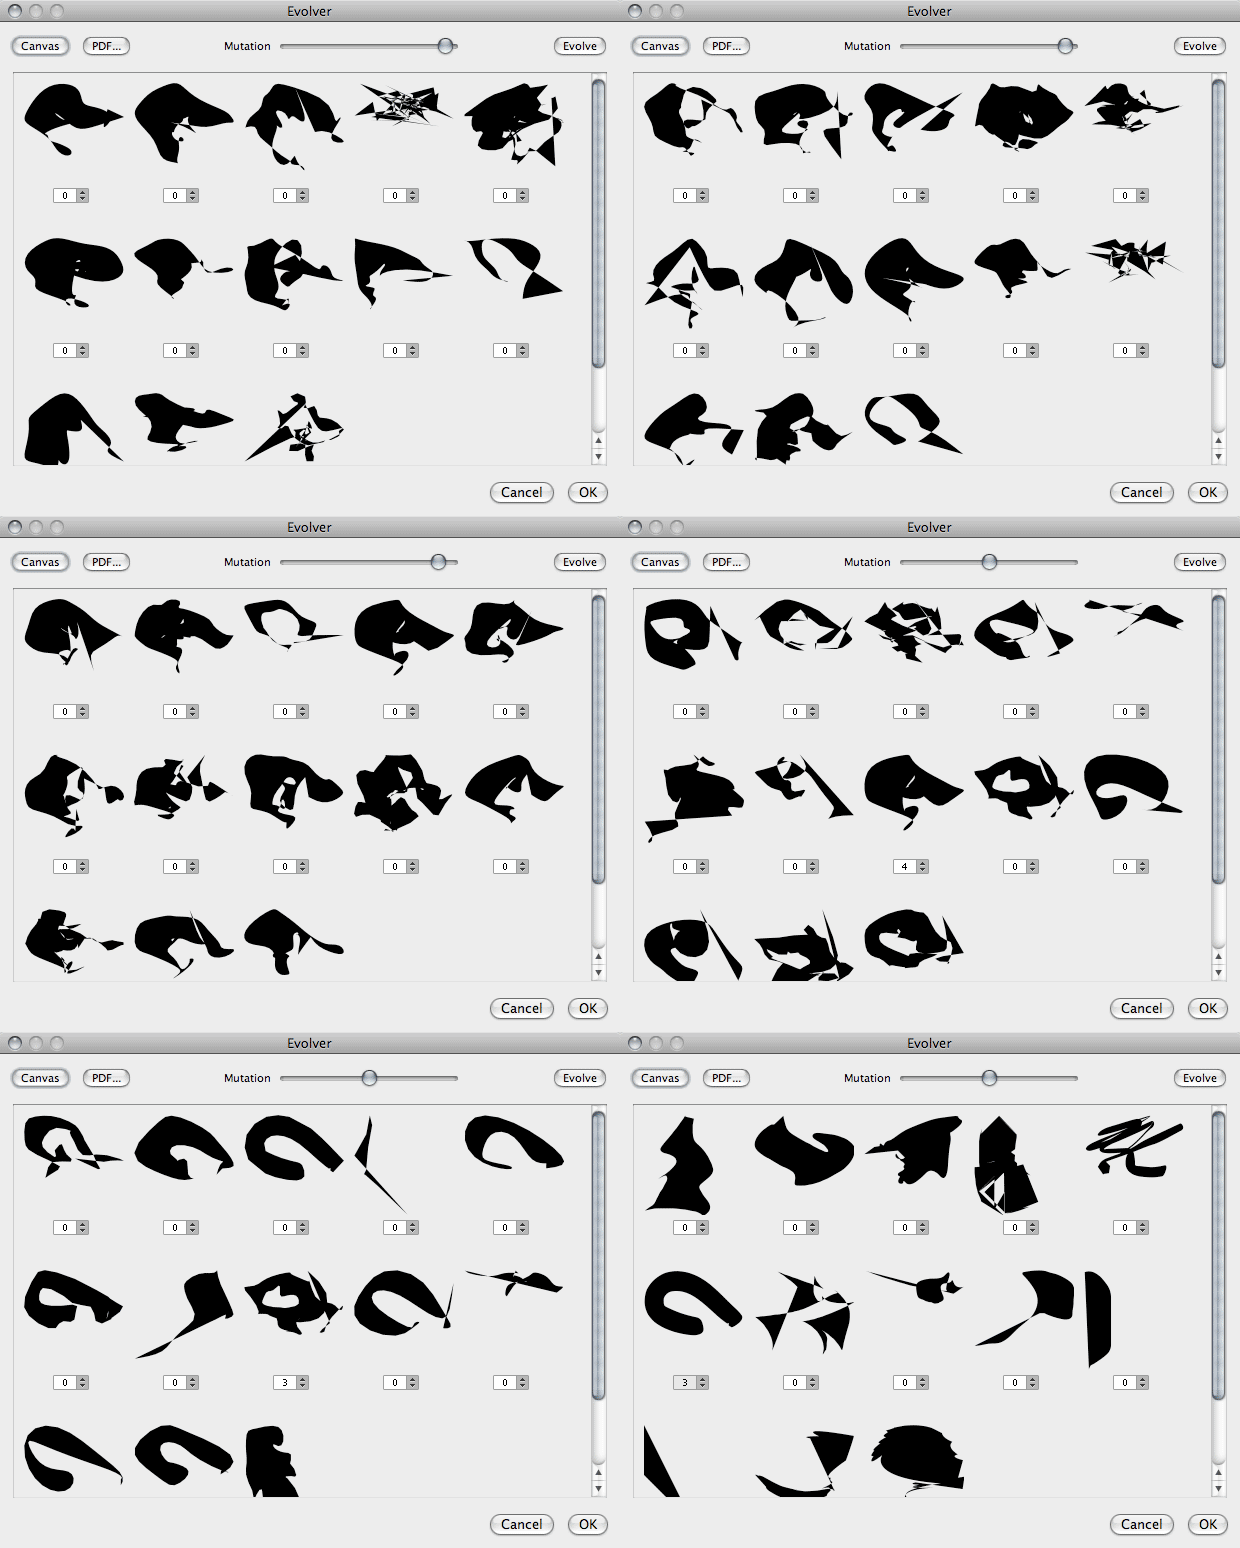
The artist starts by either drawing an initial population of shapes, or alternatively can load them from a PDF file from a previous sketch session. Selecting the ‘Evolve Shapes’ module loads the shapes from the canvas and hitting the ‘Evolver’ button launches a window where the population can be evolved.

The artist can assign a rank to each shape which weights the influence of the shape as the next round of shapes are evolved. The mutation slider controls how much the shapes should be mutated at each round.

Once the artist is satisfied with the shapes that have been evolved they can then return to the main canvas and use them like a brush, with each shape from the population pulled randomly. Rotation angle and size are controlled by the direction of the line and pen pressure respectively. Below is an example using the shapes evolved above, in combination with the Mirror module and Color Switcher module.


Reflection
This was an interesting thing to code up and learn more about the inner workings of genetic algorithms. I was also surprised by how quickly new shape forms can emerge through the basic process of ‘mate & mutate’.

The tool itself could definitely do with more work to become more refined than simply dumping shapes on the canvas. I am sure there will be members of the Alchemy community interested in experimenting with this module and I would definitely like to release this and see how people use it, then revisit the functionality and workflow.

Robotic arts event, Wednesday 2/17!

by teecher @ 3:03 pm 13 February 2010

Dear Students,

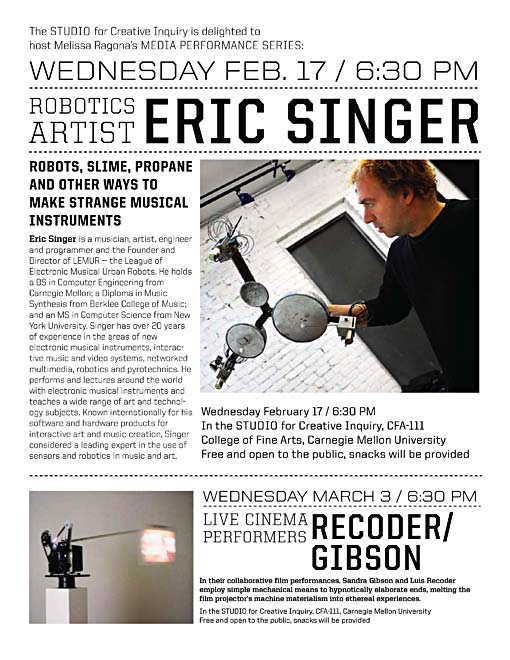
Robotics artist Eric Singer will make a public lecture/performance this Wednesday at CMU!
The lab I direct, the STUDIO for Creative Inquiry at Carnegie Mellon, is partnering with Professor of Art Melissa Ragona to bring a series of artist lecture/performances to Pittsburgh this spring. Coming up this Wednesday (February 17th) at 6:30pm is a presentation by leading robotics artist Eric Singer, founder of LEMUR (the League of Electronic Musical Urban Robots). All events in the STUDIO, room CFA-111 in the College of Fine Arts building. Events are open to the public and include snacks. Full details in this PDF.


« Previous PageNext Page »
This work is licensed under a Creative Commons Attribution-Noncommercial-Share Alike 3.0 Unported License.
(c) 2016 Special Topics in Interactive Art & Computational Design | powered by WordPress with Barecity